
This past week I finished up my project and prepared to present it at the expo. Once I had completed the design the first step was to laser cut my pattern on 5mm birch plywood. The laser cutter managed to cut through the wood, but I would estimate that 5mm (.197 in) is close to the maximum material thickness. I then glued together the layers of the wooden clock using Titebond I woodglue. 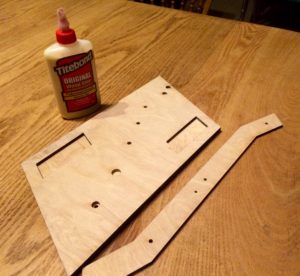
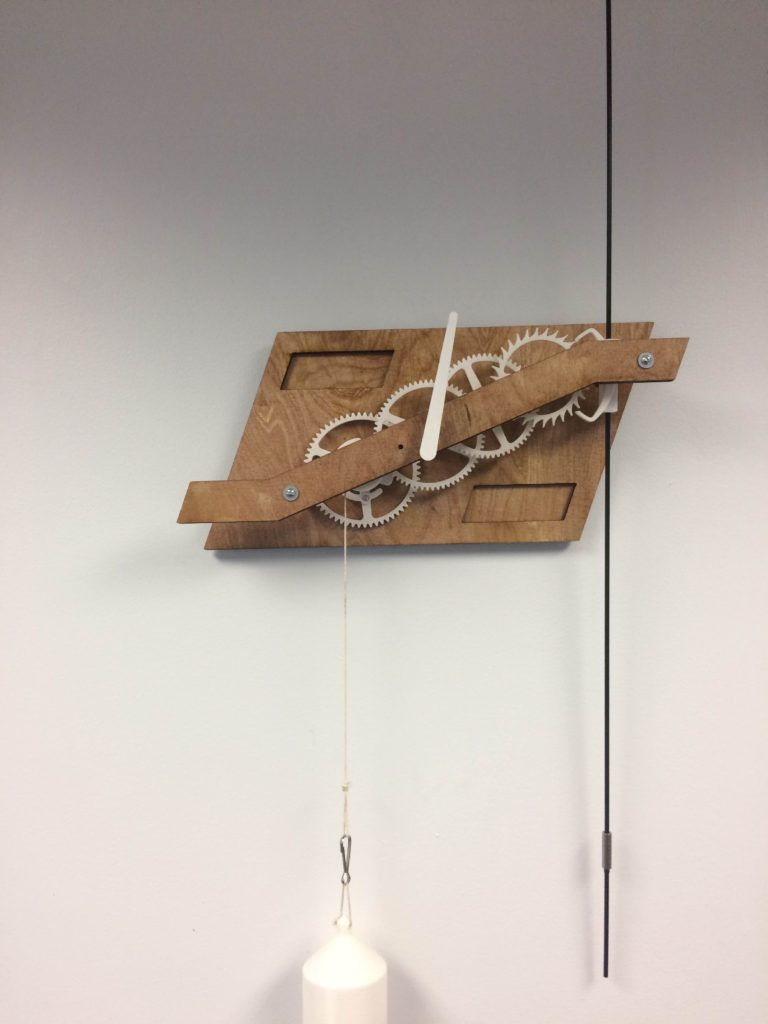
The next step was to coat the plywood sheets with a layer of wood stain and then several coats of shellac. The wood stain improved the appearance of the wood and the shellac serves as a protectorant and adds a glossy appearance.
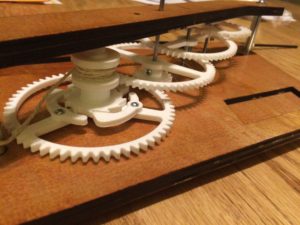
The drive train was composed of 3D printed gears. In the future I wouldn’t use 3D printed parts. The gearing required much more precision than my 3D printer could deliver. As a consequence I had to sand down many of the gear teeth to reduce friction in the drivetrain. Intially, I used a 1kg weight to drive the clock, but there was too much friction in the system. The mechanism worked reliably after increasing the weight to 2kg and polishing the gear teeth. The clock was designed to run approx. 2.5 days. Next time I would use a more forgiving gear ratio. Additionally, I would like to add a motorized autowinding mechanism.
Design Calculations:
For the pedulum I used the formula for the period of a compound pendlum. Instead of integrating the mass of the escapement and rod, I treated the pendulum as two point masses. The bottom weight is adjustable up and down so the clock speed may be tuned.
T = 2π √(I/(mgR)), R = distance from pivot to COM
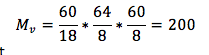
As for the gearing, the clock is contains 7 gears including the escapment. The overall gear ratio is 200:1, given that the weight string is 5′ long this allows the clock to run for roughly 2.5 days
5ft string, 1” cylinder – 19.1 Rev in
G1 = 60 T
G2 = 18T
G3 = 64T
G4 = 8T
G5 = 60T
G6 = 8T
E7 = 30T (60s per rev)
19.1 Rev in => 3820 Rev out
63.67 hours runtime (2 days 15 hours 40 minutes)
This video shows the final product!
https://www.youtube.com/watch?v=fA3Mx0rj1Ow
2 Comments. Leave new
The shellac coating on the wood brings a nice warm finish. Typically I would suggest to be careful with the tolerances on 3D printed gears due to the expansion of material that occurs, but you seemed to have figured that out. Nice work!
Nick, hopefuly this week the laser cutter is not so busy, I really liked your project. I would totally love to have such a piece/clock on my wall, great job. Did you 3D print the weight, too? I think it would look more interesting to have a bag of sand for the weight or something else, might enhance the aesthetic. I’m looking forward to your next post as I’m curiouse to see what are your own thoughts on your project!