

Introduction
For those of you who have never heard of a useless box (I didn’t know the name of it before this project), the useless box is primarily a desk toy. It can provide brief periods of entertainment and for those who see it for the first time it can spark curiosity. All that it is is a box with a switch on the top. When that switch is flipped, a mechanical arm reaches up and flips the switch back. There can be many variations to this design, but the overall concept is the same. It’s fun, it’s simple, it’s useless.
How it Works
Although this is a relatively simple mechanism, it took me quite a while to fully complete. Part of it was due to my lack of knowledge in both major fields that it requires; electronics and wood working. Through this process I have learned so many basic operations that many reading this already know. The electrical components are made up of 4 major parts, a microprocessor, 2 servo motors, and a switch. When the flip is switch, it sends a signal that has changed from a low reading to a high reading. After that, the microprocessor takes in this signal and with the code I wrote has the capability of outputting. The way I designed it, the microprocessor (an arduino pro mini) sends a pwm signal to two servo motors. The servo motors then spin to the programmed amount, 1 of them opening a door and the other one flipping back the switch.
My Design Process
Research/Pretotyping
Once I had decided on my project, my first step was to do adequate research to gain a better understanding of the system. This mainly consisted of watching videos of useless boxes in action. It was fun and inspiring. In addition, I thought it seemed like a realistic project that once I got started I would be able to problem solve my way to a solution. Boy was I wrong. After I thought (incorrectly) that I had a good understanding of what my project looked like I began to make very basic pretotypes. This consisted of making boxes that have a hinge top, a rotating arm, and my small robot friend on the inside.
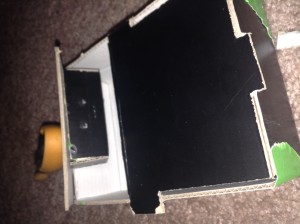 Figure 1:Pretotype-Robo Box Friend
Electronics
Once I had a good idea in my mind, I began purchasing my materials. From past experience I learned that sometimes it’s better to start working with your actual material rather than continually brainstorming and design. Therefore, I bought a stepper motor, the arduino, and any basic thing I might need to finish the project (breadboard, wires, etc) My packages arrived and I had no idea what I was doing. Turns out I was heading in the entire wrong direction and more designing ahead of time would have been better. A few of the major issues I had were that I needed servo motors as opposed to stepper motors and I had no way of connecting the arduino to my computer. After doing some legitimate research and getting help from my teammate Roshan, I began the slow arduous process of electrical troubleshooting. For a detailed description of some of the technical problems I ran into, check my previous update.
Working with the electronics was incredibly difficult and time consuming, however in the long run I got the circuit shown in the video below. It made not seem like much, but this was the first major step in getting the project going.
Mechanical- THE BOX
As it turns out, I have almost no talents when it comes to making useless boxes, woodworking especially. Originally, I had planned on making the box out of some sort of metal, but after looking further into existing designs, I found that metal would be more difficult to work with than wood. After settling on the material, I went through several iterations of what I wanted the design to look like. It began with hand sketches and eventually became a Solidworks model consisting of over 30 parts. This Solidworks model gave me concrete dimensions of all the parts that needed to be fabricated.
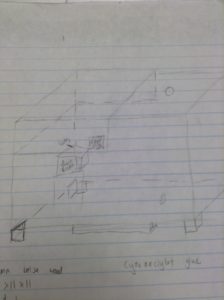 Figure 2: Original Handsketch
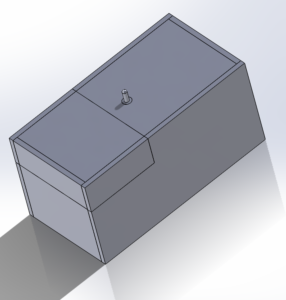 Figure 3: Solidworks Version of Box
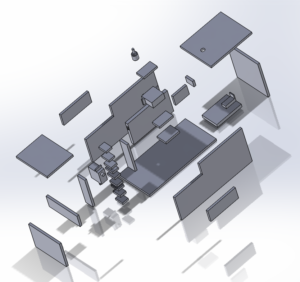 Figure 4: Exploded View
These dimensioned features then became were drawn out on paper to maximize space for my 24″ x 12″ sheet of balsa wood. This took a few tries. At first the sheet was dimensioned so that the cutouts were lined up edge to edge. However, after first visiting the maker-space I realized that about 0.1″ would be cut out due to the thickness of the saw, so the model had to be adjusted.
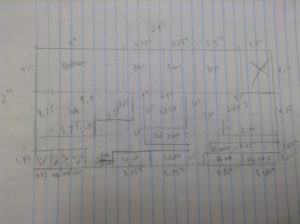 Figure 5: Box Design Layout
The sheet after being cut extensively in the maker space, became a pile of small pieces of wood. They didn’t look like very much, but luckily due to the precision of the saw and the sheet I drew out, they fit almost perfectly.
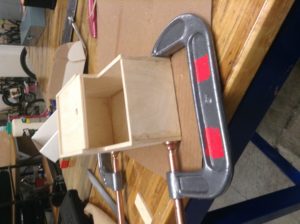 Figure 6: Gluey Mess
The pile of wood was then transformed into a gluey mess. Wood glue takes at least half an hour of clamped drying to dry and stick relatively well. This gluing process took much longer than I had originally anticipated. Also, after making the outer edges of the box, I realized it will be hard to put everything into it. For that reason I put two nails into the far edge of the main lid. They act as a pin that allows me to open that lid whenever I need to tamper with anything on the inside. Finally, as seen below the box was completely assembled.
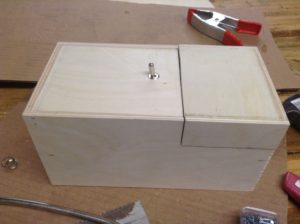 Figure 7: Semi-finished useless box
Finishing Touches
After completing both the box and the circuit, the last step was to get it to actually work. One of the hardest parts of this was lining up the fingers (that open the door and flip the switch) so that they actually do as needed. The switch finger was especially difficult. It had to be the perfect size and shape so that it would hit the switch, but not hit the wood. Also it couldn’t push the switch too far because the motor would continue pushing until it reached the angle it wanted and would either get stuck or pop the finger off. After that was completed, I spray painted the exterior of the box and any aspects that would be visible when the door opened. I was very nervous that the spray paint would look horrendous, but it actually turned out pretty nice. I am considering adding a few more coats to get rid of any wood appearance, but I have actually grown fond of the ability to see the grain on the wood. Finally, the last step was to glue my robot face into the lid so that every time you open it, you see him staring back at you. The final product can be seen below. Unfortunately, I realized that the spray paint increased the amount of friction in the hinge. Therefore, at expo, the lid did not close as fast as normal. To fix this, the robot is now full of pennies and it works much better.
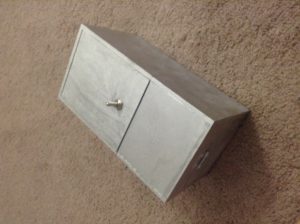 Figure 8: Exterior of Box
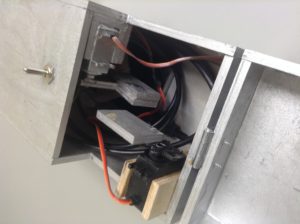 Figure 9: The Inside of the Box
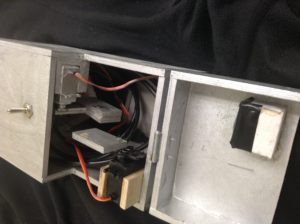 Figure 10: Opened Box w/ Lid
 Figure 11: Jeff (the Robot) Looking into your Soul
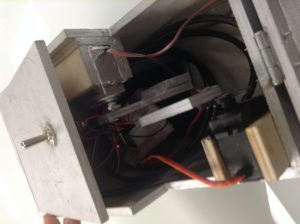 Figure 12: Opening the Main Top
Here is a video of it working. There are multiple different functions that the robot does and here are all of them.
Cost Versus Budget
Planning out my budget for this project, I didn’t expect to have to spend more than around $35. That budget was surprisingly lower than what was actually spent. The Arduino board was cheaper than expected only costing me about $12. However, the Arduino alone was useless and the the cord to connect my Arduino to my computer cost me $17. The two servo motors costed $30. The various electronics totaled around $15, and the wood/glue/nails/paint for the box cost around $25. Overall, the project ended up costing around $110, which is way more than if I were to buy a useless box off amazon.
Lessons Learned
Through this project, I learned a number of lessons, both technically speaking and in terms of projects themselves.
- Electronics
- Always use a voltmeter or oscilloscope to find out whats wrong
- Sometimes disassembling than reassembling can fix a problem
- Start early, anything can go wrong
- Woodworking
- Never forget the thickness of the saw when making a layout
- Less precision than when working with metal
- Make the cut right the first time, secondary operations are very time-consuming to reshape the cut
- Overall
- Time-management is key
- Purchase the CORRECT items well in advance – I had to go to radioshack to buy some stuff because if I had bought it on Amazon, they wouldn’t have shown up until mid-may
- No matter what your workload is, make time for all your classes otherwise you’ll fall behind
- Learning is fun – By choosing a project where I had almost no experience, I feel like I learned a lot and am slowly becoming more capable
- Learning is tough – Feeling like you have no clue all the time can really hurt your self-esteem, but I guess you have to start somewhere.
- Time-management is key
Images From Expo
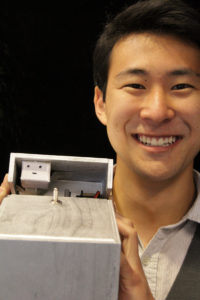 Figure 13: Joe and Jeff
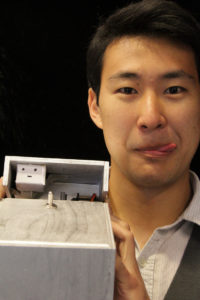
Figure 14: Joe and Jeff Silly
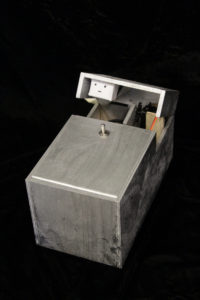
Figure 15: Open Box
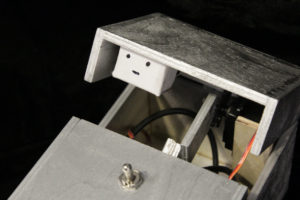
Figure 16: Zoomed in Open Box
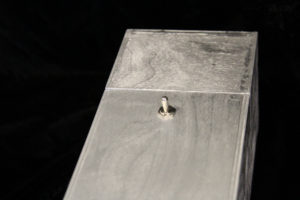 Figure 17: Closed Box
4 Comments. Leave new
I was so happy to see your project at expo! It was an absolute delight to play with and see all of the different settings. I agree completely with Laura that you’re underselling your achievements with this proejct! You came in with virtually no experience and creating a complex electromechanical system! I think it would be especially if you upped the scale of this project and maybe made another box which could be triggered by this box somehow, so that you almost have two fighting box robots! While the cost might have been high, I think the skills you gained, as well as the feeling of accomplishment can help to make up for a little bit of that. Great work on the project and best of luck with the end of the semester!
I am very impressed with how this final project came out. It is clear after reading your blog that you really put in the required time and research to understand this system fully. Even though it looks like you had a steep learning curve to overcome, you probably learned a ton from this process. I think the project is quite entertaining to watch, future iterations could involve customizing the creature that presses the switch. But once again, excellent wood work and electronics troubleshooting.
I love this project. The spunk and personality given to it is incredible. A very different take on something that other people seemed to have done before. The metallic look also adds a really cool aesthetic. I liked your conclusions also. Time management is key. The cost definitely seems high, but the personality and uniqueness of the project (i think) justifies the cost. Excellent work.
I am looking forward to seeing your useless box in action. It is a amazing that something seemingly simple is just the opposite. After reading your post, I don’t think you are giving yourself enough credit. There were numerous challenges that you overcame and skills you learned along the way. It seems that you encountered proof of the old adage to measure twice and cut once. I’m glad that your teammate was able to offer guidance and support. While stumbling through things and learning as you go can often be fun and useful, it’s also fairly time consuming. All-in-all, it seems that you have quite a few lessons learned that will serve you well in the future.