

Project description
I decided to make an infinity mirror because it can not only give me some chances to playing with some electronics but also creating some really cool optical effect after finishing this project.Why can the infinity mirror creates “tunnel” effect? The secret is that the infinity mirror actually contains two mirrors with different transmissivity and reflectivity. Mirrors that we deal with in everyday life are nearly 100% reflective. That’s the regular mirror at the “back” of the infinity mirror (on the left in the diagram above). The tinted window film, however (on the right in the diagram below), only reflects about half of the light that hits it. This means that, when you sandwich an LED between the two mirrors, some of the light escapes through the front mirror and into your eye. The rest is bounced back off the rear mirror, then into the front mirror again, and this process continues off to infinity – thus the name. There are three main parts that need to fit together to build this: the regular mirror, the frame, and the one-way mirror.

CAD drawing
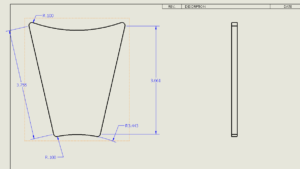
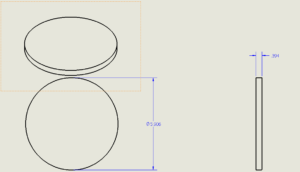
Those are the designs of the acrylic inserted in the mirror and the one-way mirror inserted in the middle of the front face.
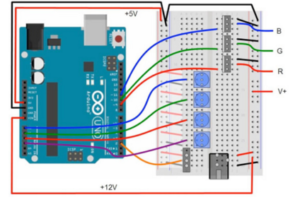
Major electronics parts
- Major Electronics: 1.Arduino UNO R3 with mini breadboard and jumper wires 2.RGB LED Strip 3.12V/5A power supply 4.AWG jumper wires
Aesthetics applied
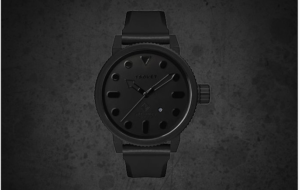
As I mentioned in last post, the only thing I left is to paint my infinity mirror. Last week, I was thinking to apply the Chinese traditional art on my final product. But, I find it is really hard to apply the ideal effect on the glass surface. So, I decided to change the aesthetics to apply. I am the big fan of all black aesthetics, which is applied in many areas such as clothing, watch and even cars. Here are some examples:

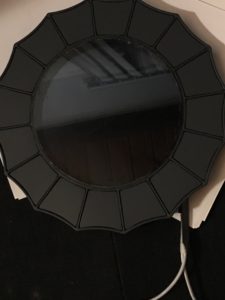
For my project, I applied all black aesthetics to my infinity mirror. Firstly,I used primer on the surface of the glass to ensure the coating quality of the black coating afterwards. After that, I used the anvil gray paint to finalize the black coating. And the final effect turns out to be pretty good.Here is my finalized product:
Budget
The budgets doubled compared to the original estimation. Overestimating the budget is a really important thing you need to do when you planning a project. I broke some electronics during wiring so that I turned into buying some extra parts. Also, machine shop costs me a lot more than I thought.
| Materials | $17.5 |
| Machining | $65 |
| Electronics Parts | $73 |
| Paint | $15 |
| Total | $170.5 |
2 Comments. Leave new
I think that you really nailed that “flat black” aesthetic! Your project fits right in with the pictures of the aesthetic that you posted. I hope that you can hang this on your wall someplace that you’ll appreciate it.
Man this is such a nice report! I like how you used enough pictures to show the basics of how your project works! The budget has also got enough details! Nice job!