
Timeline
As seen in Part 1 of this report, I had to go through some early design iterations due to my own indecision and COVID-19. I also wanted to make time for user testing and another round of iteration once my piece was built. This caused my design process to have two main design loops, one for ideas and the other for building.
Because of this iterative process, I needed to manage my time very wisely and plan out each step far in advance.
| Start Date | End Date | Task |
| 2/17 | 3/4 | Ideate |
| 3/4 | 3/11 | Plan |
| 3/4 | 3/11 | Prototype |
| 3/8 | 3/9 | Review |
| 3/9 | 3/18 | Iterate |
| 3/18 | 3/25 | Buy Material |
| 3/25 | 4/8 | Fabricate |
| 4/8 | 4/10 | Test |
| 4/10 | 4/12 | Review |
| 4/12 | 4/15 | Iterate |
| 4/15 | 4/20 | Final Touches |
| 4/19 | 4/20 | Project Due |
| 4/15 | 4/22 | Report Part 1 |
| 4/22 | 4/29 | Report Part 2 |
| 4/20 | 5/3 | Presentations |

Process
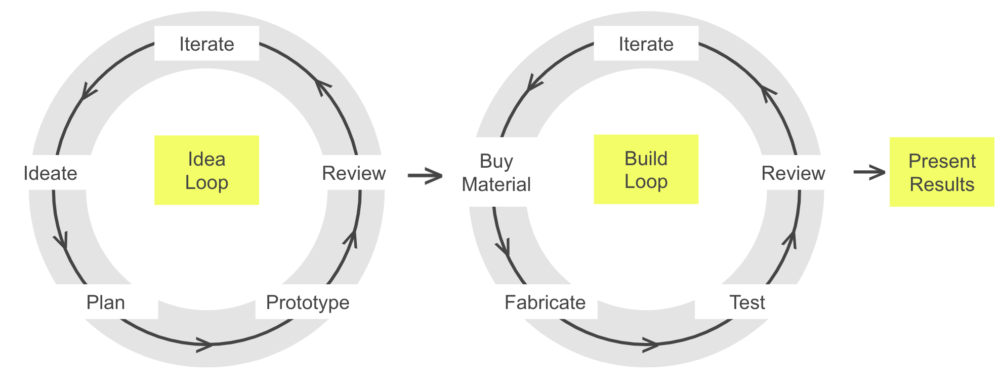
As stated above, my design process was split into two main feedback loops, an idea loop, and a build loop. My idea loop was discussed in Part 1 of my report, while the build loop will be the main focus of this part (Part 2).
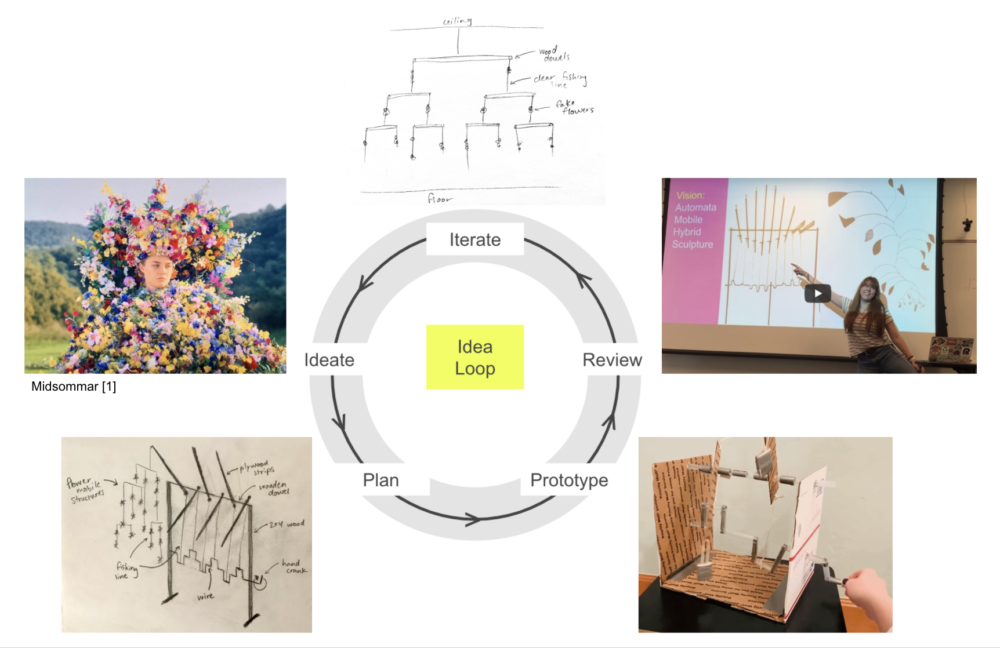
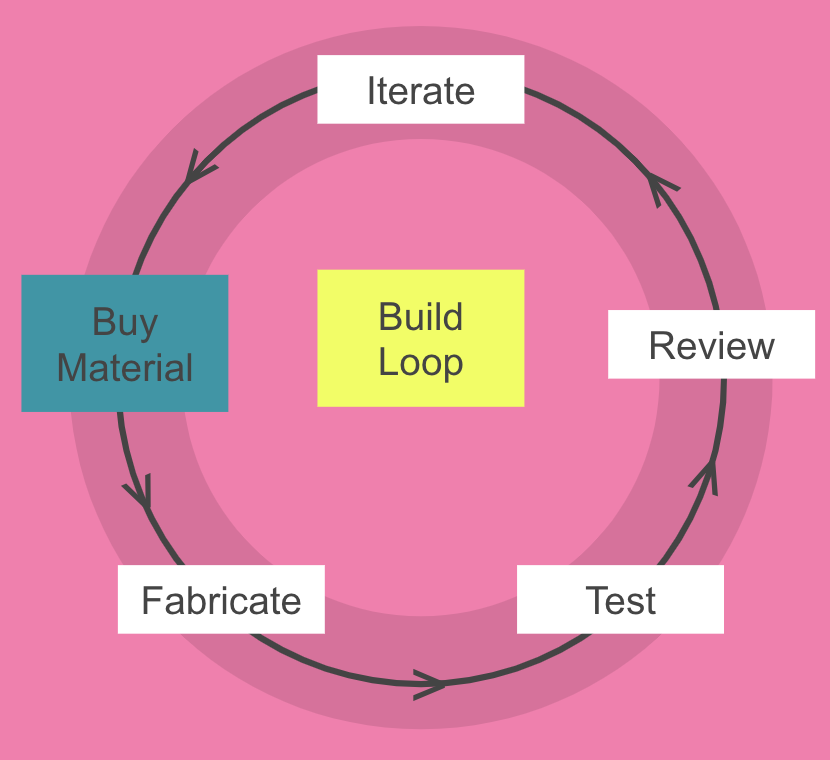
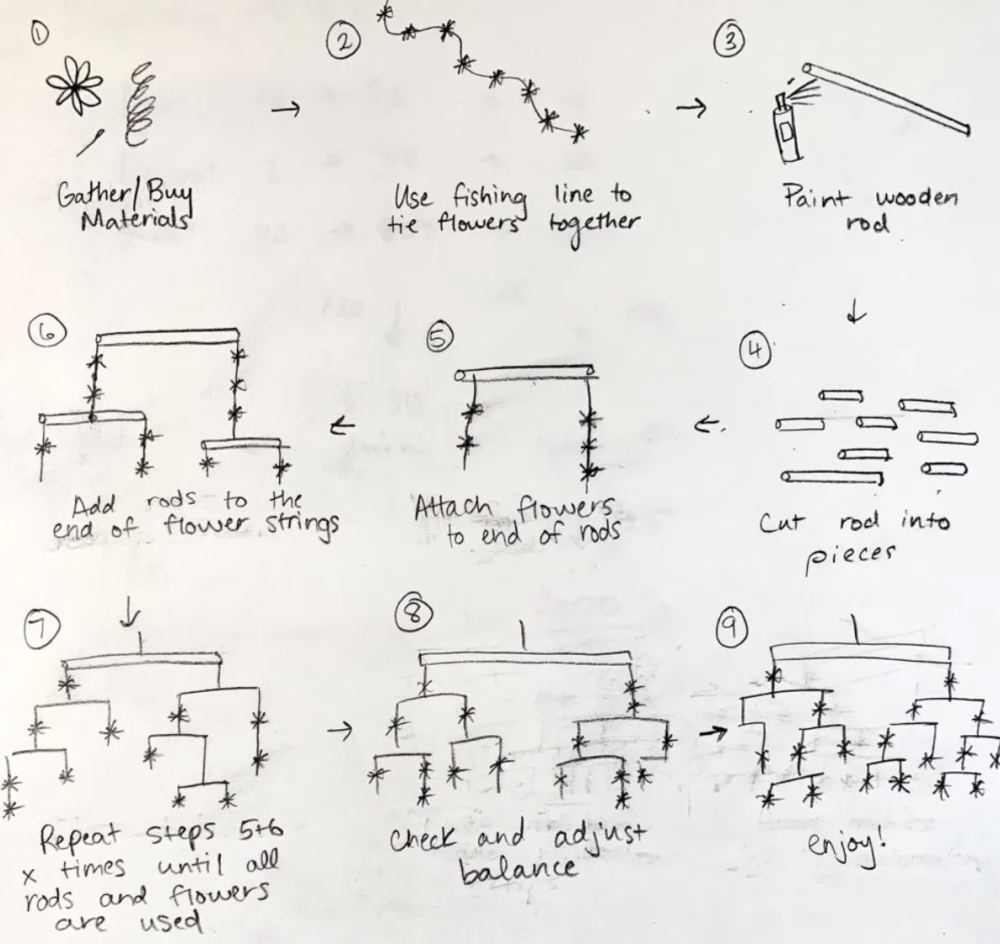
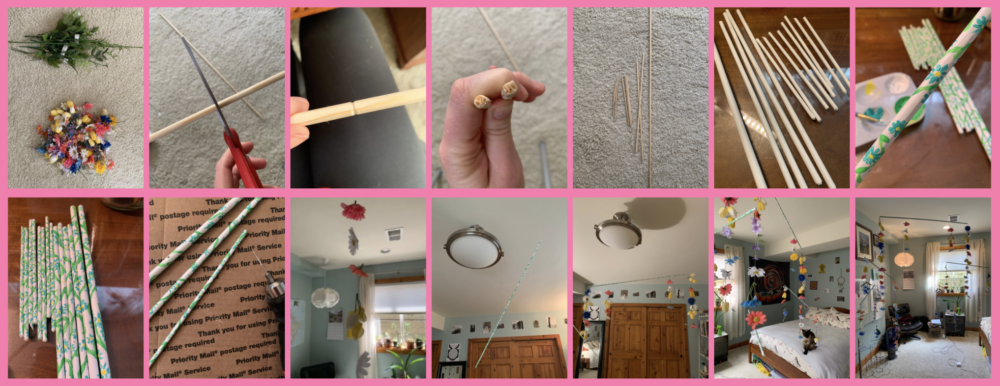
The first step of the build loop is purchasing materials necessary. I purchased a variety of fake flowers, four 36” wooden dowels of different thicknesses (3/8”, 1/4”, 3/16”, 1/8”), and 100 yards of clear “fishing line” (jewelry string). Other materials needed for fabrication included scissors, paint, and a drill, all of which I already own. The most important material of the project was the flowers, so I really tried to get a wide range of brightly colored flowers that did not look too fake. While real flowers would have been ideal, they are very hard to work with and not very delicate.

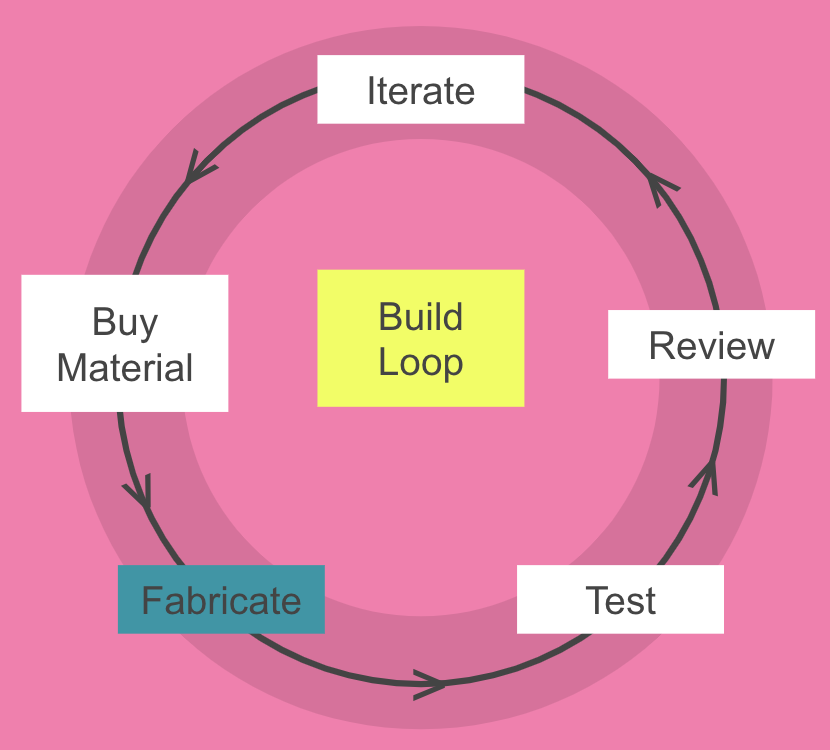
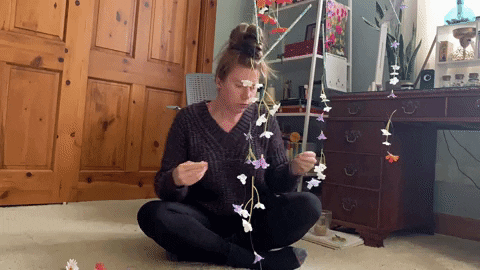
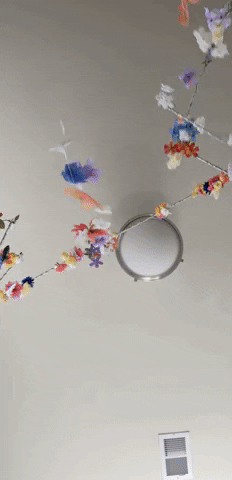
The next step in my build process was fabrication. The process was basically summed up into three main steps: preparing the dowels (cutting, painting, and drilling holes), preparing the flowers (removing the flowers from their stems and stringing them together with the fishing line), and finally assembling the mobile (alternating dowels and strings of flowers).
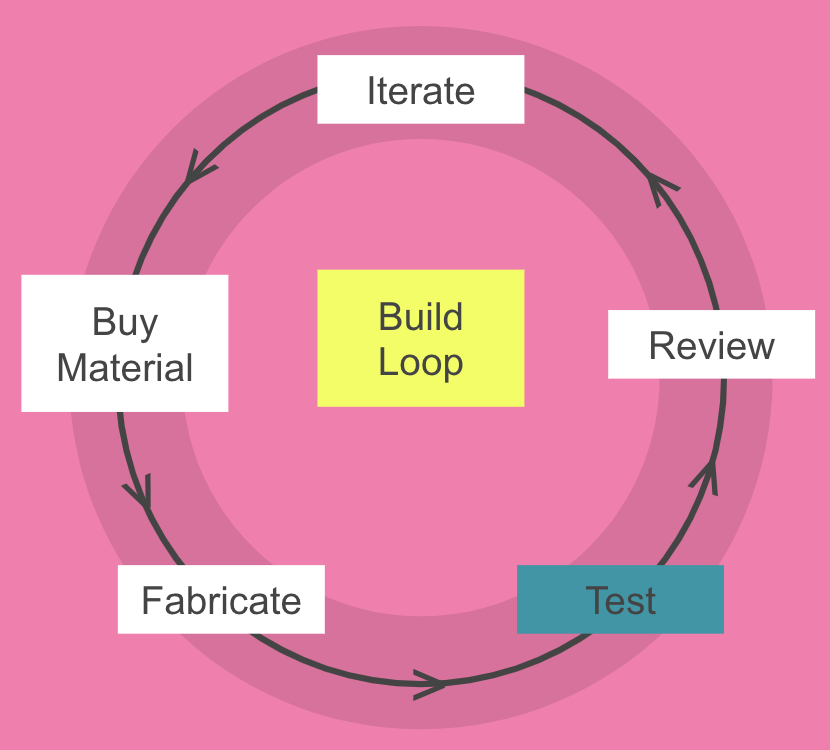
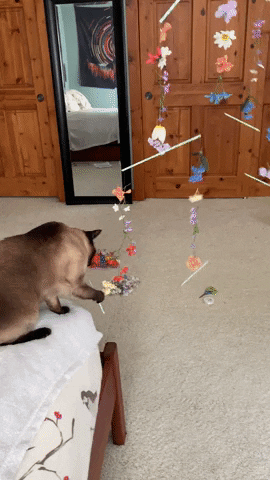
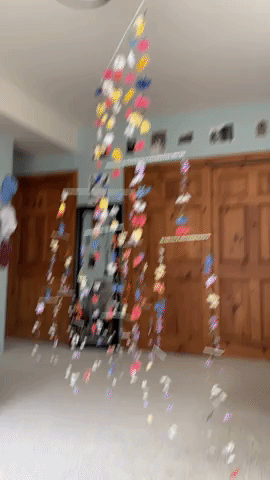
While I initially planned to do in-depth user testing and get lots of feedback on my sculpture, I was limited to testing with the users in my house (aka my family and my cat). My test basically included having people interact with the sculpture without any directions. My cat enjoyed playing with the bottom layer of flowers, but quickly got bored. From this, I discovered that my sculpture was durable enough to withstand a housecat. Meanwhile, human interaction mostly involved gently touching or pushing my sculpture so that it would begin moving. Once the sculpture started moving, the user typically stepped back and watched. I think that people interacted with it in such a gentle way because it looks delicate, however, given my heavy interaction during fabrication, I know that it is quite durable.
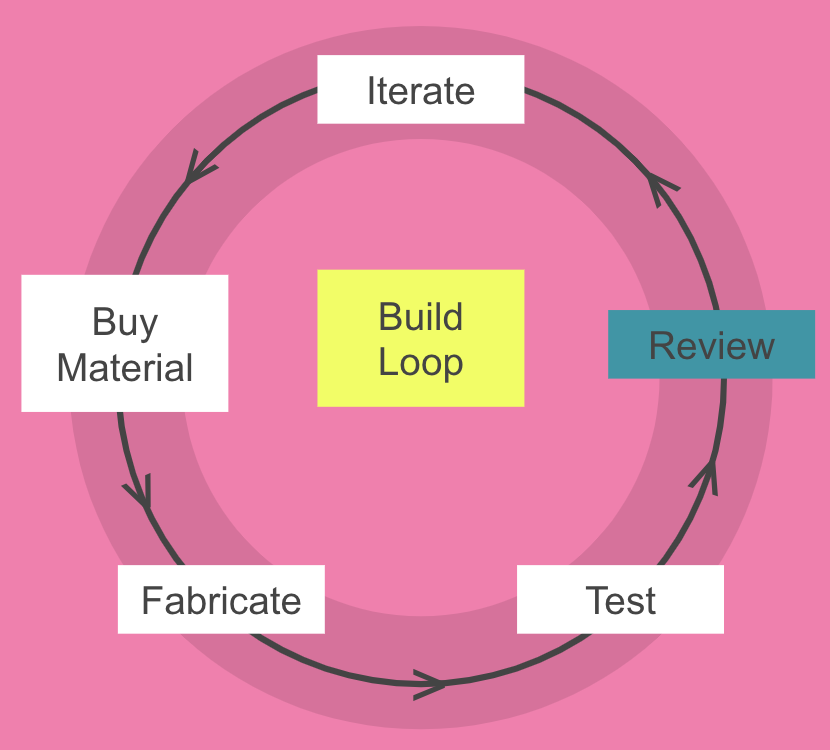
After my testing, I decided to review my own opinions and the opinions of my testers and see if it was necessary to iterate. I concluded that I personally had some issues with the spacing of the flowers on their strings and the sculpture was not as large as I wanted. I also got input via my construction update blog post.
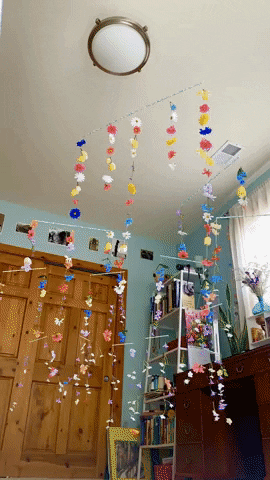
To address the issues I compiled during my review step (not enough flowers and flower spacing) I continued to iterate. Thankfully I had extra materials, so I did not need to buy anymore. As for fabrication, I added a final layer of flowers (going from 3 to 4 layers) and I took apart my first layer of flowers (the flowers hanging from the top dowel) and re-did the flower strings so that the flowers were more spaced out. Between these two changes, my sculpture almost doubled in height, finally reaching the floor, which was my goal. I also added more strings of flowers through the centers of the dowels, instead of just hanging the flower strings off the ends of the dowels.

Final Product
Achievements vs Goals
Aesthetic Goals
- Arts & Crafts: I think that I achieved this goal. I used themes from nature (flowers) and I incorporated natural material (wood). My wood was also highly decorated in a floral pattern. It was also completely hand-made and lack modern technology, which calls back to medieval culture.
- Aesthetic: As per the Aesthetic Movement, I believe that my sculpture is beautiful and accurately encapsulates my self-expression.
Functional Goals
- Moves: I achieved both translational (up-and-down) and rotational movement. While the sculpture is still when left alone, it can seriously pick up some speed when tapped/pushed or when a fan is on.
- Durable: Based on my (minimal) user testing, it can definitely withstand both human and cat interaction. One of my next steps will be testing it outside to see if it can withstand the outdoors.
- Balanced: While the sculpture is objectively pretty balanced, I think it might have fallen into the ‘uncanny valley’ [2], meaning it is very balanced, but because it is not perfectly balanced it makes the viewer slightly uneasy.
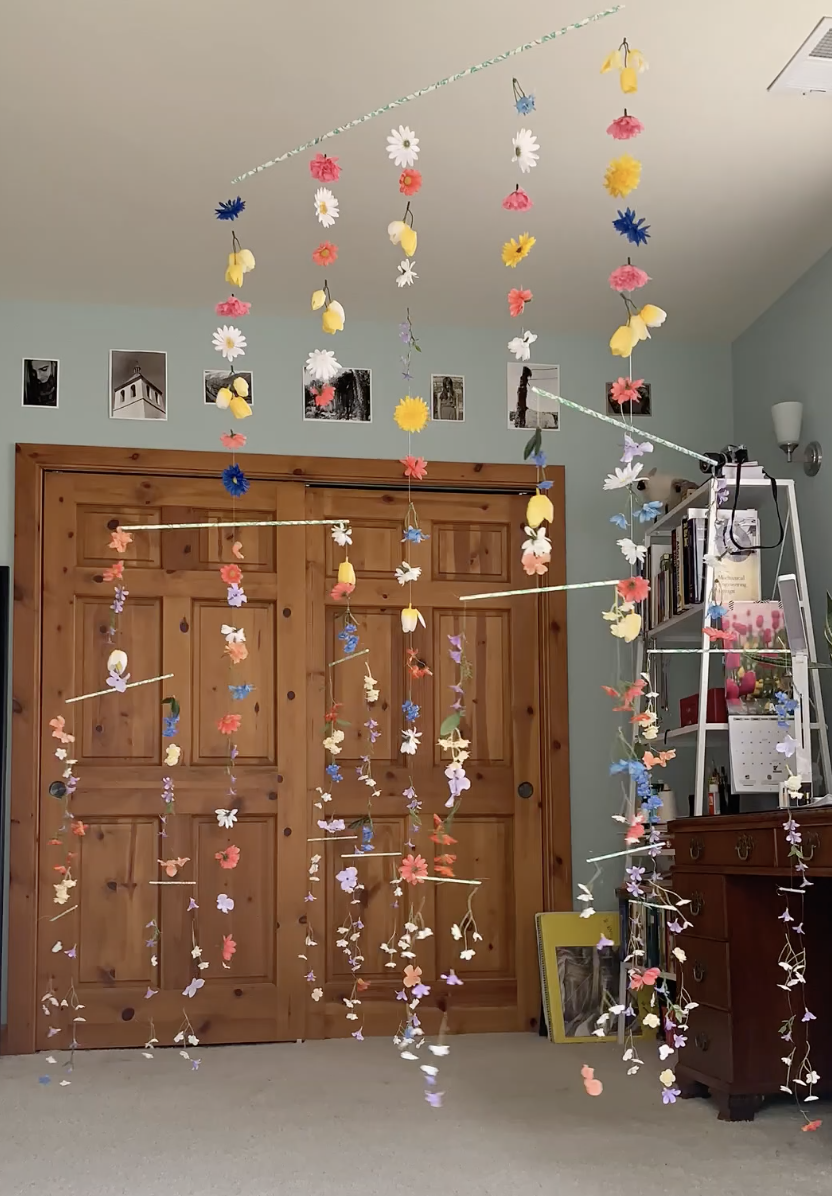
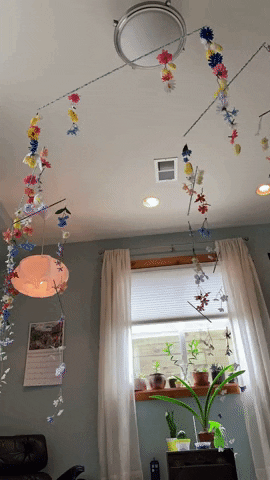
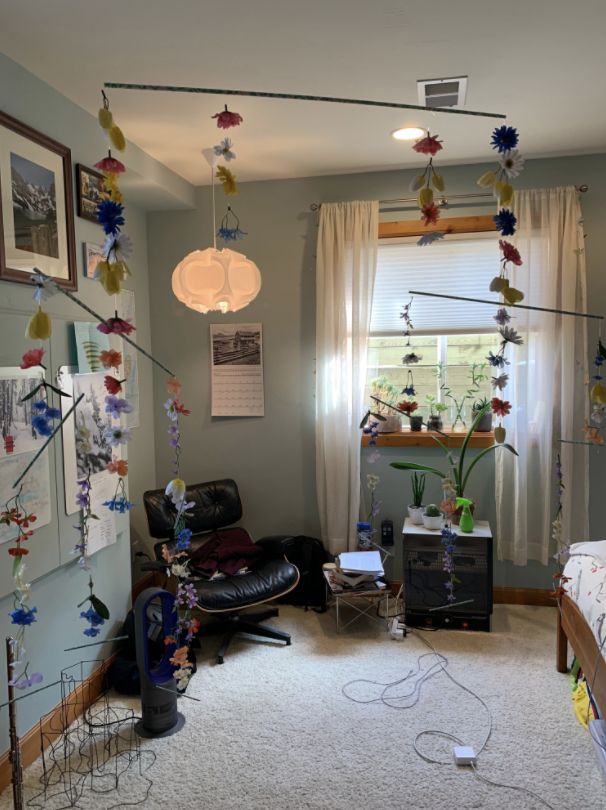
- Large: As far as size goes, I achieved a floor-to-ceiling height, making it look decently impressive, which is what I was going for.
While I achieved almost all of my goals, I wish that I made some slight alterations to the mobile design before I started building. If I could do this project again, I would have broken every dowel twice as many times and worked in a more 3-dimensional shape. This is to say instead of working off a singular, linear dowel, I would have made a cross out of the dowel and then worked downward. Therefore instead of my top dowel structure being 36” long and 3/8” wide, it would be 18″ by 18″.
Next Steps
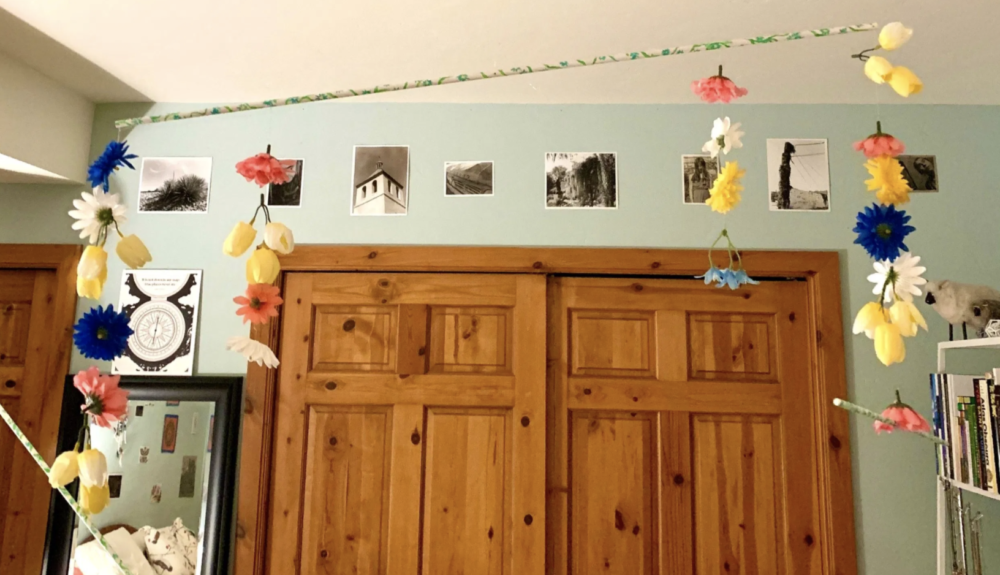
I am currently enjoying my sculpture in my bedroom. I have a small fan and when I turn it on, the sculpture slowly starts rotating around, which is quite mesmerizing. Despite the personal joy it bring me, seeing it on a daily basis, its large size makes it somewhat hard to maneuver around, so I plan to move it to another place in my house and or place it outside once the weather is consistently nicer. I am very intrigued by placing my sculpture outside because I think it might interact well with a light breeze.
Due to the fact that I am a first-year grad student, and have many more years of grad school ahead of me, I hope that either the ATLAS or Engineering Expo gets postponed to this coming fall so that I can still show others my work.
Video
References
[1] “Midsommar.” IMDb, IMDb.com, www.imdb.com/title/tt8772262/mediaviewer/rm1884590593.
[2] Lidwell, William, et al. “Uncanny Valley”. Universal Principles of Design. Rockport.
4 Comments. Leave new
Hello Fiona. The featured image really stood out to me, and instantly reminded me of your initial goal to follow Midsommar’s aesthetic. I think you nailed it, because seeing the featured image sent chills down my spine, reminding me of that movie’s events!
As a statement of meaning, I think it was great that you iterated upon your design and made it really big, stretching from floor to ceiling.
Please let me know if you have any questions for me regarding your main project to fulfill the “Artist Asks Questions” step of Liz Lerman’s critiquing methods.
As a neutral question, would it be possible to add depth to the existing structure? You were saying that if you were to do the project over again you would make it more 3-dimensional and 18″ by 18″ rather than 36″ by 3/8″.
Finally as a permissioned opinion, I think it would be really impressive if you could implement a way to control a mobile’s rotation, though I’m not sure if that would be possible with the existing structure.
Excellent final product! You’ve nailed both the aesthetic and dynamic functionality, while making it truly impressive in scale!
– Justin Engbrecht
Hi Justin! I am very interested in making it more 3-dimensional by adding a perpendicular rod to the top of the mobile. I also really like the idea of being able to control the rotation of the structure. I worry about adding additional electrical or mechanical components to achieve this though because the structure is so delicate, and I don’t want extra components messing with the aesthetic. I can get some controlled motion by using a fan, which I can specifically position in relation to the mobile and set a reasonable power/airflow. Thanks for the comments!
Hi Fiona. I was an absolute fan girl of your project from the beginning so I decided to do an in-depth critique for it in the format of Liz Lerman’s critiquing methods.
As a statement of meaning, I love how you drew your inspiration from Midsomar and the Art Deco Movement and did so successfully! One can see the amount of time you dedicated to the layout of the flowers and the detail of the rods. The flowers and the movement of the sculpture must be so calming and rewarding.
If you, the artist, have any questions for me, please let me know.
As a neutral question, are you still interested in creating a mobile that is run by a crank or motor? It seems like a regular (wind-powered?) mobile hanging from the ceiling is just as mesmerizing.
Lastly, as a permissioned opinion, would you consider adding more? I know you already felt like this in your process and you did end up adding more flowers, but in a project like this, so uplifting and colorful, I think more is more. I thought that you could add a perpendicular rod at the center of the top and repeat the same patterns. You mentioned this, but it would be really great to play with time and use real flowers instead. Like a one-time Spring exhibit?
Congratulations on executing your vision Fiona! I only wish I could have experienced it in person.
Nicole Leon
Hi Nicole! Thanks for commenting! As for your neutral question, you are correct it is just a wind-powered mobile, and I think I’m okay with that. In fact, I think leaving out electrical components or complicated mechanical components work with the nature-inspired aesthetic. In response to your opinion, I absolutely love the idea of adding more and I think adding a perpendicular rod would be a great way of doing this. I also am very interested in making a version from real flowers because I love the idea of the sculpture changing over time (i.e. the flowers drying out).