
For this project, I decided to go with a realism aesthetic. The realism aesthetic originates from 19th century France. Realism as defined by Britannica is “the accurate, detailed, unembellished depiction of nature or of contemporary life.” To achieve this, I wanted to include pieces in my diorama that you would likely see in a real-world setting. To get an idea of my vision, I drew inspiration from photos of cars that I’ve seen in the past. I found that my favorite backdrops usually included a cool mural or cherry blossom tree. The common theme I found was a contrasting but super colorful background. I knew I wanted to have some vegetation in my diorama as well. From my research into making a diorama specifically for a model car, I found the majority had vegetation which helped add depth to the diorama as well as a way to scale the car. This was more difficult than I originally thought for a couple reasons. If I wanted to try and add a cherry blossom tree, it would be extremely difficult to get the right scale of the tree in relation to the model car. In my case, a tree wouldn’t fit my predetermined size of the plastic model cover. Not only that but I didn’t have a material to make a tree out of. Due to these factors, I opted for a bush and wall vine vegetation. For the backdrop, I opted for a mural of some kind and what better way to do that than include my name in graffiti. I originally wanted to have graffiti on a brick wall, but I couldn’t figure out a good way to make the bricks to scale and I think this would add unnecessary complexity. Once I had decided on my plan, I had made a vague image in my head of what I wanted to shoot for and went for it.
The first step in the process of making my diorama was gathering the materials. The wood pieces are balsa wood which I purchased from Michaels. These pieces were used as the base and the wall of the diorama. I sourced the plastic casing from an old model case that I had. This would be used as a cover to prevent dust accumulation and as a general size guideline. The black road surface was painted using some leftover paint from my mom’s art projects. In order to rough up the road surface to make it look more realistic, I used a pointed bit on my Dremel and randomly sanded portions of the wood as shown below. ![]()
The top piece is the piece I used for the wall and is shown in contrast with the road surface on the bottom to show the difference between the two.

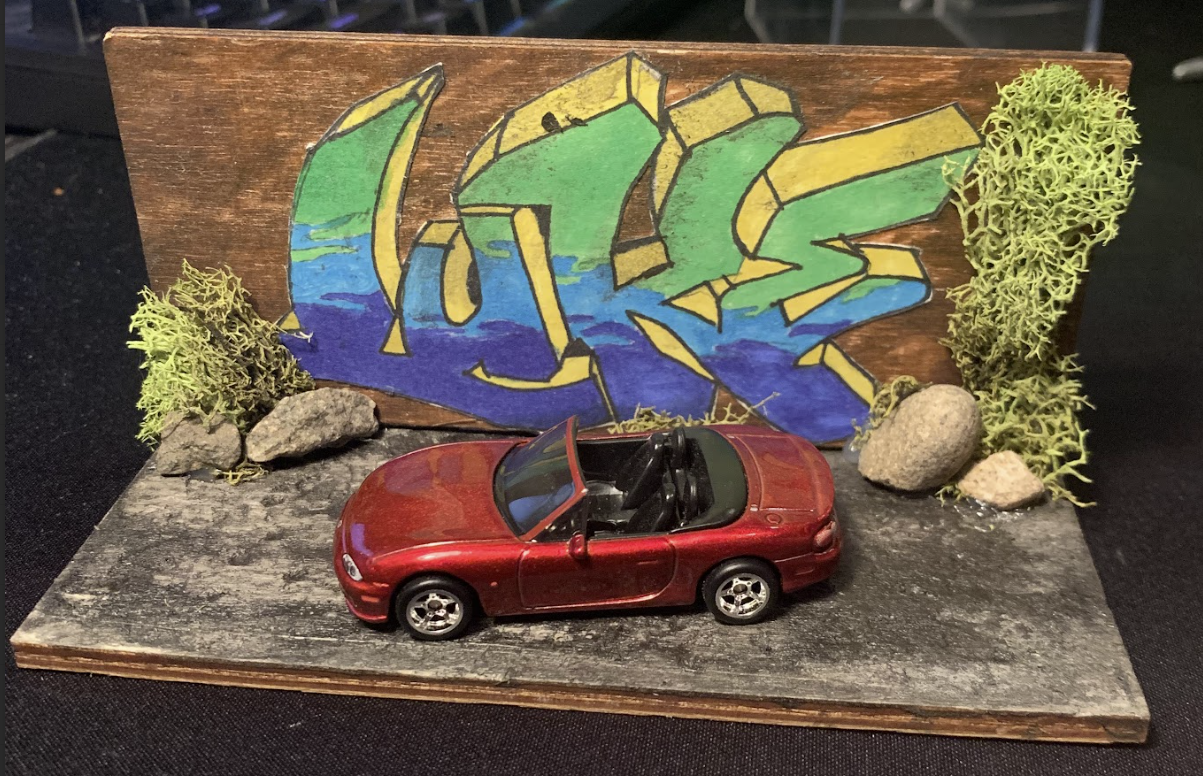
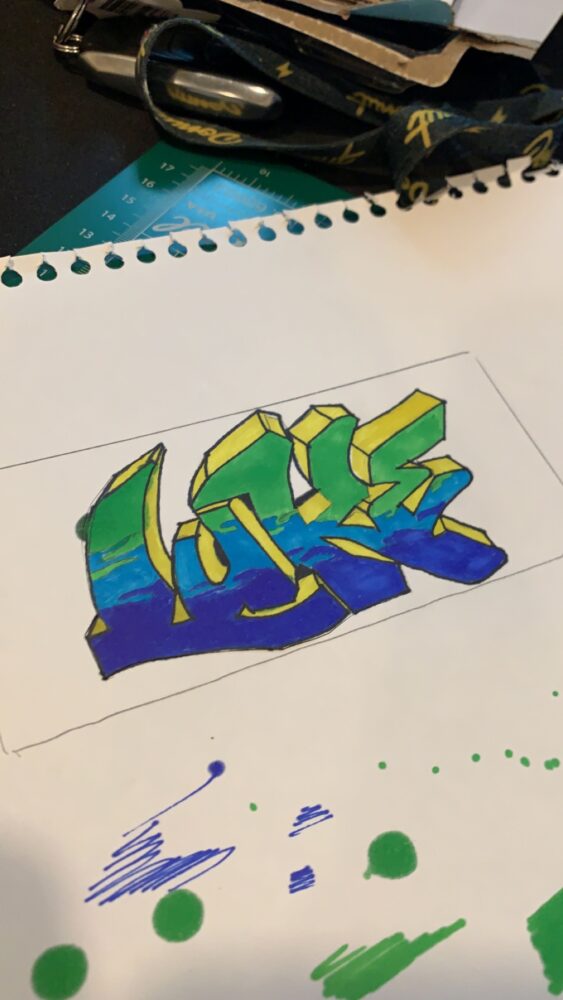
This photo shows the road with the dried paint. Seeing as the scene of the diorama is more of a back road/ alley way, the road surface is a good match. To me, it looks like a really rough back alley like you’d see on the hill here in Boulder. Filled with potholes and discolored tar. The brown wall was done using markers from home. To make the bushes, I used the extra fake vegetation from my brother’s fishtank. The rocks used on the base were found outside my house and actually helped the structural rigidity of the back wall as I used it as a support feature as well. The car is a premium hot wheel I bought last year and was sitting on my desk. Since it’s a premium hot wheel, the model has more detail including the brand badges on the rear and painted headlights. This helps add to the realism aesthetic. To make the graffiti, I used art paper from an old scrap book I had. To get the dimensions right, I traced the back wall wood piece onto my scrap book. Then I sketched out the lines for my graffiti with pencil. After I finished the sketch, I started to add the color. This took some decision making since I didn’t exactly know what color I wanted to use. Looking around at some graffiti online, I found a few examples with similar colors I used in the final product. Once I had completed the color, I went back over the sketch lines with a fine tip marker. The markers I used weren’t the best quality and I noticed they were bleeding quite a bit which I didn’t really plan for. Once I finished the design, I found that this gave it a cool affect since it looked similar to the paint spread you’d expect to see with a spray can. More points added to the realism unintentionally. Below you can see my finished sketch before I cut it out using a razor.
Once I cut the graffiti out, I used a glue stick to glue it to the wall. I then went to mock the design up while the road paint was still drying. Bad idea, at first, as I accidently dropped the graffiti into the black paint. As I was wiping off the black paint, I noticed all hope wasn’t lost. Again, I accidentally added more realism as the wiping of the black paint made the graffiti look tarnished. Once the paint dried, I used a hot glue gun to glue the wall to the road. In doing so, I noticed that it wasn’t super sturdy which is where the rocks came in to help keep the wall in place. Lastly, I added the vegetation to the wall and edge using hot glue as well. You might have noticed that I didn’t permanently fasten the car in place. This was on purpose as I wanted to be able to change it out with another model later on. That way I don’t get bored of the same car all the time. Here’s a look at the wall finished product below. 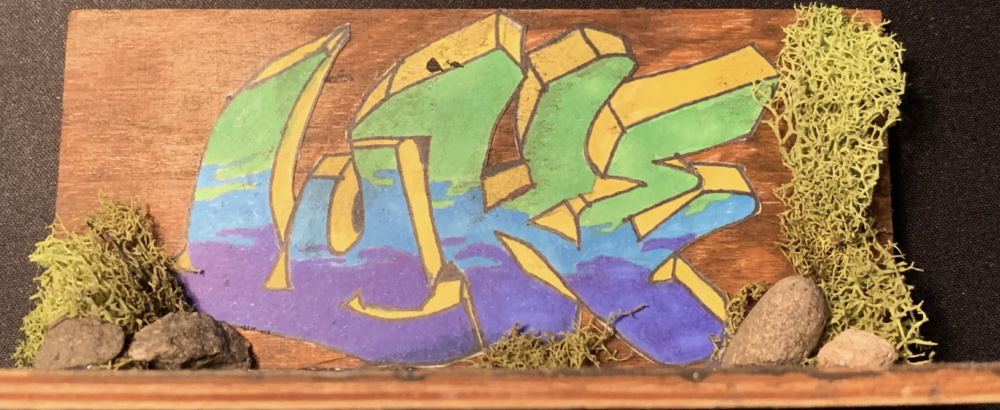
The finished part can be shown below first without the casing off first and the next photo with the casing on.


In my opinion, I am really happy with the final result. I think it aligns perfectly with what I was expecting in my head. It works as intended as a nice desk ornament and doesn’t take up too much space on my reasonably small desk. However, I do have two minor critiques that I want to change in the next iteration or modify the current iteration. The first one being the foliage/ bushes. I think they came out great, but they definitely could use some trimming. Right now, it doesn’t look very real, you can kind of see how there isn’t a direction of growth. What I mean by that is plants tend to grow up and out, the fake plants I have here are more of a sponge where the “branches” are randomly orientated and don’t follow the upwards path. This takes away from that realism a tiny bit. Another thing, which you can see in the photo with the casing on, is that the casing doesn’t exactly fit around the base. I was hoping for a tight fit so it could stay together as one piece. Unfortunately, the finished size is too small so the case loosely rests on the floor. Ultimately, I will end up keeping this piece but I’m hoping to try and add some lighting to the diorama to make it that tiny bit better. I was thinking of adding some under glow or some working headlights to the car so it can act as a night light as well.
Citation
“Realism.” Encyclopædia Britannica, Encyclopædia Britannica, inc., 16 Feb. 2024, www.britannica.com/art/realism-art.
3 Comments. Leave new
The diorama turned out fantastic despite the minor issues you’ve highlighted. It gave me a nostalgic feel of one of those large dioramas with working toy trains that I used to think about all the time when I was younger. Regarding the fixes to the foliage, I’d recommend getting reference photos of plants on walls and adjusting the foliage accordingly. I recall from somewhere that only picturing the thing you want to replicate in your head doesn’t translate well and sometimes can appear completely different from the real deal.
Hi Luke!
I really enjoyed learning about your project and the inspiration behind it. As you know I also have an interest in cars and I think you did an excellent job displaying the model and putting it in a realistic setting. Why did you choose a Miata for your model? Is there a sentimentality to that car for you? You have definitely inspired me to maybe create a diorama of my own for some of the many Hot Wheels cars that I have. Great job on your project!
I chose the Miata as my model as it’s one of the only premium hot wheel models I have and because I own this car in real life. Regardless of those factors, I’m also a diehard Miata fan so it holds a lot of sentimental value to me. Let me know if you have any questions if you end up making your own.