
Abstract
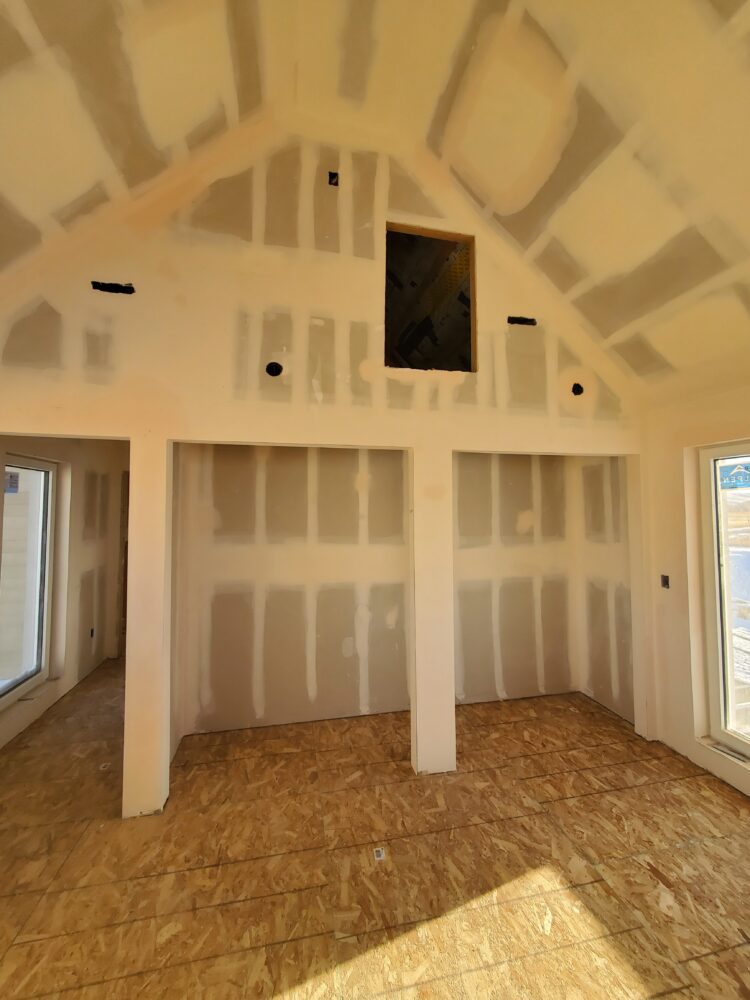
For my project I will be creating a dynamic art piece for my parent’s new house. In their bedroom there is currently a hole in the wall that is an entrance to an unfinished loft. My mom has requested that I create a door to cover the opening that includes an art piece. This will make the room look much more finished and will add an artistic element to the space. It is therefore extremely important that the piece is aesthetically pleasing because who wants an ugly decoration in their bedroom!? Although I suppose anything is better than the gaping hole that is there currently.
Aesthetic and Alternative Considerations
The aesthetic for this piece will be naturecore. I am trying to capture the serene feeling of trees reflected in a lake with towering snowy peaks in the background. It is also important to the customer (my mom) that the color scheme of the piece goes well with the rest of the house. The color scheme primarily consists of blues and grays. In order to be consistent with this I plan to paint the backboard blue, trees black, and mountains white. Black and white conveniently go with anything and match the colors that would exist in nature for the two elements. The black reflected trees will give the illusion of a silhouette at dusk and the white mountains will appear to be covered in snow. The whole scene will not only match the existing house color scheme but also highlight the naturecore aesthetic.
An alternate/opposite aesthetic would be a dark and gloomy scene or perhaps a disturbing image. Words to describe this type of aesthetic include decay, This would elicit brooding and contemplative emotions rather than the peaceful and calming scene I am currently planning to create. It is possible to laser-cut nearly any geometry that can be created on a 2D surface. This means it would be possible to create all kinds of death related imagery as easily as mountains and trees. The possibilities are truly endless and the beauty of the laser cutter as a means of production is that it is so versatile and can create anything that I convert to a dxf file.
Perhaps a more realistic alternative is to keep the same nature-based image but create a sunset aesthetic using bright, vibrant colors rather than the colder blue I am currently planning to use. This could provide a pleasant contrast to the rest of the house and add some light to the bedroom.
Function and Form
The function of the piece is relatively simple. The hinges will allow the door to swing open and closed. This also satisfies the dynamic element requirement of the project because the art scene will also have a moving component. The only tricky part will be aligning the hinges and ensuring that the stoppers prevent the door from slamming into the wall while also remaining coplanar with the wall in the closed position.
The primary emphasis of the project will be on the forms and colors of the nature scene on the front side of the door.
Sketches and Design Plans
Below is a sketch that shows the approximate dimensions of the door and art piece. I plan on using the mountain and tree patterns from the Etsy post in the following ‘inspiration’ section.
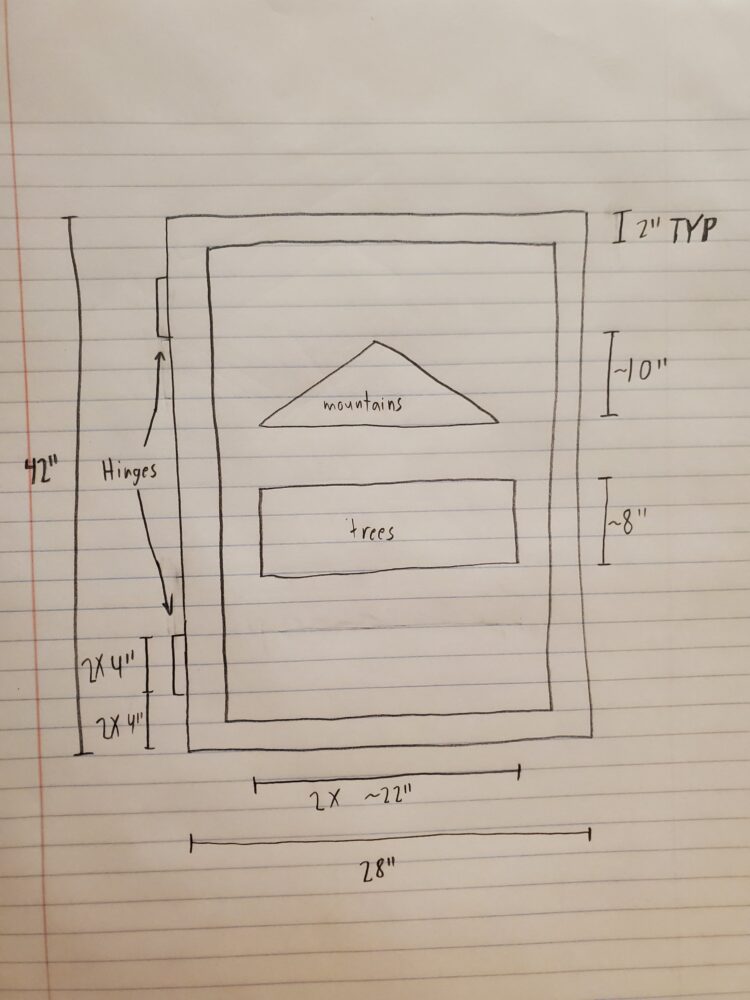
One of the things I am torn about is whether or not to paint the negative space behind the animals a different color. This is a question I plan to ask my pod members at the next design preview meeting to hopefully get some useful feedback and have a more solid painting plan moving forward. I also wonder if blue is too dark of a color for the background given the black trees. It is worth considering alternatives or perhaps creating a hew around the tree pattern with a lighter color, even though this is difficult to accomplish.
Inspiration
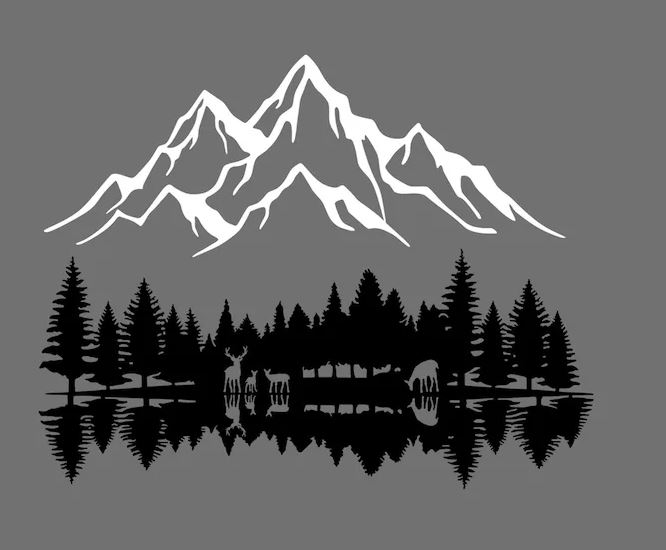
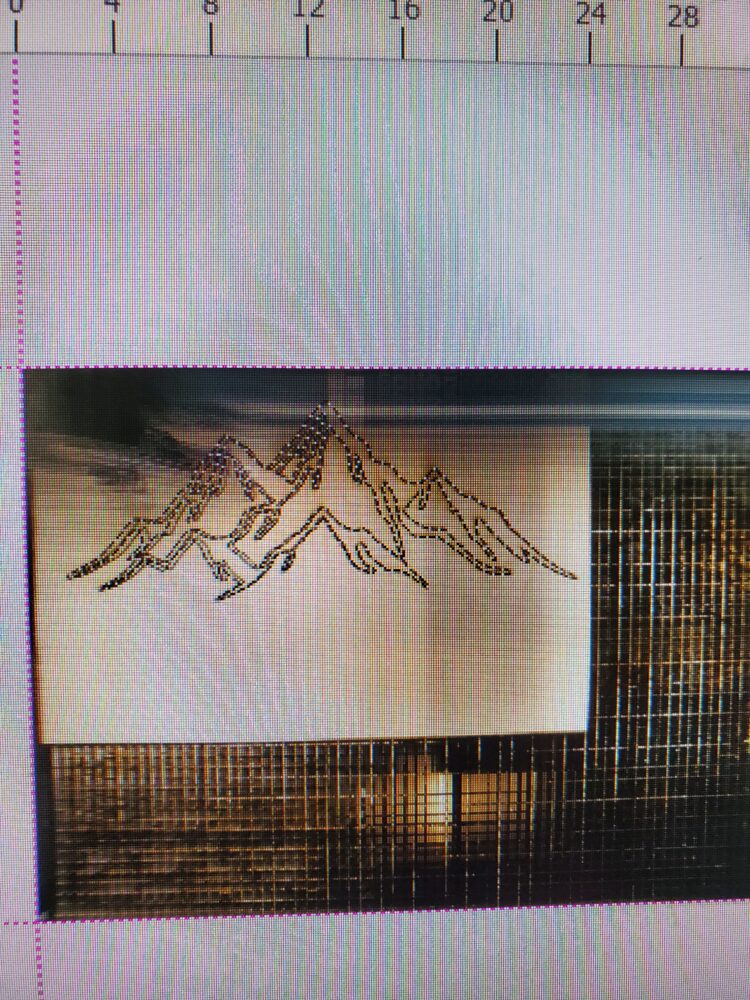
I was heavily inspired by several Etsy posts that featured mountain and tree graphics mounted on a wall. Many of these are made from sheet metal and painted with expensive metal paints and are therefore a pricy piece of home decor. Due to limitations with the material cutting capabilities of the ITLL laser cutters I will be using thin sheets of wood rather than metal to create the pieces.
Prototyping
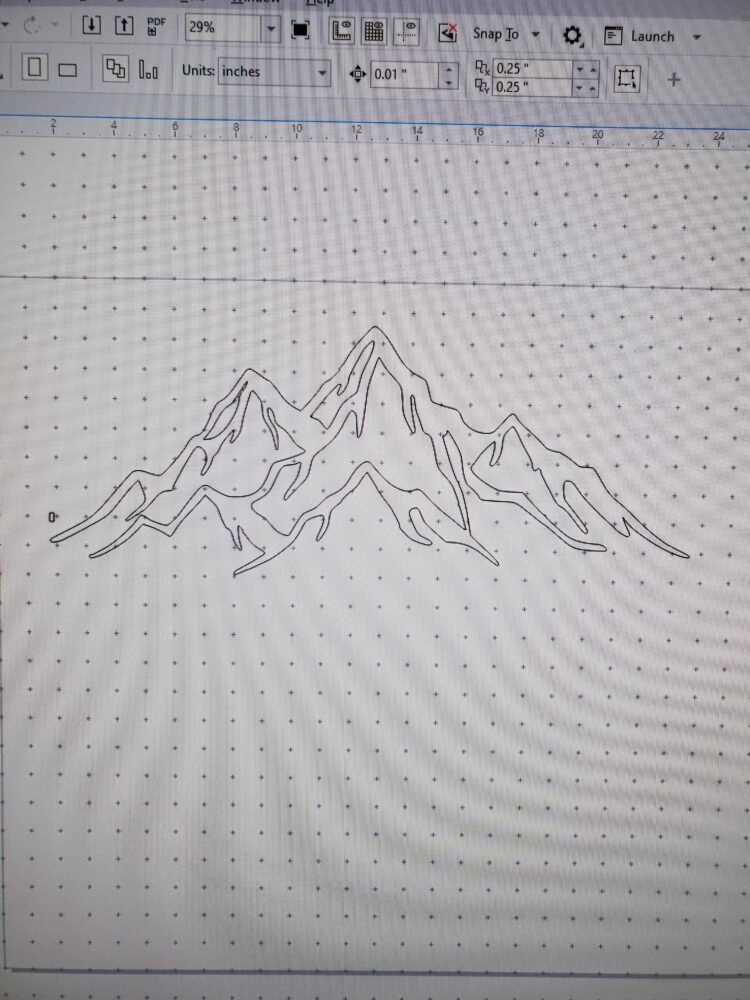
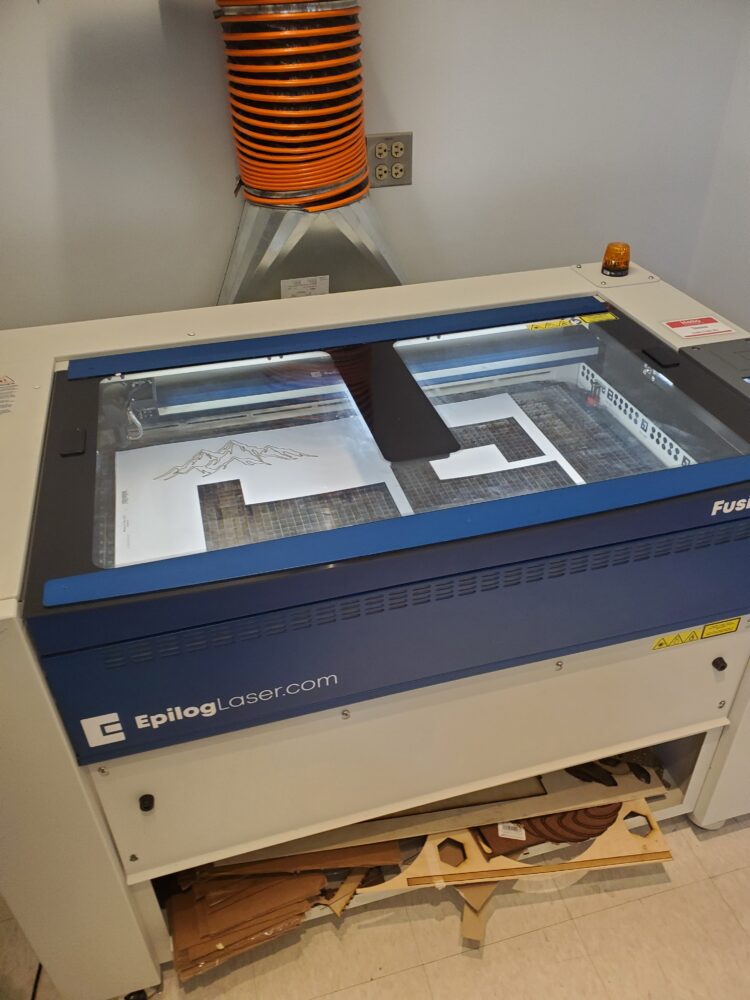
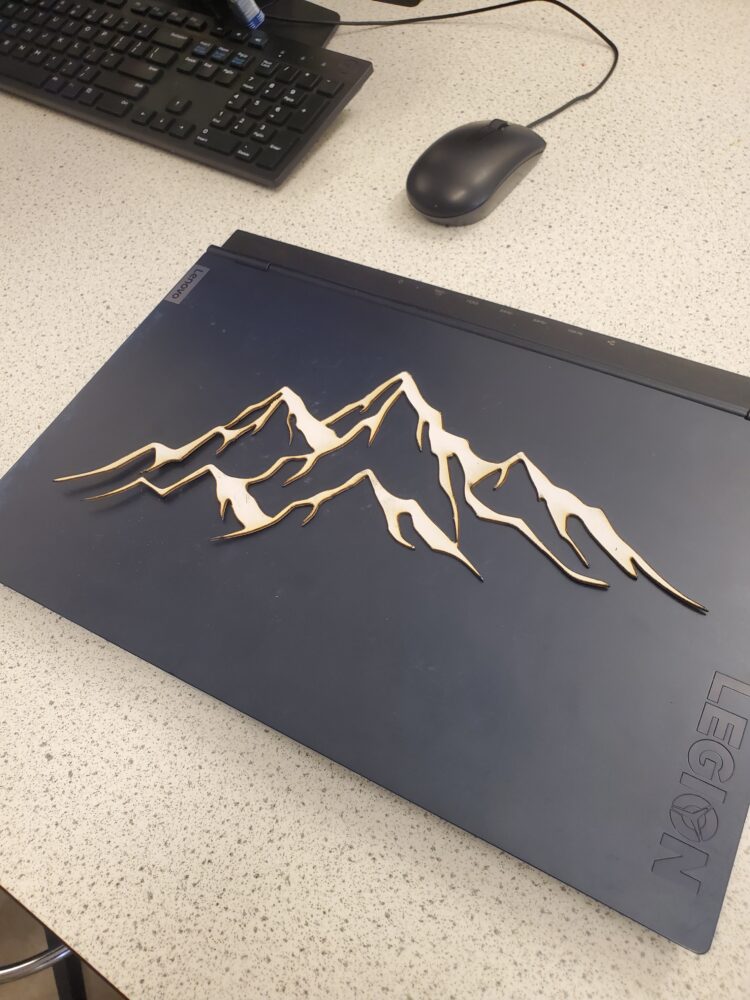
I have already begun the prototyping process. I wanted to see if the laser cutters would be able to cut the intricate geometric shapes that constitute the tree and mountain patterns. The first step was to convert the image file into a dxf file that could be read by the laser cutting software, a program called CorelDraw. Using a free online converter and the SolidWorks dxf file editing software I was able to generate the necessary document that could be loaded onto the laser cutter. I then went in person to the ITLL and found a piece of cardstock that was in the scrap pile. Cardstock is a good test material because the settings used to cut all the way through the material in one pass has already been dialed in by the ITLL staff. The test piece turned out really well and all the features were clear and precise. This gives me confidence that the full scale wood pieces will be of similarly high quality.
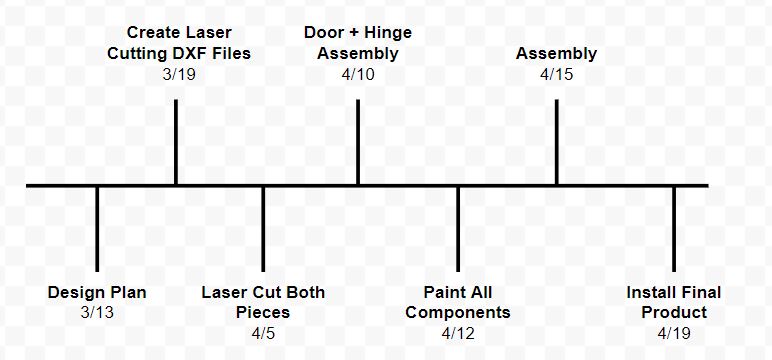
Timeline
When making my timeline I tried to be conscious of the 7X rule that says tasks usually take around seven times as long as you expect them to. This metric accounts for the time it takes to learn new skills that are necessary to complete a task and other unexpected delays. I am aiming to complete the project by April 19th in order to maintain a reasonable work-life balance in the last two weeks of the semester which are certain to be an extremely busy time. By that point I would like to be able to focus solely on writing the final deliverables for this class and have the time-intensive manufacturing for the project completed.
Cost
The anticipated cost of this project is around $150.
I arrived at this number using the following price estimates:
| Material | Cost | Vendor |
| ⅛” Birch Wood Sheets | $50 | Home Depot |
| Paint | $40 | Home Depot |
| Fasteners | $20 | Home Depot |
| Hinges + Stoppers | $40 | Home Depot |
Time on the ITLL laser cutter is not charged and all the assembly will be unpaid labor by yours truly. There is no associated shipping cost because I will pick up all the materials from home depot. My total of $150 satisfies the budget constraints outlined in the final design project description.
Fabrication Process
- I will first cut the birch wood sheet into three parts. This is the best way to optimize the width of the door frame while still allowing the cut pieces to fit in the laser cutter bed.
- Next I will load each file onto the laser cutter and align the desired dimensions to the piece of wood in the bed and verify that the pattern will fit using the integrated camera system. After visiting the ITLL to re-learn how to use the laser cutter machines I learned how to use all the software necessary to load the files, process and align the pattern, and export the path to the machine with the desired settings. It is important to use the correct settings for the material and thickness that I will be cutting. Luckily, ⅛” birch plywood is a common material and the settings are already known and recorded on a sheet in the lab room.
- When the pieces come off the cutter there should be minimal post-processing required. The machine is precise enough that support tabs will likely not be needed. In the event that they are I will file them off so only the desired pattern (trees or mountains) remains.
- I will cut the two back panels on the band to the appropriate sizes outlined in the sketch section.
- Next I will mount the hinges to the thicker door panel and the wall itself.
- The alignment and centering of the trees and mountains is likely to be a little bit tricky and I will make sure to mark the exact location prior to applying any glue. Once the pieces are aligned I will glue the thinner backboard to the mountain and tree pieces.
- Finally I will mount the thinner backboard to the door board using command strips. I think a less permanent mounting solution is appropriate in case my parents decide they want to move the art piece off the door for any reason in the future they will have the option.
References
[1] “Mountain and Forest Metal Wall Art, Hill and Trees Metal Wall Decor, Lake House Decor, Modern Home Interior Design, Gift for Farmhouse.” Etsy, www.etsy.com/listing/1533491643/mountain-and-forest-metal-wall-art-hill?gpla=1&gao=1&&utm_source=google&utm_medium=cpc&utm_campaign=shopping_us_a-home_and_living-home_decor-wall_decor-wall_hangings-other&utm_custom1=_k_Cj0KCQiA5-uuBhDzARIsAAa21T9S5DdhYiGM_AgjLlskS9PptjF80qaNd-3D0aBsgYgwclfsfpTsmnAaAg_4EALw_wcB_k_&utm_content=go_12570712527_123240181887_507439075829_pla-305562556206_c__1533491643_12768591&utm_custom2=12570712527&gad_source=1&gclid=Cj0KCQiA5-uuBhDzARIsAAa21T9S5DdhYiGM_AgjLlskS9PptjF80qaNd-3D0aBsgYgwclfsfpTsmnAaAg_4EALw_wcB. Accessed 18 Mar. 2024.
2 Comments. Leave new
Hey Collin, the biggest question I have right now is how you will achieve the dynamic aspect. The hinges on the door allow your art piece to move in 3D space. You could try and create the gloomy creepy image you talked about on the opposite side of the door. This would give your artifact an interesting duality between peaceful/calm and unsettling. I think the creepiness of the inside piece would be accentuated by the dark creepy attic. Maybe not the best idea for a house but could be a funny prank on your parents!
Hi Collin, this is a really cool idea and I love the aesthetic you chose. I think that using patterns from Etsy is a very good way to make something easily that looks very nice, and the use of a laser cutter is very appropriate for it (and I hope your parents think it’s cool). I’d like to hear more about the actual door. Are you making it, or is it pre-made? How are they going to get to this door that’s so high up off the floor?