
For my Aesthetics of Design final project, I made a large format pinhole camera in a toyshop aesthetic inspired by the iSpy books of the 1990s and 2000s.
Introduction:
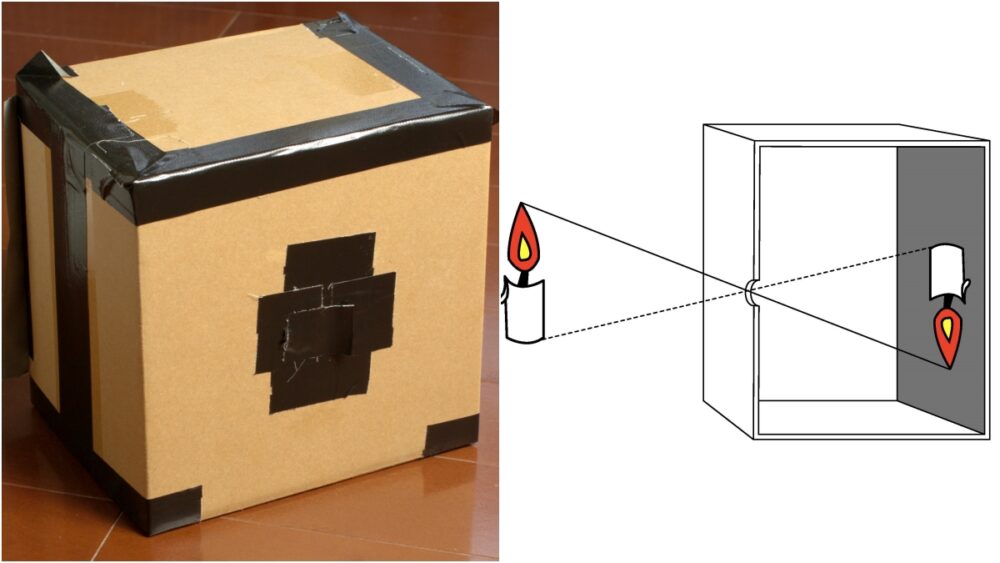
What is a pinhole camera?: A pinhole camera is a very simple image making device that relies on the “camera obscura” effect. They were heavily utilized during the recent solar eclipse! It is essentially a light-proof box with a very tiny hole in one side. This small hole, or aperture, lets a few light rays in that project an inverted image on the opposite wall of the box. Often people put translucent paper on this wall so they can view the image, or put photo paper or film inside to permanently capture the image. Usually, the aperture is covered with another component that serves as a shutter, and the user manually removes it to let light enter the camera for a certain exposure time. Exposure times for pinhole cameras are much longer than for regular cameras, due to the incredibly tiny aperture and some resulting diffraction (less light + more spread out light).

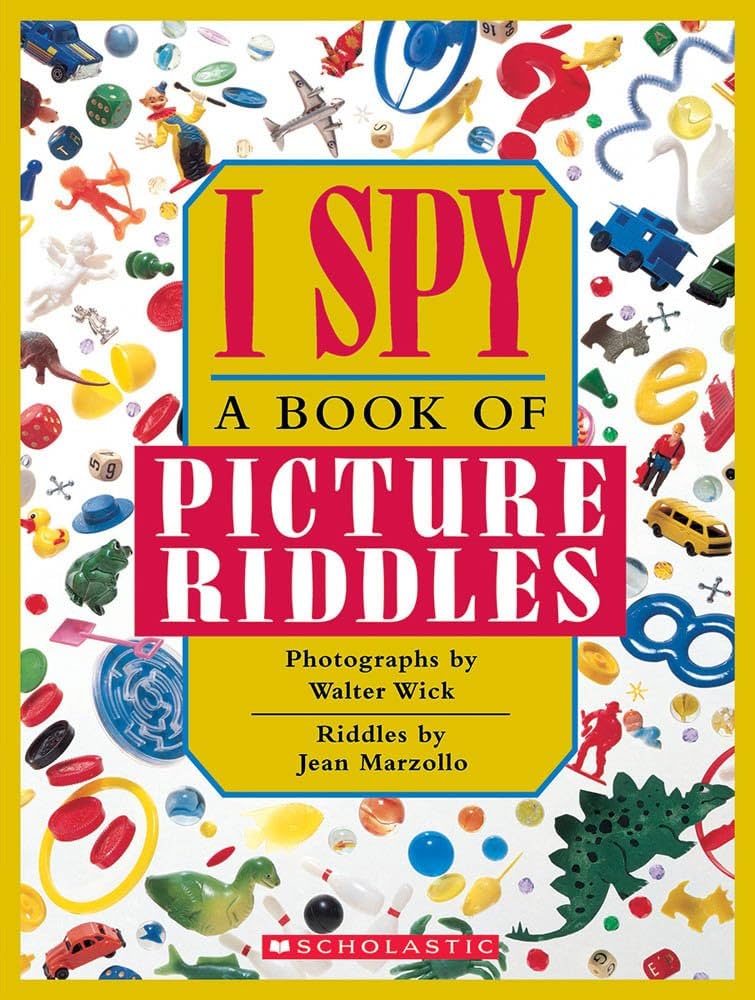
iSpy Aesthetic: The aesthetic of the “I Spy” books evokes nostalgia for my generation and features an eclectic array of classic children’s toys like wooden blocks, dice, marbles, cars, and knick knacks. Primary colors are dominant. Imagination, observation, and discovery are championed.
Why make a pinhole camera in the iSpy aesthetic?: A pinhole camera could be considered more of a “toy” version of a classic film or digital camera with a lens (though there is some incredible professional pinhole work). There are some interesting parallels between the “iSpy” concept and pinhole photography–“spying” a composition to capture with a pinhole camera, inviting people to observe, etc. This aesthetic allowed me to work with mixed prototyping materials. Wood and bright colors often come together in the iSpy pages, which meant I could utilize the bright PLA with the 3D printers and wood with the laser cutters. For my camera I was really inspired by this particular image from an iSpy book.

Design:
Ideation: I had to design three different subassemblies for this project: a camera body, a spot for the photo paper to sit, and a shutter to expose then hide the pinhole. More of my research resources will be highlighted in the next blog post, “How”!
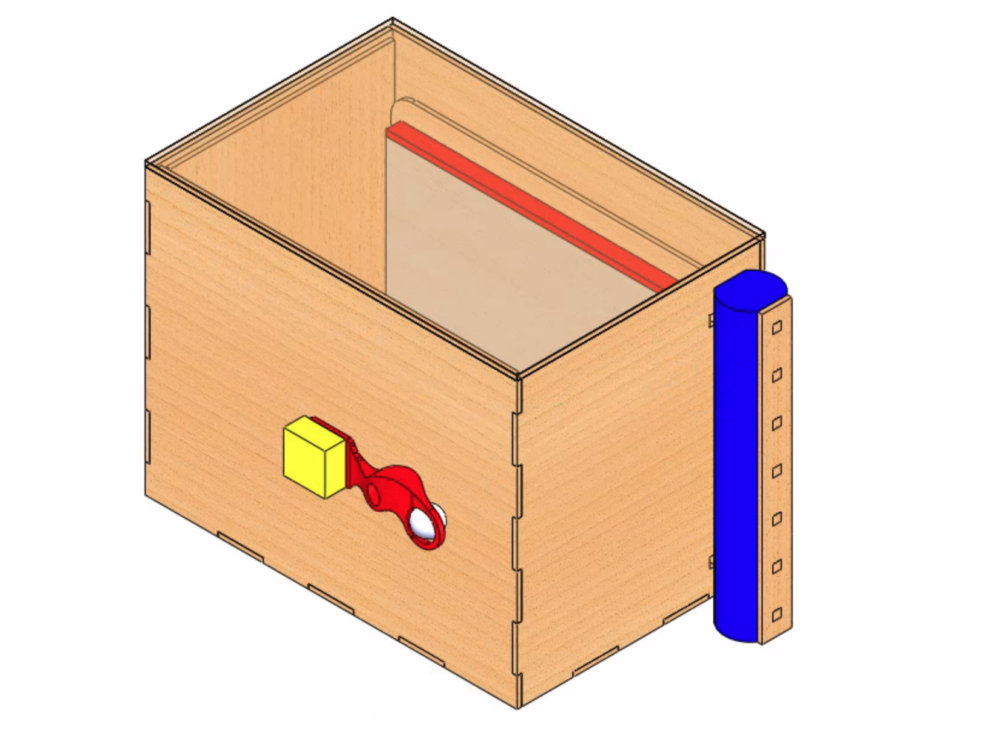
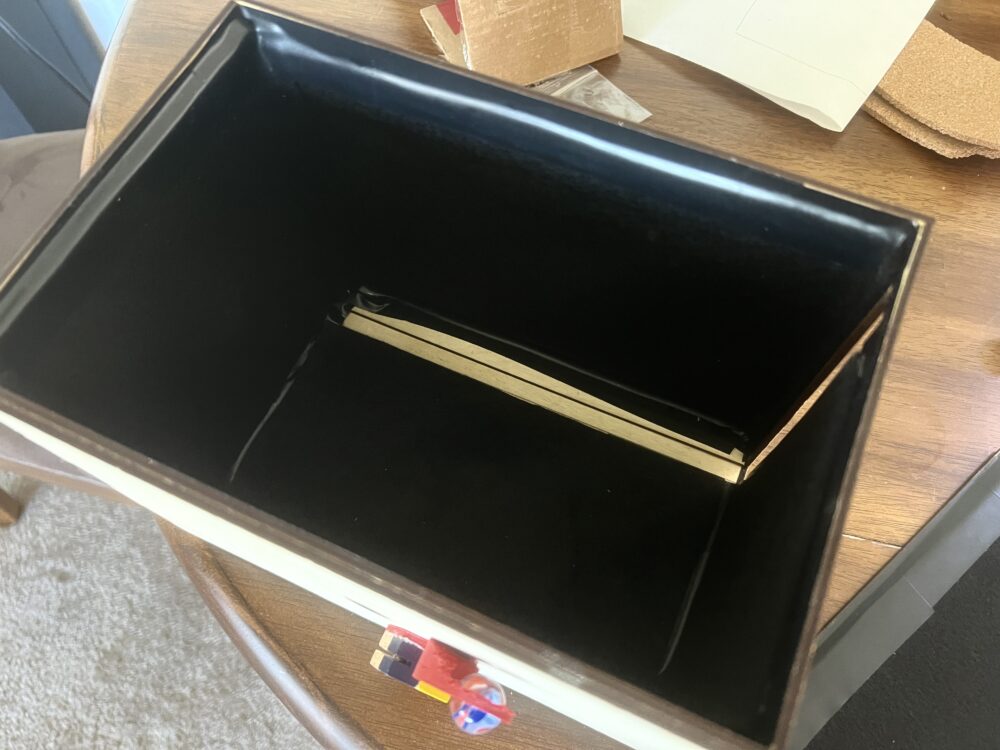
Camera Body: In its simplest form, camera bodies are just boxes. The dimensions are based off of some calculations, and the form allowed itself for quick manufacturability. The box also serves as a good canvas for fulfilling the aesthetic.
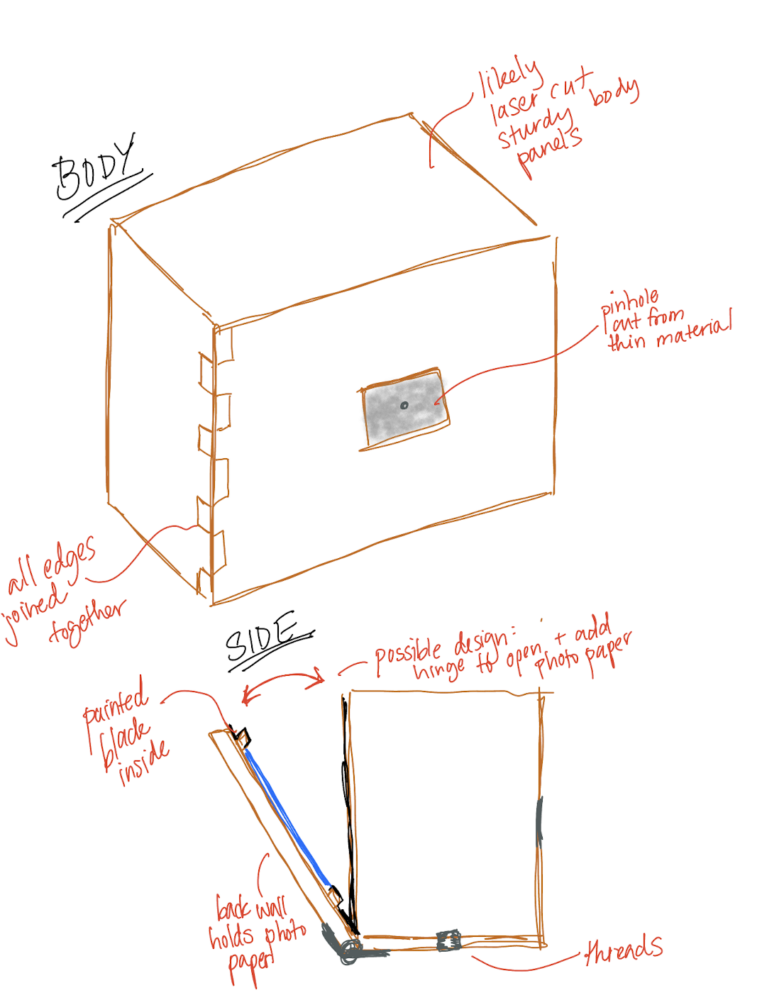
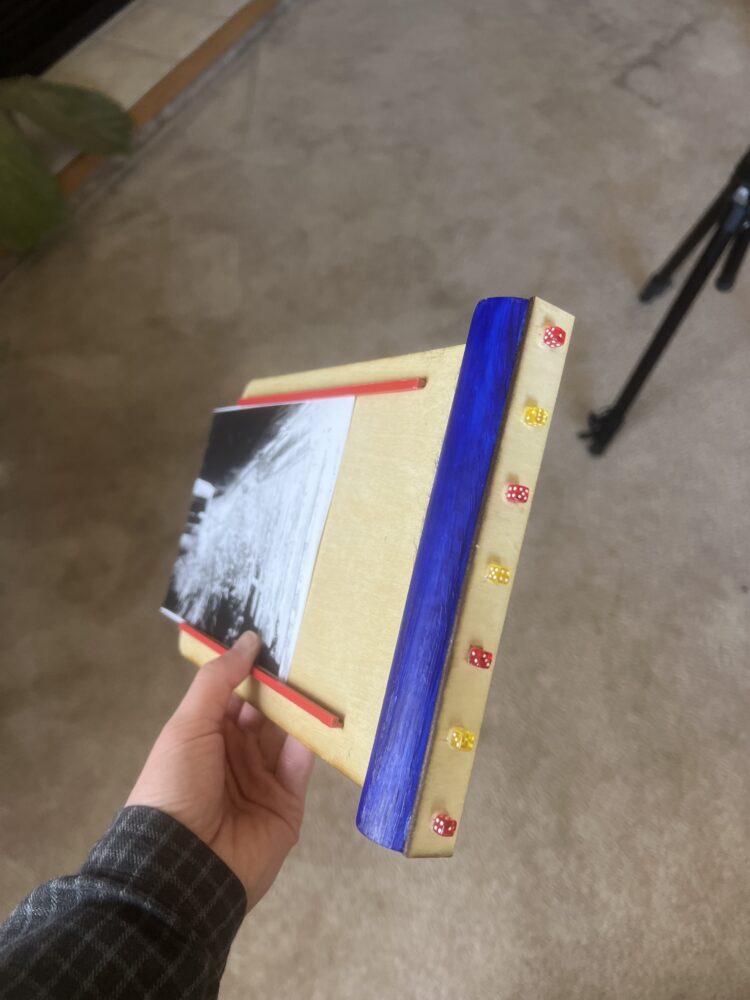
Film Slide: I wanted my camera to actually be able to capture photos. For pinhole photography, this meant my options were to utilize photo paper or film. Photo paper is easier to use and requires less steps to develop, so it is a better introduction to pinhole photography. The photo paper needs to sit at a certain distance from the pinhole, and be easily inserted and removed. My ideas for this included a hinged back of the camera body, placing the photo paper along the back wall, or having a film slide like other large format cameras.
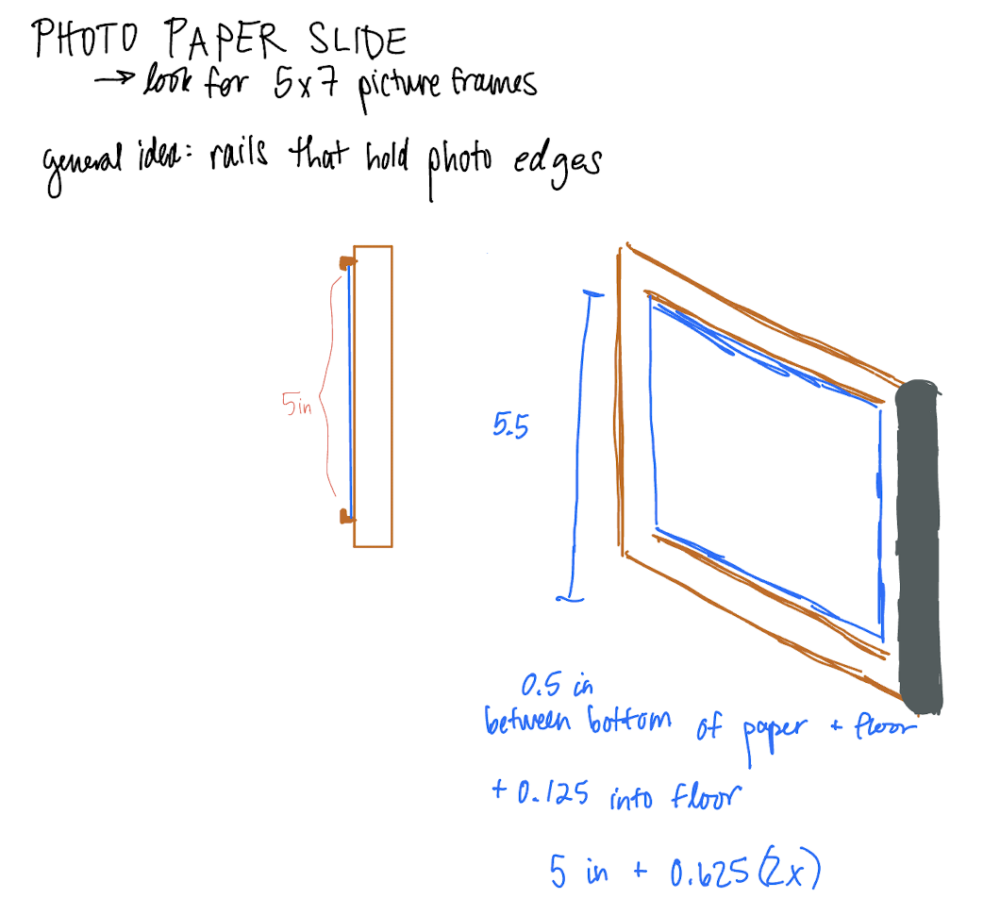
I ultimately chose the film slide method of inserting and removing the photo paper as I thought it would make for more closed-off box (for preventing light leakage) and an opportunity to decorate the camera more.
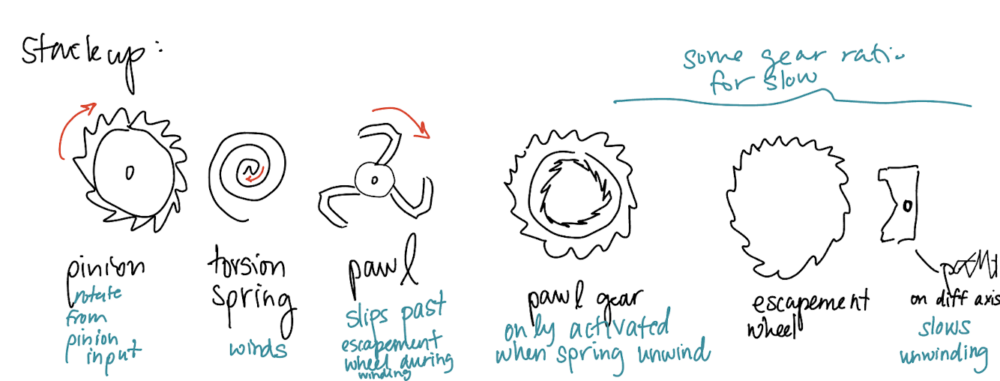
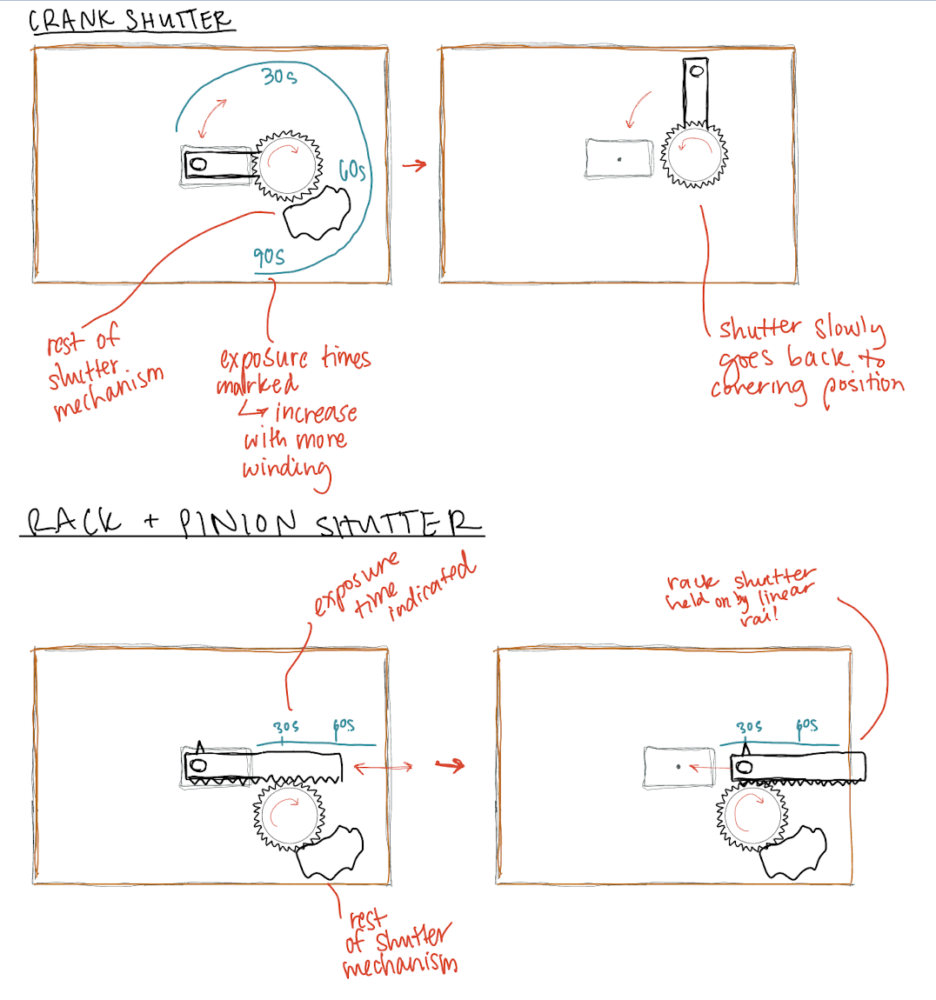
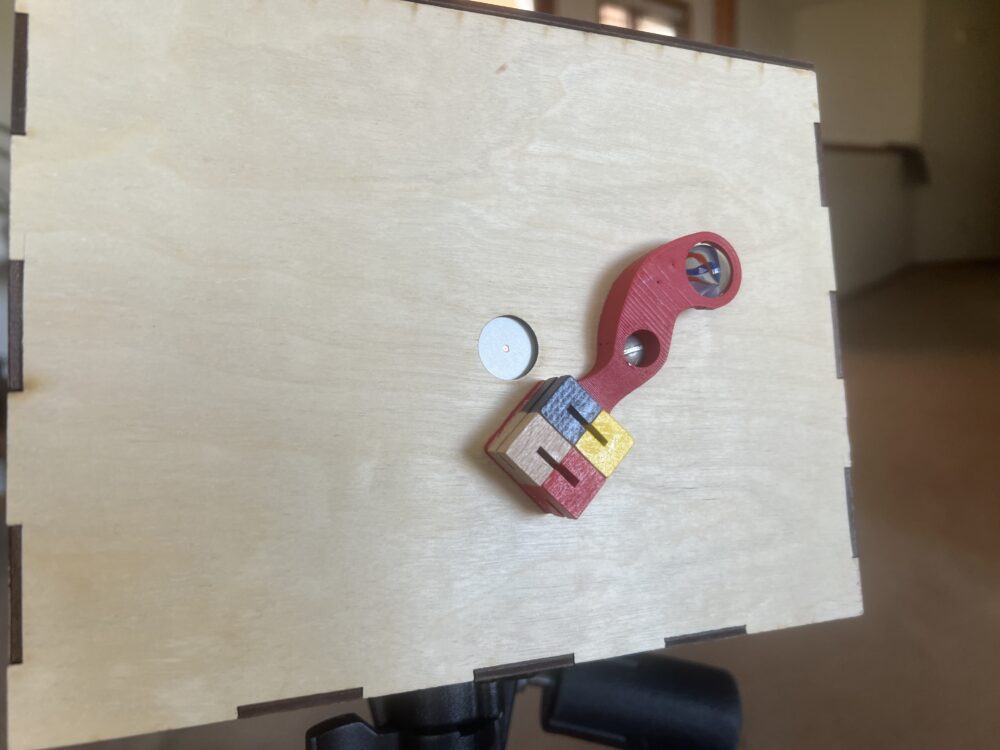
Shutter: The shutter needs to have a default state of covering the pinhole, then expose the pinhole, then return to the default state after the exposure time. It is usually attached to the outside of the camera body. My initial plan was to make an automatic shutter mechanism that exposes the pinhole to light and then covers it for variable amounts of time, inspired by mechanical timers, clocks, and wind up toys that don’t use electronics for the timing system. I thought a wind up toy type of shutter would be a great nod to the aesthetic. I researched this type of system heavily, but in the end I unfortunately did not have enough time to prototype it, so I went with a manual shutter that still has a fun dynamic component. As expo approaches and for a personal project, I aim to still explore this as a possibility for another pinhole camera.
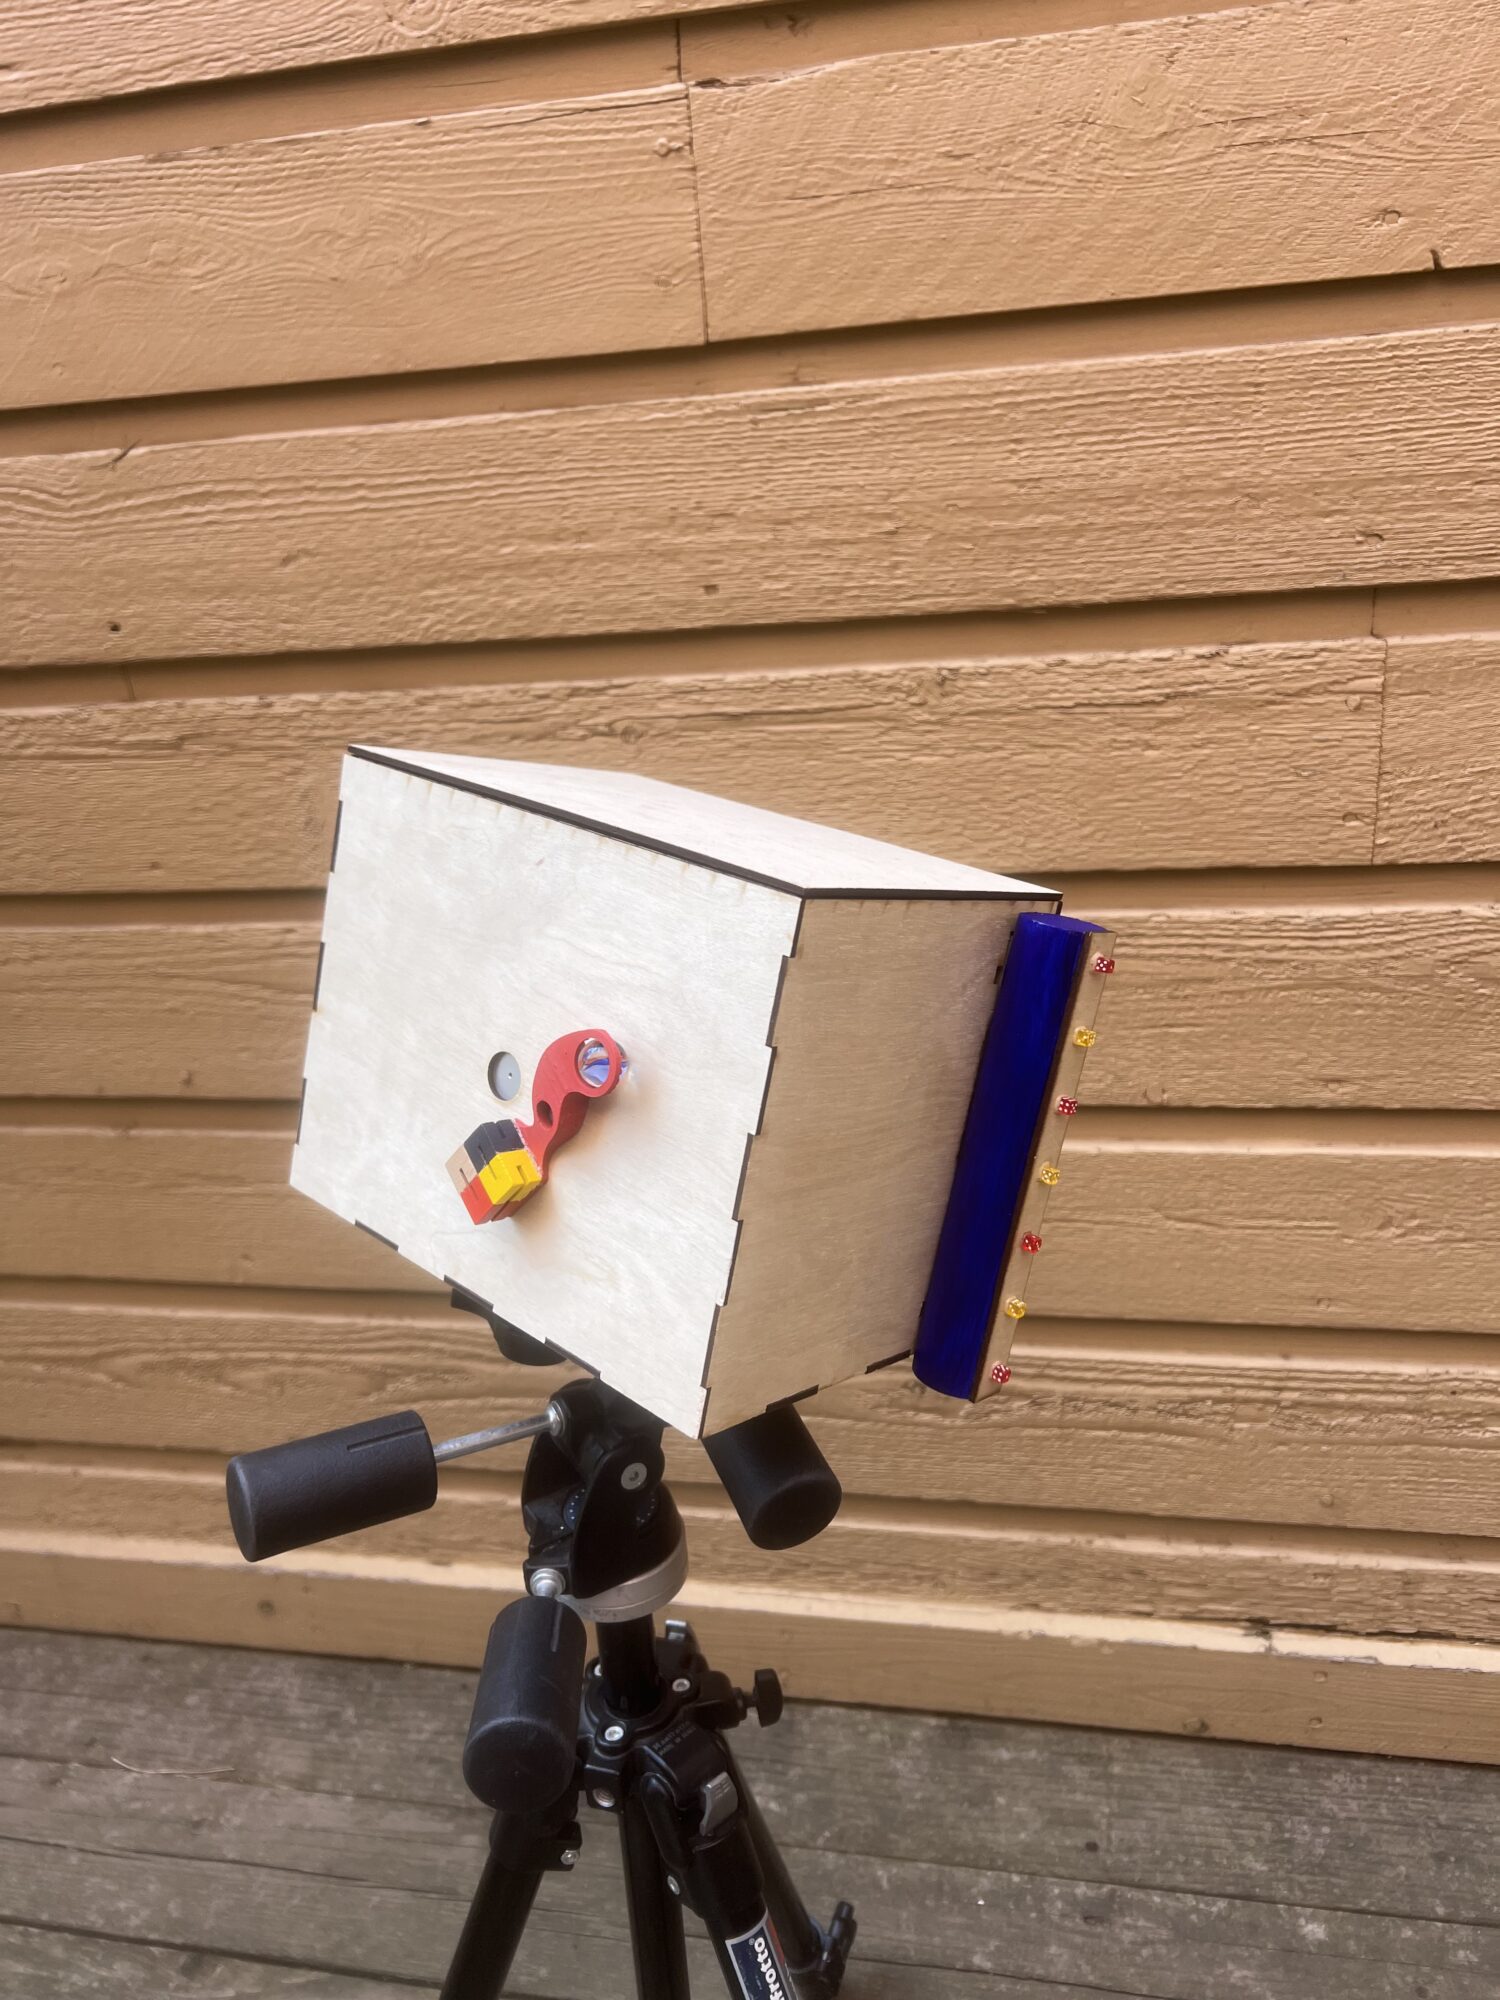
After visiting the Into the Wind toy store, I got some marbles and designed a shutter that rolls a marble along the front of the camera as it is opened and closed.
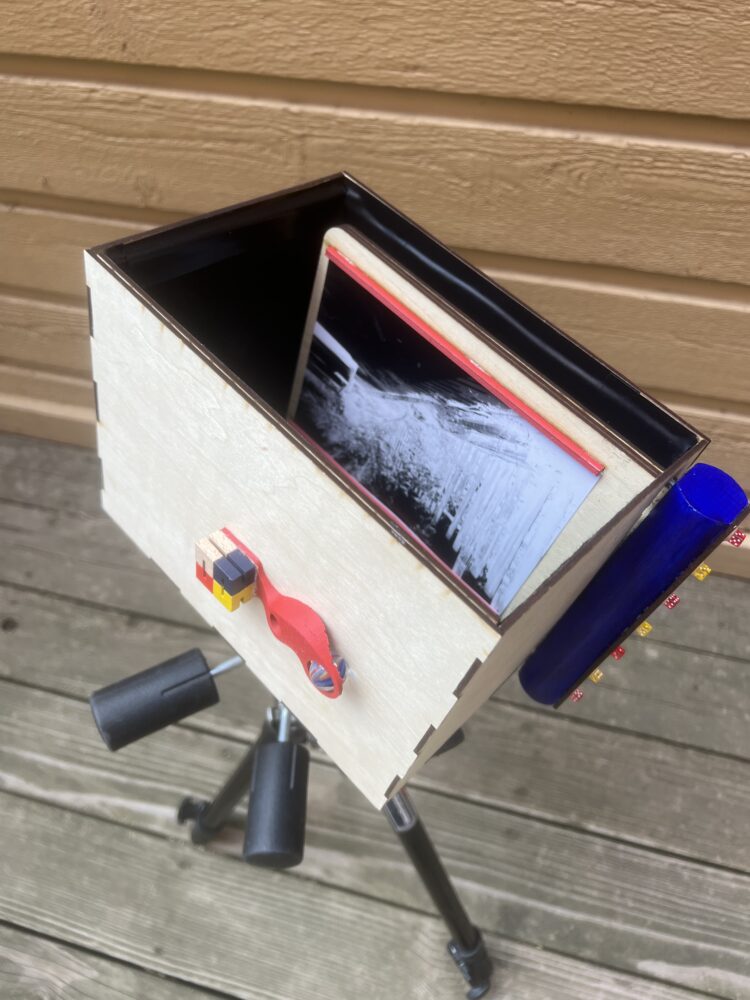
Final Design:
Functionality Features:
• 0.4mm pinhole
• Film slide that holds 5×7 photo paper
• Wooden camera body with focal distance sized around pinhole calculation
• Inside lined with black tape and felt to minimize excess light from hitting the photo paper
• 2 1/4-20 threaded inserts for attaching the pinhole camera to a tripod in both landscape and portrait orientation
Aesthetic Features:
• A wooden camera body brought together with finger joints to evoke the wooden blocks and landscapes of the iSpy image
• Bright, primary colored accents through the film slide (red paper retainers and blue handle) and shutter
• Various toy decorations: tiny dice dotting the side of the film slide, wooden puzzle blocks (arranged to look like a set of eyes) and a marble as part of the shutter
• A sense of whimsy through the sweeping lines of the shutter
How it works:
1. A piece of photo paper is loaded onto the film slide in a dark environment (darkroom or film changing bag)
2. The film slide is loaded into the pinhole camera in the dark environment
3. The camera is brought to the shooting location and placed onto the tripod
4. The shutter is opened for the desired exposure time and a negative image is created on the photo paper.
5. The shutter is closed and the camera is returned to the darkroom
6. The film slide and photo paper are removed from the camera. The photo paper goes through a series of developer, fixer, stopper, and water chemical baths.
7. To get the positive image, a contact print is created from the photo paper negative.
References:
[1] https://www.alternativephotography.com/how-simple-can-a-camera-be/ [2] https://www.latestly.com/social-viral/how-to-make-pinhole-camera-follow-simple-steps-to-make-an-easy-diy-pinhole-camera-at-home-watch-video-5499119.html [3] https://m.media-amazon.com/images/I/71sWQ2lqKPL._AC_UF1000,1000_QL80_DpWeblab_.jpg [4] https://www.reddit.com/r/nostalgia/comments/70l1ch/can_we_talk_about_how_incredible_the_photography/
3 Comments. Leave new
It good
Katie, this is a very interesting and cool project idea! The use of the iSpy aesthetic is very original and reminds me of simpler times when we were much smaller. I’m curious, what did you mean by a sense of whimsy through the sweeping lines of the shutter? How would you implement that? I look forward to the second part of this report!
This is awesome Katie! I love the aesthetic choice and how you are integrating your motion system is really cool! I am super excited to see the how of all of this build coming soon! I do have one question though, are there any times on might optically flip the image again so that its a reflection instead of an inversion?