

Blog: Final Project Report: What and How. Overall description and photos, then details of what you have made: CAD drawings, fabrication description, costs vs budget, etc.
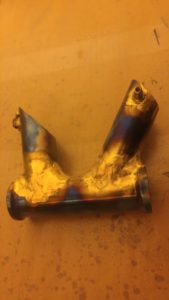
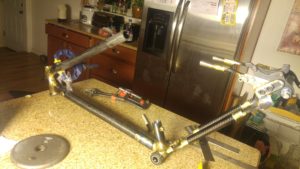
The frame is finally all assembled. At this point, all the remains before it can be built into a operating bicycle is curing of the epoxy, some finishing work and paint. After that it will have to have the bottom bracket retapped and the seatpost reamed.
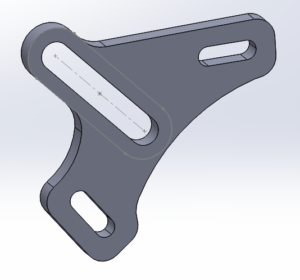
The jist of it is a long distance 29er mountain bike. The top tube is unusually short for an upright riding position and accommodation of drop bars. It has disc brake mounts, sliding dropouts and down tube shifters as an option.
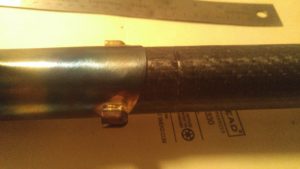
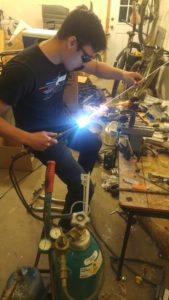
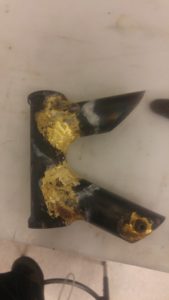
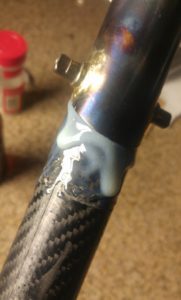
The steel portions are surface treated with torch bluing. The steel is connected with brass. Between the steel sections are long portions of carbon fiber tubing, some of which were made at home, some of which were purchased.
The How
First, the geometry was researched. Past experience and the decisions of other manufacturers lead me to decide upon a geometry. This geometry was drawn up in a sketch book, and the angles and tube cuts were determined by hand.
After spending approximately 100 hours on calculations, the tubes were all machined. I found a critical error in my calculations, and the process was repeated, this time in solidworks.
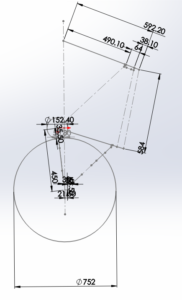
This geometry was largely the product of other smaller computer models, and was constrained by the geometric fitment needs.
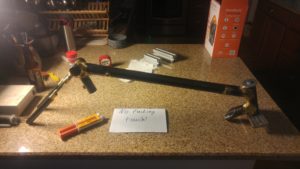
These were machined up from 4130 steel.
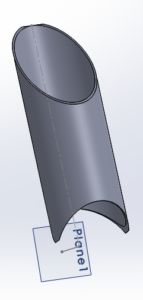
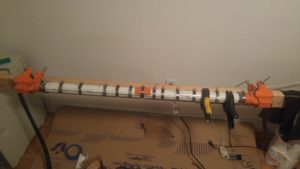
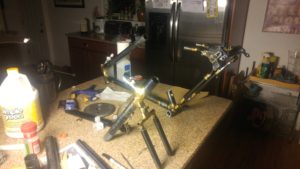
For making the carbon fiber, I took carbon weave sheets, impregnated them with MAX1618 epoxy, wrapped them around a bicycle inner tube and pumped this tube up into a PVC pipe. The first sets of these tubes were instron tested to verify that they would hold up. This bike is quite over built.
The steel pieces were brazed together, stripped of excess oxide and borate, and torch blued.
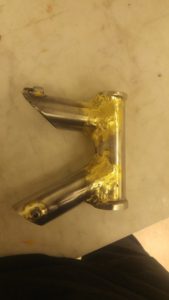
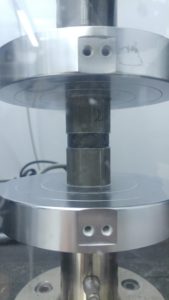
The various steel assemblies were connected with carbon tubing. The aerospace adhesive Loctite e120HP Hysol was used. It was a shear strength of over 4000 psi, and was tested to perform closer to 3000 psi with my application.
In order to provide consistent adhesive coverage, a bond line controller was used. The ideal adhesive fill gap between the steel and carbon is about 0.007″ to 0.012″. 0.007″ glass beads were used as a bond line controller, mixed into the adhesive. The carbon fiber was machined down to provide a gap of approximately 0.010″.
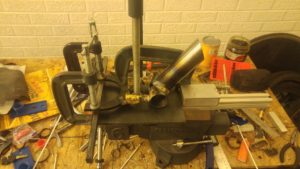
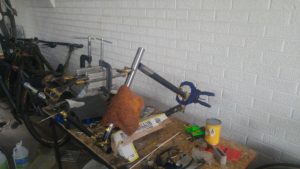
Geometrically and structurally speaking, the lower tubes of the frame provide the most important role. This starts at the head tube, and runs down the down tube towards the chain stays and dropouts. The lower assembly was made first, that is to say. Each mate was sanded and cleaned with 5 or more runs of degreaser.
The down tube was connected to the bottom bracket. After this cured, the head tube and chainstays were affixed. This was followed up with the dropouts, which were bound by a provisional axle.

The intersection of these tubes was measured to determine how to braze the last lug. I would hate to braze it according to my calculations, and find that errors in my tube straightness and the like had made my final lug worthless.

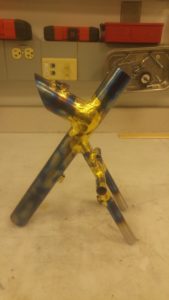
That leaves us with this. An old style lugged carbon frame with even older style gun bluing. All with modernized component compatibility. I suppose in the end, with it’s 1800s retro-futurist aspect, it’s a steampunk bike. I personally was leaning a bit more techno cowboy than Victorian England, but the brass really dominates.

There are some finishing touches. I want to refinish the carbon fiber and clear coat it. After that, just needs to have parts fitted to it.
BUDGET
This just completely fell apart. I was determined to finish and to do it right.
Steel: ~$150
Brazing: $240
Carbon: $180
Tools: $100
Total: ~$670
6 Comments. Leave new
Marvelous job with the tolerances, I imagine this came mostly from your superior jigging. Do you intend to add some bottle fillets? Makes me kind of sad that the current build isn’t keeping with your intended era or a modern full group, but I understand money gets in the way. Overall this is an amazing project and I’m very impressed how cheap you were able to do it with. Maybe add some parts where you could potentially cut cost.
Awesome project! We all know that you put in an incredible amount of work into it and it turned out great. When you presented I just wanted to break one of those carbon fiber tubes, but as you described, they are incredibly strong, thus signifying that your bike is also incredibly strong! Was the brazing a desired look you were going for? I actually think I might like it more if it was more uniform, but that is just me. Overall though, it looks great.
The final project looked great, from the carbon fiber to the brazing, the bike was quite attractive. Putting so much time and effort into the project really paid off, even if some of the smaller details were not met to exact spec, like the warped carbon member. One note, the rear end seemed quite flexible as you were riding, you may get a bit of dampening out of the rear triangle similar to a MOOTS frame, on a second attempt would you consider adding suspension?
Good work, I’m sure we’ll see your ride around campus.
What do you mean it looked flexible? Could you see visible flexing? To some degree, that is in the design. The chainstay has leaf springs like parts in it. The flex shouldn’t be visible though, so this worries me
I’m not sure what the next frame will be, but full suspension is tempting
Awesome project! Having made the carbon skateboard, I understand the pain with carbon you may have had. I like the look of the brass and the carbon, its a great mix and contrast of materials. For the carbon tubes, did you consider using a metal tube as your mold and wrapping the layup in a vacuum bag or plastic? It may have helped get a cleaner surface finish. Overall, this is a very impressive project that came out looking great!
The critical dimensions are on the outside of the tube, and with my process, I think I needed to do it the way I did.