
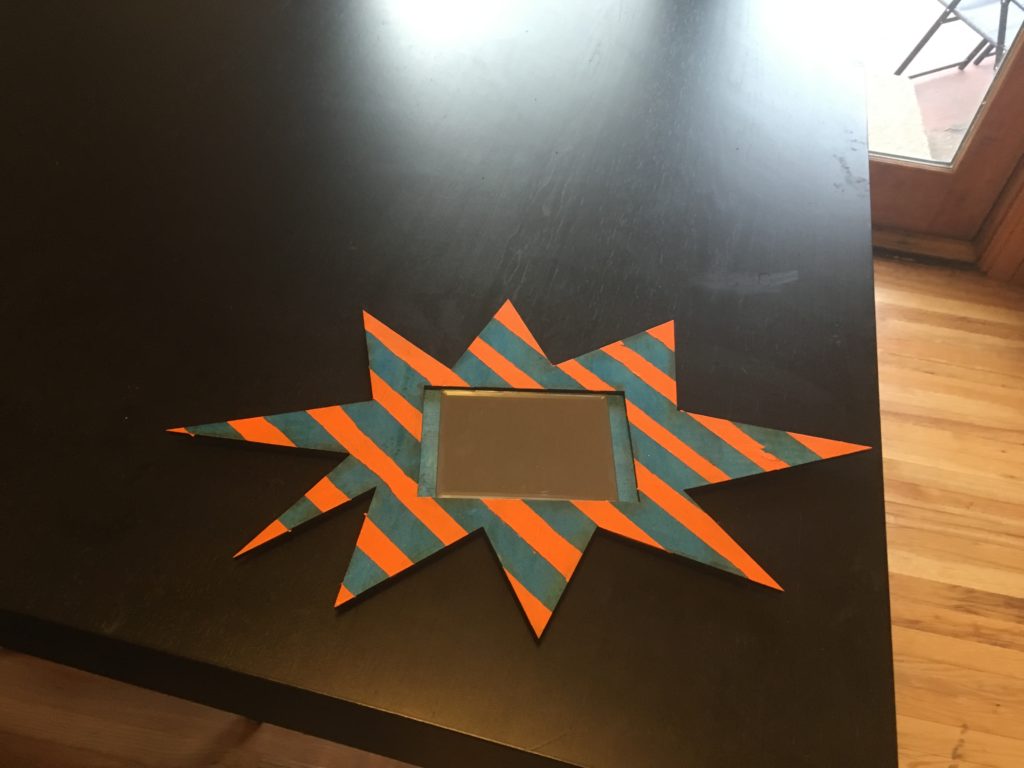

Design: The original design I covered in my critical design review was much bigger and much more complicated. I wanted a smaller mirror to fit in my bedroom, that I could easily move with once I leave Colorado. I also got rid of a lot of the edges and went with a simpler design with less spines. The inside and outside of the spines fall on two ellipses so only their angle and side length are random, the outside and inside points still fall on a circular ellipse. Unfortunately, the smaller mirror meant that I could not fit the Raspberry Pi behind the mirror anymore as I had planned in my CDR. For now, the Pi will sit on my dresser and will not be physically connected to my mirror. Later on, I would like to find a way to physically connect the Pi and mirror


Aesthetic: My inspirations for this piece was to capture the 1990’s aesthetic of sharp-shaped corners and funky coloring and apply it to a futuristic concept; the smart mirror. My aesthetic will fall along the lines of “what would a smart mirror look like if it was created in 1994”. Being born in 1996, I grew up in a time where these design elements were very common and remind me of my childhood. My other inspiration for this piece was that I currently do not have a whole lot of art in my room, nor do I have a mirror. I would like to design something that I can use regularly that reminds me of my childhood with the aesthetic that I am trying to portray. The smart mirror features will be amazon Alexa integration and possibly a camera that can identify and acknowledge me. These features help add to the futuristic aesthetic, and will make the piece more interesting and more useful once installed in my home
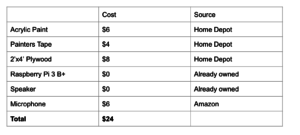
Budget
Manufacturing: I cut the mirror frame and back panel on the laser cutter at the ITLL. It took me a couple of tries to get the cut right due to my unfamiliarity with the material. Next I superglued the back panel onto the mirror, and went about painting it. I used a glittery blue acrylic paint for the base layer, of which I applied two layers. Next I covered parts of the frame with painters tape to create a striped look, and painted two layers of orange acrylic paint onto the frame. Taking the tape off did not go as well as I wanted it to, and it kind of ripped up some of the paint in a way that I was not expecting. Once the paint dried, I super glued the mirror to the frame
Raspberry Pi: The Raspberry Pi hosts the microphone, speaker and CPU that handles all of the Alexa requests. It is linked to my Amazon account, meaning I can perform any action you could perform with a normal Alexa (except streaming music). In order to set this up, I had to download all the necessary files from the Amazon Vendor Services website. I then built the AVS device SDK using the scripts I downloaded and instructions from the internet. Once installed, I acquired the refresh tokens that allowed me to authenticate my device and was then able to talk to Alexa. I then connected the Raspberry Pi to a speaker using an auxiliary cord. I had wanted to use the bluetooth functionality of the speaker to hook up to the Raspberry Pi but that proved more difficult then I had anticipated

Video: https://youtu.be/fk0fs-5reVw
10 Comments. Leave new
It’s interesting that we got to see two different versions of a smart mirror design in out pod. I enjoy that you both went for very different aesthetics and both executed them successfully in a similar project. I like the colors. Good job!
It turned out really cool! I dig the rugrats theme! brings back some memories.
[…] overview of how this project came to fruition and how the manufacturing process worked can be found here. A report describing my inspiration, next steps and overall happiness with my final piece can be […]
Can you show a video of your project work? I am confused on how the final results are and what are the functions of the mirror. I love the aesthetic you have chosen, its bright and fun vibes bring a smile to whoever looks at it.
This is such a fun aesthetic! It’s super nostalgic which is really contrasting with the technical aspect. I like how you cut it and painted it to resemble 90s TV shows. Good job Andrew!
Your project came out really nice. The aesthetic is interesting and made for a unique final product. I can see this being placed in an elementary school or a playground.
I think your project came out just the way you wanted! It was really cool that you incorporated the Alexa command software! I think that addition really pushed your project to the next level. Also, the aesthetic was really fun and unique, and added a cool twist to the project. Well done!
Cool project! I love the 90’s aesthetic you went for. It reminds me of my childhood and watching Rugrats. I also think it’s really cool that you made it an interactive mirror.
Great project Andrew. Loved the 90s Vibe of the project. If you are looking for a solution to mount the raspberry pi, you could just use VHB adhesive on the back of the mirror.
I really love your aesthetic. Watching your presentation gave me nostalgia seeing all those Rugrats images. The functionality of your project is really cool! I think this will be a project you are still using long after the end of this class. Good job!