
Final Project Report Part 2: Vortex Waterfall
Introduction
As the COVID-19 pandemic unfolded, I decided to re-scope my project. Instead of manufacturing anything, I decided to use the past few weeks to really focus on the design and create renderings and an animation of the device. I have also pivoted my idea to designing a water vortex desk ornament. Previously, I was going to build a water clock: water would drip over a sensor, and from this sensor reading, a digital clock would be ticked and displayed on the device’s LCD screen (view my previous post here).
Because of the campus closures and not having manufacturing resources available, it would not have been reasonable or possible to get everything manufactured within my budget and timeline. As my design of the water clock was also limited by the manufacturing processes and materials I had available, I was limited in exactly what I could accomplish aesthetically. Meaning, it was more challenging to achieve my target minimalist/Apple aesthetic using laser cut acrylic. Apple uses a lot brushed aluminum, curvy and organic shapes, and typically black accents. This would have resulted in a project cost that was above my budget and would have been difficult to achieve before the end of the semester.
The Vision
My aesthetic goals for the project will be measured by how well my device fits in with the other devices in the image below. To do so, I am targeting Apple’s minimalist and modernistic aesthetic. I am using brushed aluminum and clear plastics. The device is extremely simple in function, but has an advanced look to it. The goal for this device is to be an eye-catcher and grab peoples’ attention. Refer to some of my previous posts to learn more about why I chose this aesthetic.

Inspiration
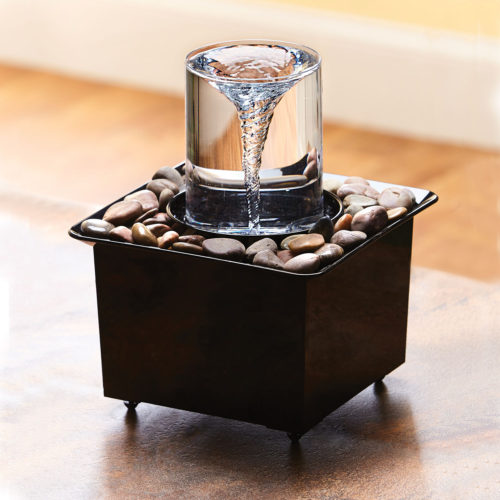
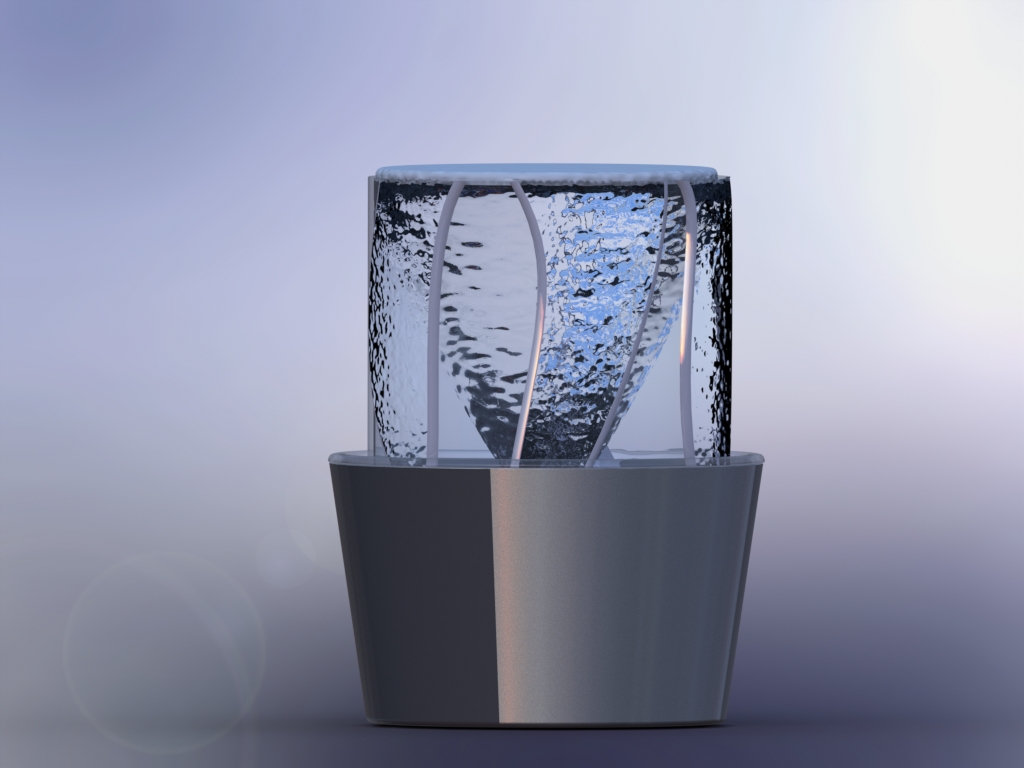
When I attempted to modify my previous “boxy” design to adhere more to the Apple aesthetic, it proved to be really difficult to utilize the same concept of dripping water, sensors, and LCD screens. I instead essentially started my design process over again. I knew I wanted to still incorporate water in some way, but wasn’t sure exactly how. So, I went online to look around at various water fountains and other decorative items that utilize water. I then stumbled upon vortex waterfalls and immediately found myself doing more research on them including how they work, the math and fluid mechanics involved, where to buy them, etc. I stumbled on the one pictured below and decided I wanted to recreate this using the Apple aesthetic.
After deciding that I wanted to make a vortex water fountain, I began to brainstorm what the device would look like. I knew I wanted to keep the design as simple as possible, minimizing parts and simplifying the functionality. I was inspired by the video below in which someone makes one of these waterfalls from up-cycled materials.
From here, I went into SolidWorks and started from scratch (sometimes I find it is easier for me to go straight into CAD in the brainstorming phase rather than starting with specific sketches). I knew I wanted the design to be cylindrical, but wanted to incorporate a draft angle into the base to add some three-dimensional aspect to the device (I thought that a straight cylindrical device would look boring). After going through a couple iterations of the base design, I modeled the cylinder. At this stage, I was bouncing around with dimensions quite a bit, but in general knew I wanted it to be desk-sized and stand less than 10 inches tall. The cylinder needed to have a smaller diameter than the base to ensure that the water lands in the container as it overflows from the top of the cylinder
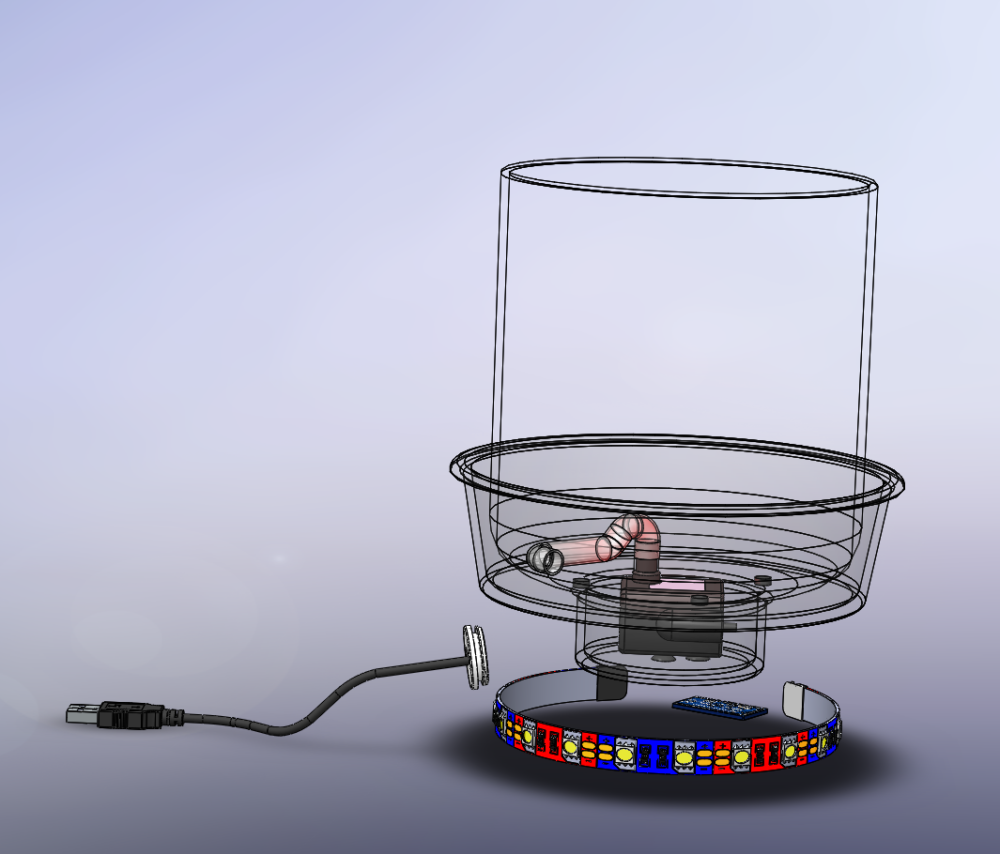
After I modeled the cylinder, I started to think about how the cylinder would sit in the base of the device. Then, I needed to determine how the water would be contained and how to isolate the water from the electronics. I went back to the video above and landed on designing a pan to hold the water; the pump could then sit in the pan. After going through a couple iterations of the pan design, I decided it would mount flush with the base for easy assembly and maintenance. From here, I added the LED strip and the accompanied lighting effects in SolidWorks. After adding all the appearances to the parts, I started rendering to get a glimpse of how it looks.
The next step was modeling the water. This took some time as it is really difficult to model water with 3D solid parts. I tried a few things such as a helical sweep with a draft angle to create the vortex as well as using revolved extruded cuts of varying geometries. As I continued to render the CAD, the water started to look more and more realistic. I then modeled the water overflowing and dripping down the side of the cylinder. I was pleasantly surprised how it all came together as well as how the rendered images came out.
Timeline and Design Process
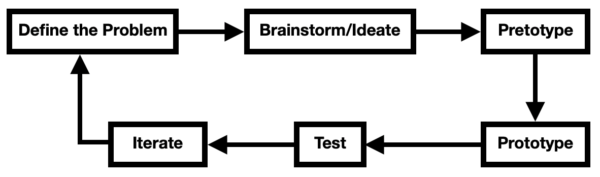
My design process for typical engineering projects starts with identifying the problem, brainstorming, prototyping, iterating, fabrication, and testing. It is typically a highly iterative process. Refer to the image below for my ideal design process.
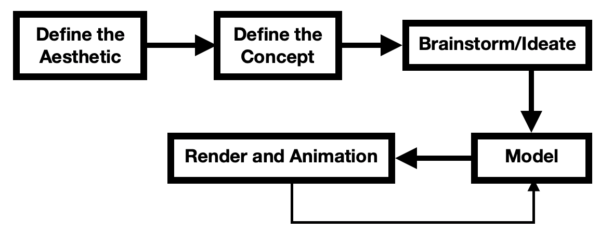
Because the timeline for this project was much shorter than the timeline I usually have, my design process needed to be trimmed down. I didn’t have a lot of time for iteration. I knew which aesthetic I wanted to work towards and had an idea of what the concept was. I then needed to continue brainstorming and fleshing out the design. When it came to creating the rendered images and animations, it was a highly iterative process. Refer to the image below for a flowchart of the design process I used for this project.
Below is a table of the milestones and deadlines I used to complete the project. At this stage, the design, renderings, and animation is complete. I completed the project right on schedule (4/15). I am currently working on documentation and preparing my presentation.
Device Overview
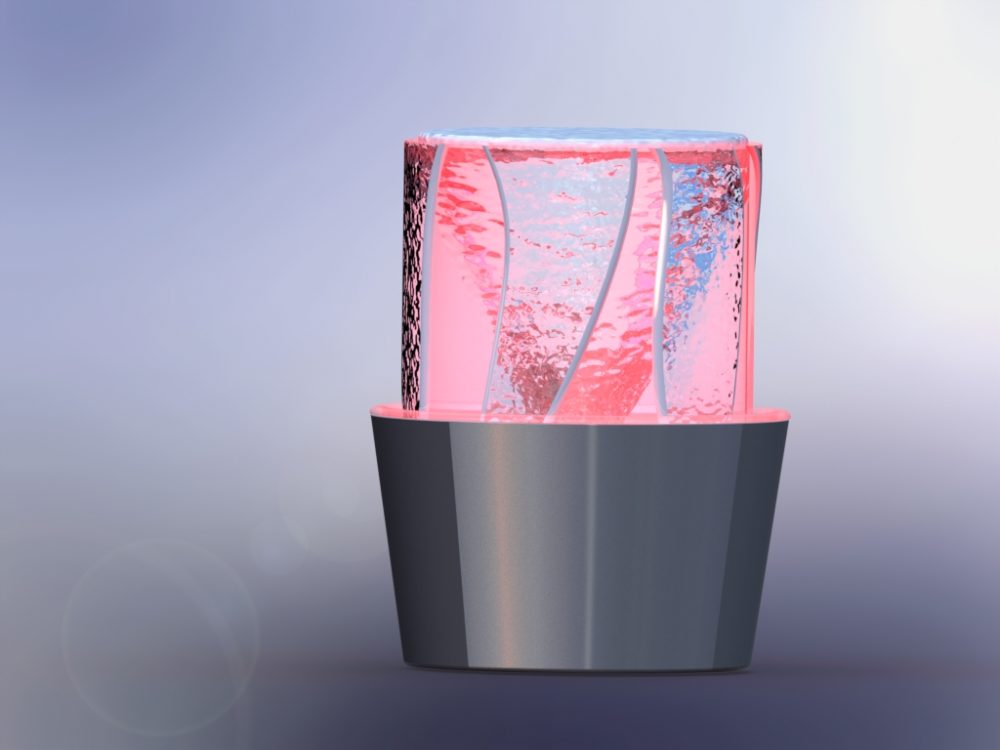
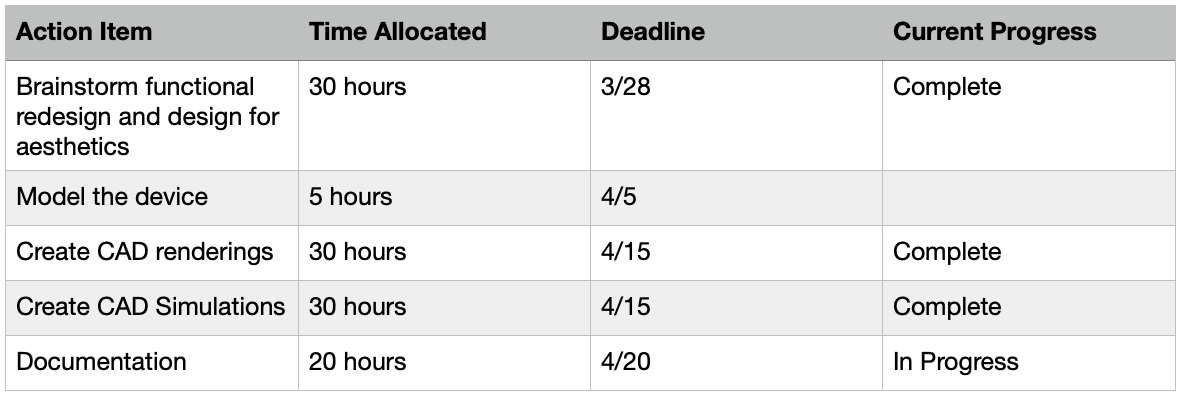
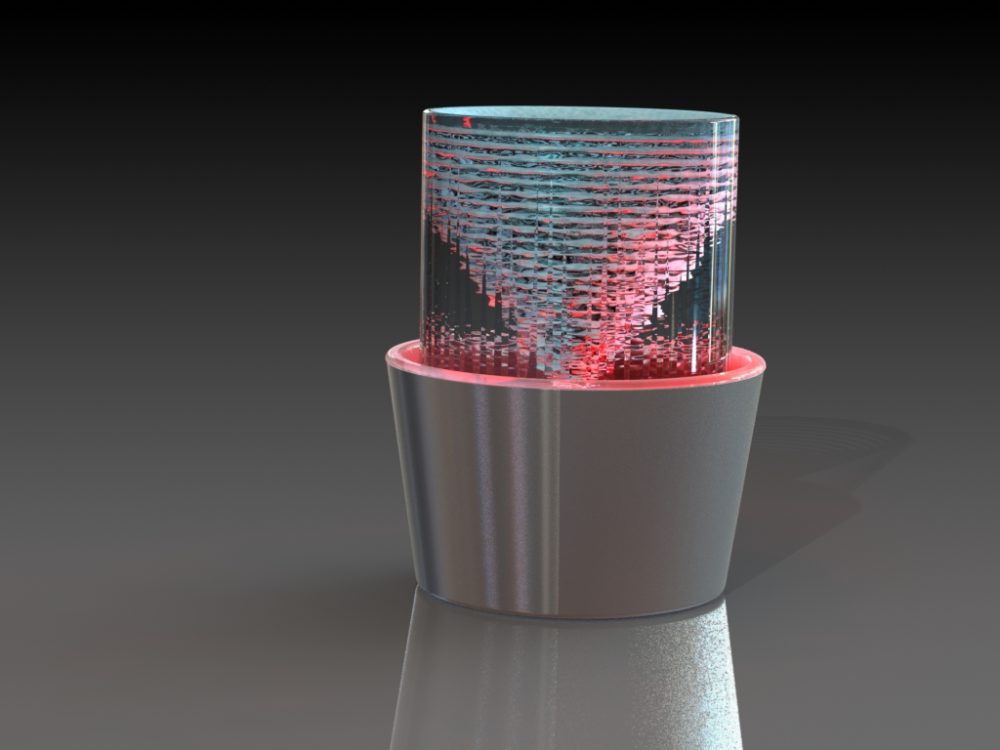
Below are some of the renderings I have created. The idea here is that a pump (aquarium pump) similar to the one I proposed earlier in the semester will be used to pump the water up from a bowl-shaped reservoir and send it in a spiral pattern. As the cylinder fills up with spiraling water, it will begin to spill over the top of the cylinder and return to the reservoir to be pumped into the cylinder again. I have added an LED strip; as the light refracts through the water and cylinder, it can offer an interesting glow and an eye-catching aesthetic. Because my device is no longer square-shape, it was difficult to incorporate an LCD screen.
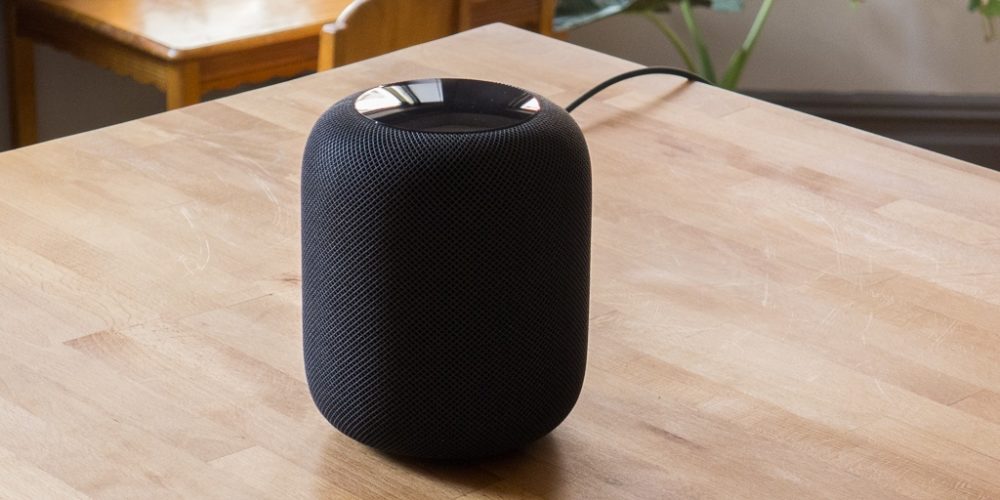
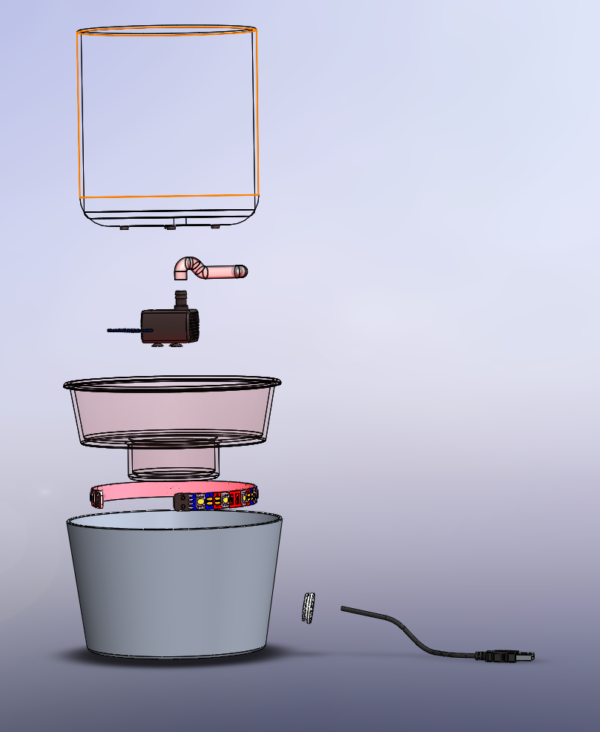
As I played with a couple ideas of how to incorporate a sensor and LCD screen for the clock, it began to take away from the aesthetic. So, I went back to look at Apple products and returned to the roots of this aesthetic: simplicity. Without the additional components, the design remains more sleek and simplifies what types of electronics are needed. I also concluded that the clock portion of this device does not add much to it. There are three main components in this assembly: the cylinder, the water pan (reservoir), and the base. I used Apple’s HomePod device as my design inspiration and is pictured below.
Preliminary Renderings
For the preliminary CAD renderings, I used a helical sweep to create the ripples of the water vortex. I wasn’t happy with the way this turned out, so I decided to model the vortex using a revolved extruded cut. In doing so, I was able to change the height of this extruded cut as the top of the water raised. In other words, the dimensions of this extruded cut are a function of the height of the water. When watching one of these waterfalls fill, the vortex geometry starts as a bowl shape, and as the height of the water increases, the vortex gets skinnier and skinnier. This helped with creating the animation. While watching the animation, notice how the shape of the vortex changes. I then used the water appearances in SolidWorks to get the blurred-water effect.
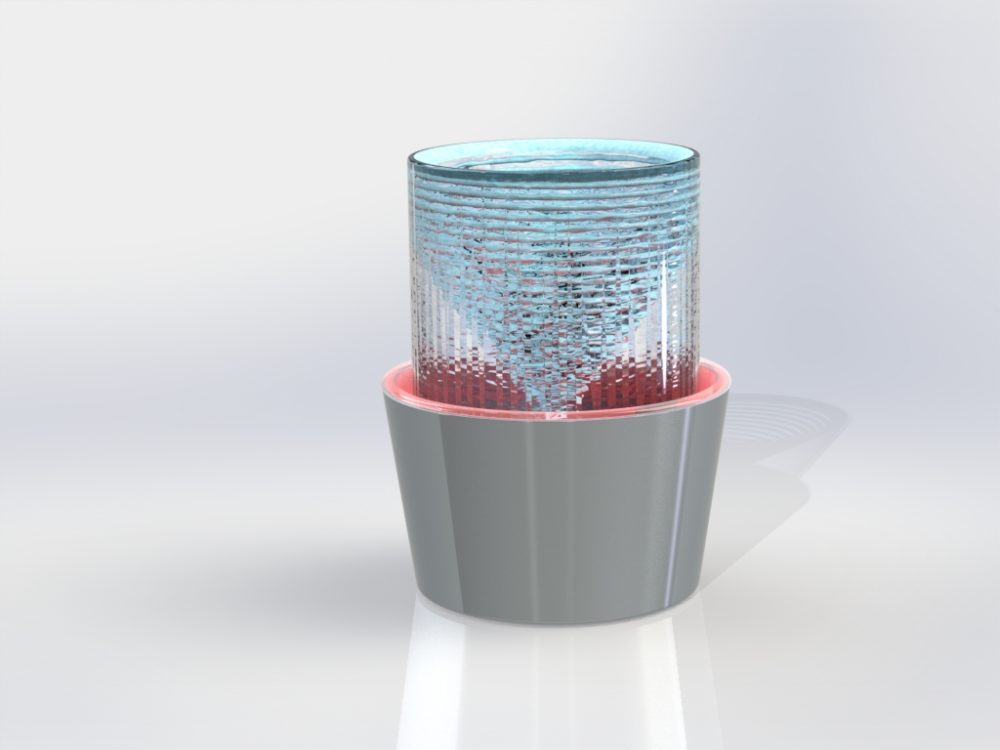
I made about 20 renderings and about 5 different animations. In the rendering below, notice the LED light is not intense enough to refract through the water. I had to move these lights around and alter the intensity, ambiance, and color of the lights. Notice that I had also changed the background of the renderings a few times.
Design Overview
The device is desktop-size and stands about 8.5 inches tall and 5.5 inches in diameter. It consists of a transparent acrylic cylinder and is designed to be cast. Other possibilities are blown glass or polycarbonate. I decided to go with acrylic to reduce the cost of the device. However, the bottom of the cylinder does have some organic curvature, so it is possible this may need to be redesigned, or designed so it can be made out of blown glass. The cylinder is responsible for containing the water vortex. On the bottom of the cylinder are four feet that stand the cylinder off the pan to allow water to run underneath the cylinder and get to the pump.
The pan contains the pump and the water. It fits flush with the base of the device. I have designed it to be made out of ABS, and could be injection molded (if I were to mass produce) or machined (the design is not optimized for machining on large scales). The pan is transparent (or mostly transparent, difficult to achieve with injection molding) to allow for the LED lights to shine through. The wall thickness of the pan is all uniform which allows uniform cooling during the injection molded process; it also has a more than acceptable draft angle.
The base of the device holds everything in place. It is made from aluminum and I have designed it to be casted. The base will then need to be post machined to achieve the necessary tolerances, and will be brushed to match the aluminum used in Apple products. This also has uniform wall thickness to help with the casting process and has a sufficient draft angle. On the bottom of the base, a circular ridge has been included that can accommodate a rubber footing to help keep the device from sliding around on the desk.
The remaining components consist of the pump, tubing to route the water into the cylinder, and an LED strip. The device uses a standalone LED strip and contains the necessary electronics to control the color and LEDs independently from the rest of the device. Notice how some of the CAD screenshots contain an Arduino Mini; I was originally going to use the Arduino to control the LEDs and pump but decided it was not needed. Instead, there will be two power cables coming out of the device (not shown in the renderings): one for the LEDs and one for the pump. The base contains a cable grommet through which the power cables are routed. Refer to the exploded view below for the orientation of the parts.
Device Animation
Here is a short animation I made of the device. In the animation, you can see the water level rise and the vortex forming. The lights change from red to green. An exploded view is also incorporated at the end of the clip. As the development process of this animation was highly iterative, I wanted to keep the animation short to minimize the computational workload. My original goal was to render each frame, but the processing time was way too long to do so (would have taken a day or so). I ended up just animating the CAD parts.
Next Steps
My future steps of the design process would be to prototype it and test it similarly to the DIY video above. With this prototyping, I will determine what pump would best suit the device including the appropriate flow rate and how to mitigate the noise of the pump. I also need to determine the most optimal manufacturing process to use and hone the design where needed. From there, I can determine the best fabrication methods to use while not exceeding my budget. Additionally, I would spend more time on the animation and focus on how to better model the water that is overflowing from the cylinder. To help with the animation, I would like to incorporate more of the fluid mechanics equations and geometries into the animation. I don’t have a lot of experience with equation-based modeling in SolidWorks, so this is something I would like to work on. I am considering building a device like this as I would really like to have one on my desk. I may pick this up as a summer project once the country opens back up.
Conclusion
There is no doubt that COVID-19 put a heavy damper on this project. I originally set out to build a water clock with the full intention to procure the materials, manufacture the parts, and assemble the physical device. This would have allowed me to go through a testing phase. However, due to the campus closures, this was just not feasible. Because I couldn’t manufacture the product, I decided to use the time I would have spent manufacturing to go back to the drawing board and reimagine the device, putting extra emphasis on the aesthetic. I think this vortex water clock adheres to Apple’s aesthetic infinitely more than the water clock I had designed.
In the end, I think the device renderings turned out really well. I can absolutely see my device fitting in with the rest of the technology in Figure 1. Based on this, I am considering this project a success despite not being able to manufacture it. After re-scoping my project and deciding not to manufacture anything, one of my personal goals was to gain more experience in CAD rendering as well as animations. I have rendered CAD images before, but there were new tricks of the trade that I learned this go-around. This is the second animation I have made with SolidWorks, and it is clear it requires a lot of time and experience to get these right, however, I am happy the way this one came out. It was a challenge to animate the water, and I am still working and thinking about how to improve it. Because creating this animation was a stretch goal of mine, I am satisfied that I was able to achieve it. All in all, this project was a great experience for me and I was able to learn some new skills as well as hone some of my previous skill sets.
Presentation to the Class
Below is a video of the Zoom presentation I gave to a group in my class. I created a slide deck to reiterate the information provided in this report. My classmates enjoyed the presentation and provided great feedback. In general, I believe they all agreed that the device incorporated my targeted aesthetic well.
2 Comments. Leave new
Hello Daniel! Excellent documentation of your final project process! I also have chosen to do an in-depth critique of your project.
As a statement of meaning, I think the CAD renderings of your desktop vortex waterfall look insanely good and clean, especially the rendering without LEDs you have used for your featured image.
Please let me know if you have any questions for me regarding your main project to fulfill the “Artist Asks Questions” step of Liz Lerman’s critiquing methods.
As a neutral question, what equipment and tools do you anticipate you would need to fabricate your prototype?
Finally, as a permissioned opinion, I think there are two ways to proceed regarding LED hues. One option would be to do as Nicole suggested below and stick to a monochrome white or warm white LED, consistent with modern Apple aesthetics. Alternatively, if you wish to use color LEDs, I think it would be really cool to pay homage to Apple’s history by using LED colors from Rob Janoff’s 1977 rainbow Apple logo design.
The renderings look amazing so far, and I hope you can find a way to fabricate at least a prototype! Best of luck proceeding!
– Justin Engbrecht
Hi Daniel. I was a big fan of your project so I chose to do an in-depth critique for it in the format of Liz Lerman’s critiquing methods.
As a statement of meaning, it was brave of you to approach an Apple aesthetic. I think you did a great job it portraying that in your project. Not only is it clean cut and “expensive-looking” but it also manages to keep every element of the inner workings concealed. Even though its feature is essentially transparent, you managed to nicely tuck away anything that can give away the “magic.”
If you, the artist, have any questions for me, please let me know.
As a neutral question, if you were to manufacture and sell this product, would you consider implementing some kind of self-cleaning mode or a cleaning tool kit? Or making it in such a way that it is easy to take apart and put back together if need be? I know Professor Hertzberg mentioned that she didn’t use her vortex since she would have to clean it frequently.
Lastly, as a permissioned opinion, even though you planned to add LEDs to your model, I feel that if you’re pursuing an Apple Aesthetic, any random colors would pull you away from that goal. In my opinion, if you do want to use LEDs, white or warm white may be a good option. If not, no LEDs would be good as well.
I definitely hope you’re able to continue iterating your vortex to ultimately make it. It’s a great idea and you’ve managed to create a beautiful design for it.
Best of luck!
Nicole Leon