
As discussed previously in my blog posts, I’ll be making a two-stroke engine lamp for my final project. Previously, I had talked about how I was inspired by my own dirtbike and the simplicity of a two-stroke motor. I also have wanted a desk lamp for some time, so I wanted to challenge myself to merge the two ideas. I came up with the idea while looking at an image of my dirtbike and thinking about how cool it would be to have a lamp with a moving piston.
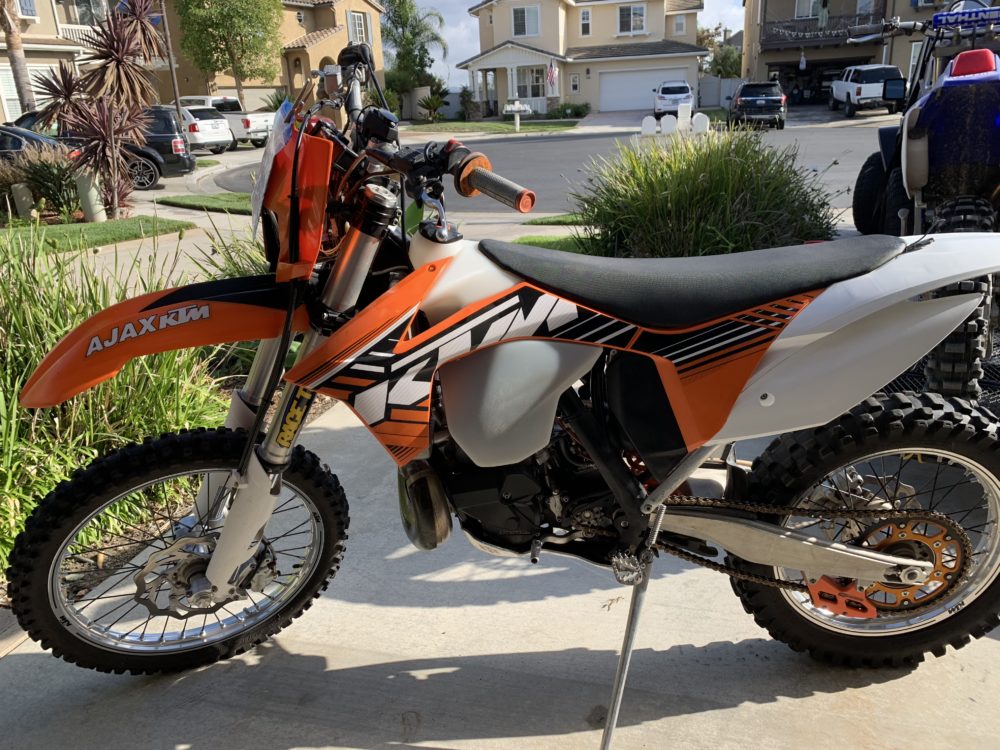
Figure 1: An image of my KTM 300 XC-W.
I have decided to go with a minimalist aesthetic as my vision for this project since it goes against the image above, which is filled with so much detail and complexity. You can barely see the engine casing in the picture, but what drives the bike is hidden deep within the plastic and metal parts surrounding it. Two-stroke engines are known for their simplicity, so I felt that a minimalist aesthetic matched what I wanted to achieve with this project. The other elements of my vision for this project include the following:
- A spark plug switch to activate both the piston movement and the lamp.
- An Edison light bulb to go with the minimalist aesthetic.
- A white-colored lamp base.
- A 3D printed, custom piston assembly, powered by a fan motor.
With these ideas in mind, I began sketching. Below is an image of the front view of the lamp, along with annotations calling out parts/features, which are found below the image.
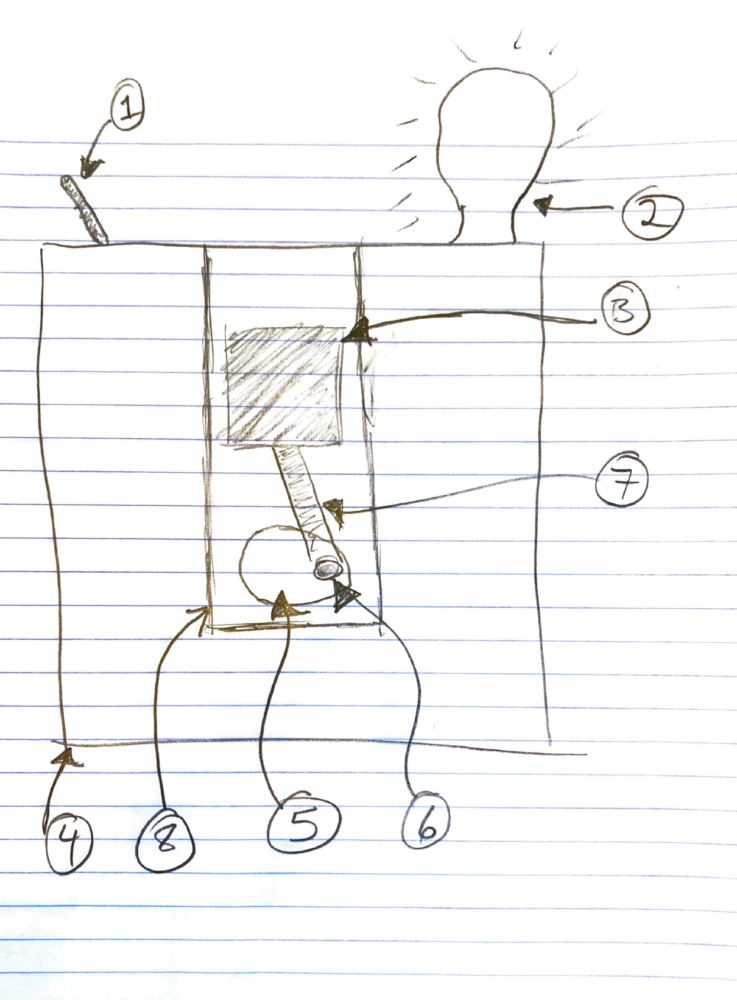
Figure 2: Front View of the Lamp.
The parts/features seen above are described below:
- Spark plug switch
- Light bulb
- Piston
- Overall lamp base
- Cam attached to motor
- Connecting point between 5 and 7
- Connecting rod
- Extruded edges to hold piston vertical.
Since this piston isn’t in a cylinder, there’s no need for it to be cylindrical, however, it does need something to hold it from falling over horizontally. Hence, I added feature #8 to only allow vertical motion of the piston. I then designed a quick sketch of the inside of the lamp, which will also explain how everything works.
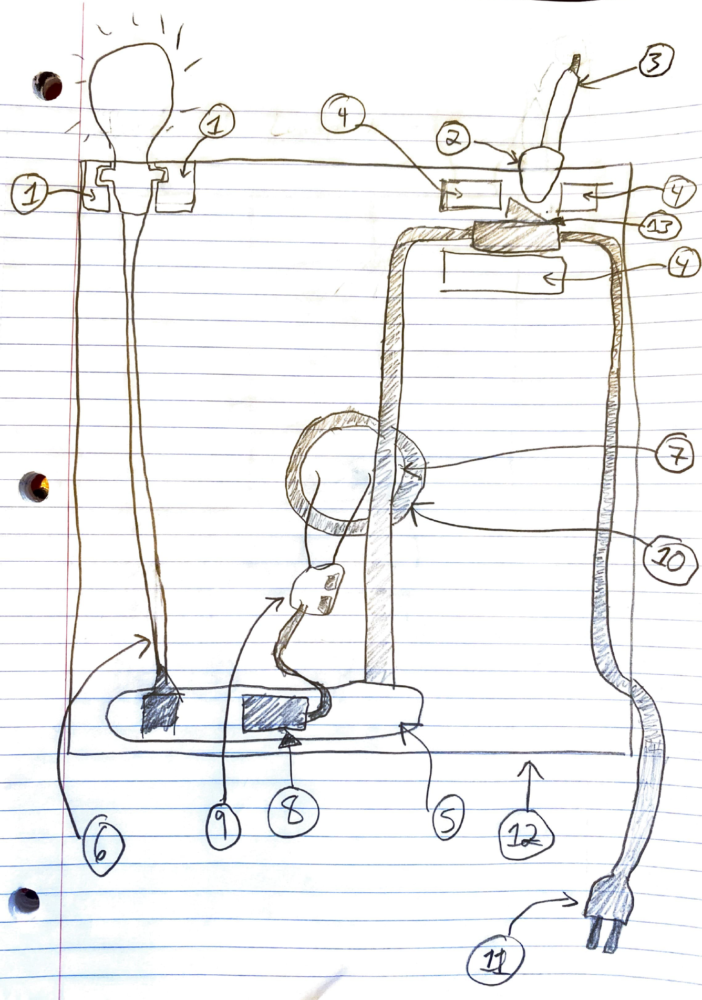
Figure 3: Inside View of the Lamp.
Below is a description of each part/feature callout.
- Bosses to hold the light bulb socket
- Cam to activate extension cord switch
- A spark plug that goes inside of 2
- Bosses to hold the switch in place
- An extension cord base to power both the motor and the light
- Light bulb socket cable
- Motor
- Power supply for the motor
- Circuitry for the motor
- Boss to hold the motor in place
- The power cord to a wall outlet
- Lamp base
- Switch
I came up with the idea of using a fan motor at the expense of sacrificing a fan in my room. I took the lamp apart and was easily able to extract the motor, as shown below.
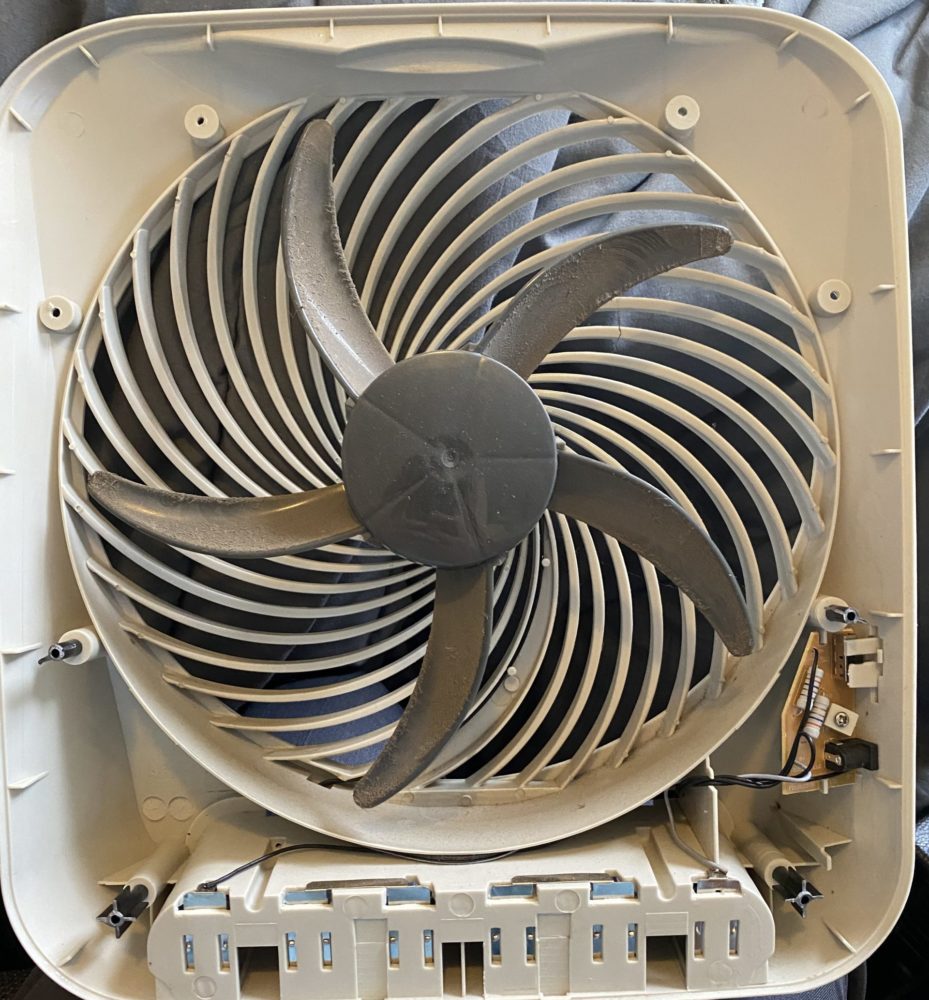
Figure 4: Partially disassembled (and dusty) fan used to get the motor.
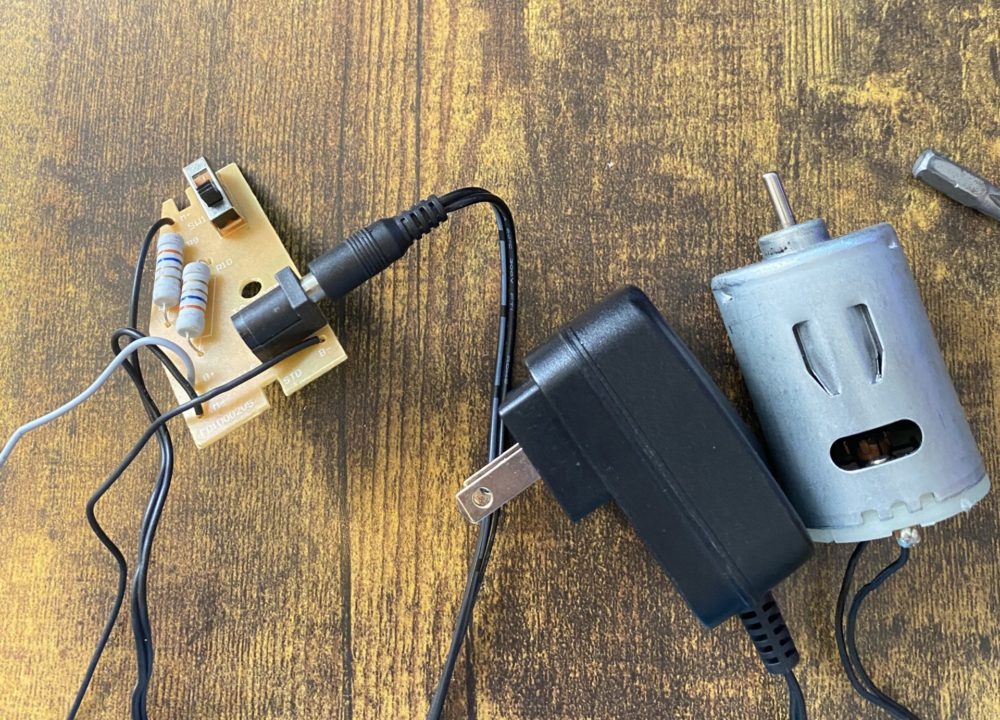
Figure 5: Circuitry, power supply, and motor that will be used to move the piston.
Instead of attempting to combine the circuitry with a light bulb socket, I decided that I will use a two-outlet extension cord that has a switch. The switch will be activated by the spark plug and cam assembly as seen in Figure 3. Below is an image of the extension cord that will be used for powering both the light bulb socket and the fan motor.
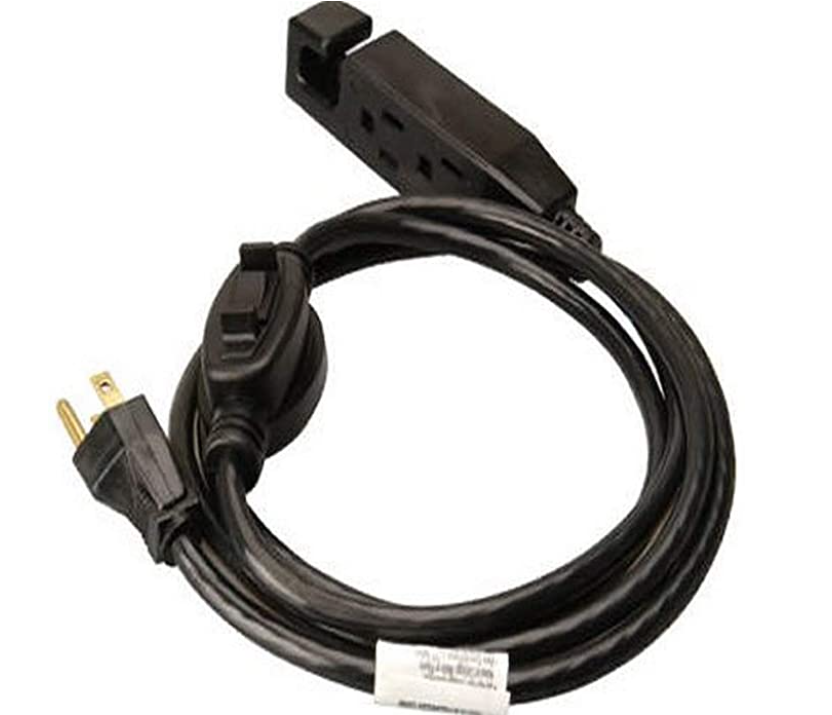
Figure 6: The extension cord that will be used to power the light bulb and motor.
With the sketches from Figure 3 and 4, I formed the following bill of materials for this project.
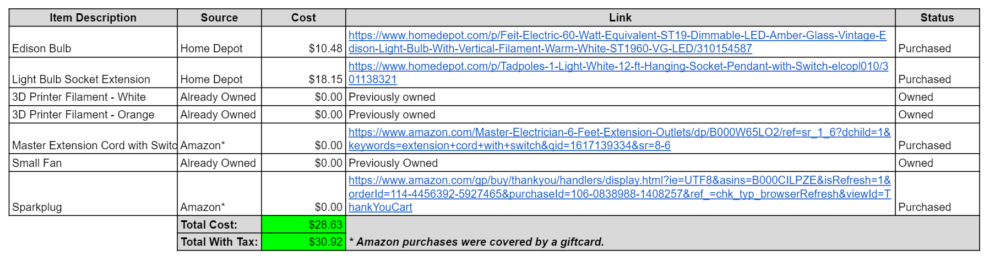
Figure 7: Bill of Materials.
Since I already owned 3D printer filaments and the small fan, which I used to source a motor, my costs for this project are extremely low. Additionally, the Amazon purchases were covered by a gift card, but even if I didn’t have that, it would have only added about an additional $15. I was also able to already purchase all of these parts, knowing that this is the route I want to go down. Using the shipping dates and my knowledge of how long it takes to design and 3D print small objects, I formed the following timeline for my project.
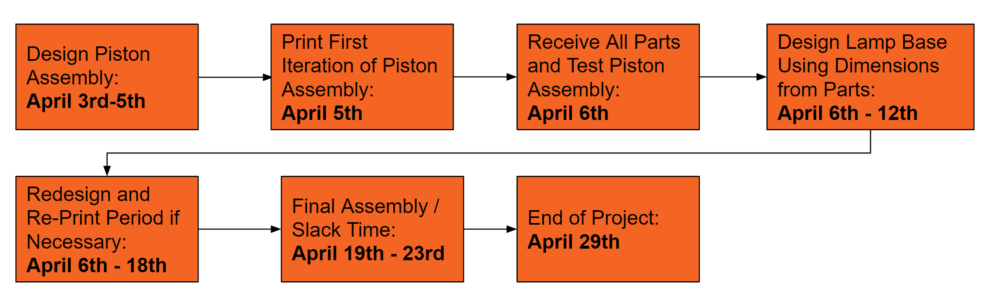
Figure 8: A brief timeline of the project.
Knowing that the lamp base itself will be quite large, I decided to first design and print iterations of the piston assembly this upcoming weekend. The lamp base will likely be printed sometime between April 6th and April 18th. It may take multiple attempts, hence the large window for printing. I also added a large amount of time for final assembly or slack time toward the end in case things break or if a redesign is needed. The project will conclude on April 29th.
Credit for Images:
2 Comments. Leave new
Hi Chris! It’s exciting seeing this design come together, I love this idea. I especially like some of the little details that you’re adding in, like the edison light bulb and the spark plug switch. This design does seem somewhat complicated though, so good luck! I was wondering, do you plan to put any sort of paint or like coating on any of the parts? And what type and color of filament are you using for the 3D printed parts?
Hey Chris, I am also I big fan of dirt bikes and own a 2 stroke KDX so I really like this idea and I am looking forward to seeing the final product. I think your idea of having a moving piston inside will make for a really cool aesthetic for a desktop lamp. I was wondering if you planned on enclosing the piston in acrylic or anything or if you planned on leaving it exposed? Also, I am curious if you are worried about the light output of this lamp with the placement of the light bulb or is this going to be more of an aesthetic piece?