
Presentation Video: https://vimeo.com/541321416
As another semester comes to a close, I am delighted to say that my final Aesthetics in Design project is complete!
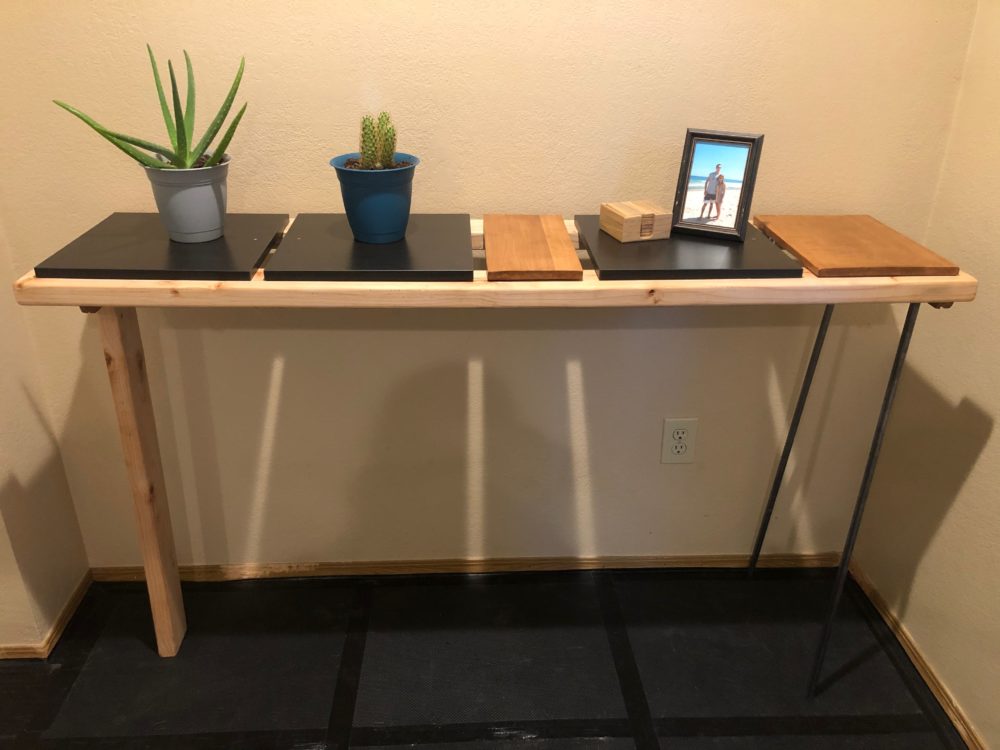
I had several functional goals going into this project. I wanted to create some sort of wall decoration that would help fill wall space in my dining room, which is the least decorated area of my home. I also wanted to leverage off of my Upcycle project and create something that would go well with the table I created earlier this semester; this table was the only decoration in my dining area prior to creating my final project. In addition, I wanted to incorporate house plants in my final design. I had a couple small succulents going into this project, and really liked the spark of life and added color they brought to my living space. I was hoping to use this project as an excuse to welcome more plants into my home. I also wanted to create a very one-of-a-kind artifact that was unique and customized to me. Most importantly, I wanted to meet the one hard requirement of this project: to create something dynamic.
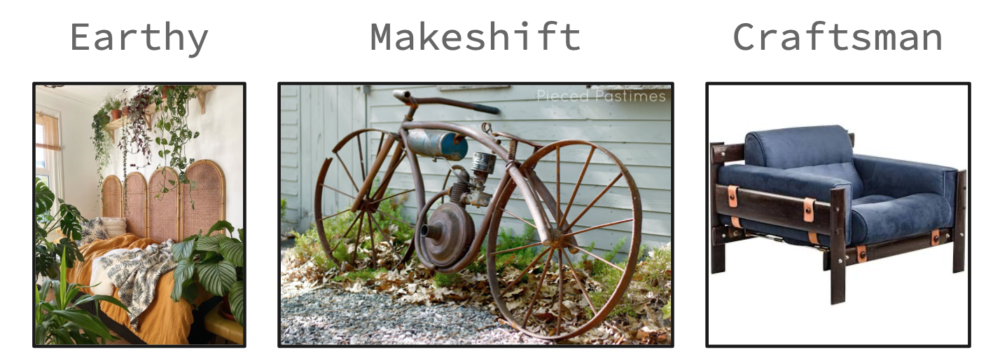
In terms of aesthetic, I had three different visions that I wanted to combine into one. I wanted my final artifact to be earthy, not only in the incorporation of plants, but in the overall colors, tones, and materials of the final product as well. This meant using lots of brown and green tones and natural materials like woods and raw metals. I also wanted the artifact to be tastefully makeshift, utilizing a number of different materials and bringing together unique parts to create a single unit. With that said, I wanted the final artifact to have a craftsman feel, with the final finish looking well put together and crafted with purpose. With a clear aesthetic vision in mind, it was time for me to select a project concept.
It took a while for me to decide on a direction to go in for this project. I toyed with a number of ideas, but none of my initial concepts really excited me. I eventually did a google search to get some inspiration and came upon this image of a plant wheel wall decoration.
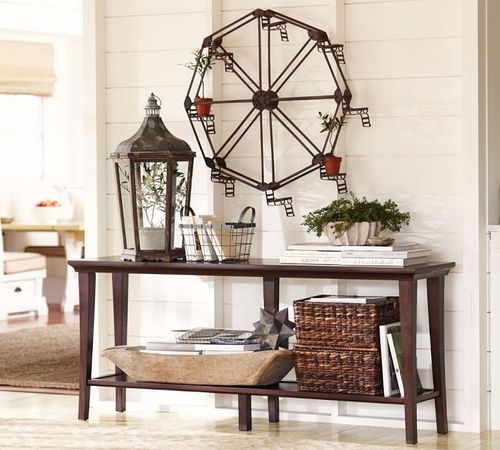
I was immediately inspired and excited by this design idea. I liked that the wheel seemed to fill a decent amount of wall space, which was one of my functional goals for this project. It also has a craftsman feel to it, appearing very cleanly and precisely put together. This particular image also captured my attention with the inclusion of the long, skinny table underneath the wheel, which reminded me of the Upcycled table I created. When I came upon this concept I immediately knew that this was the direction I wanted to go in.
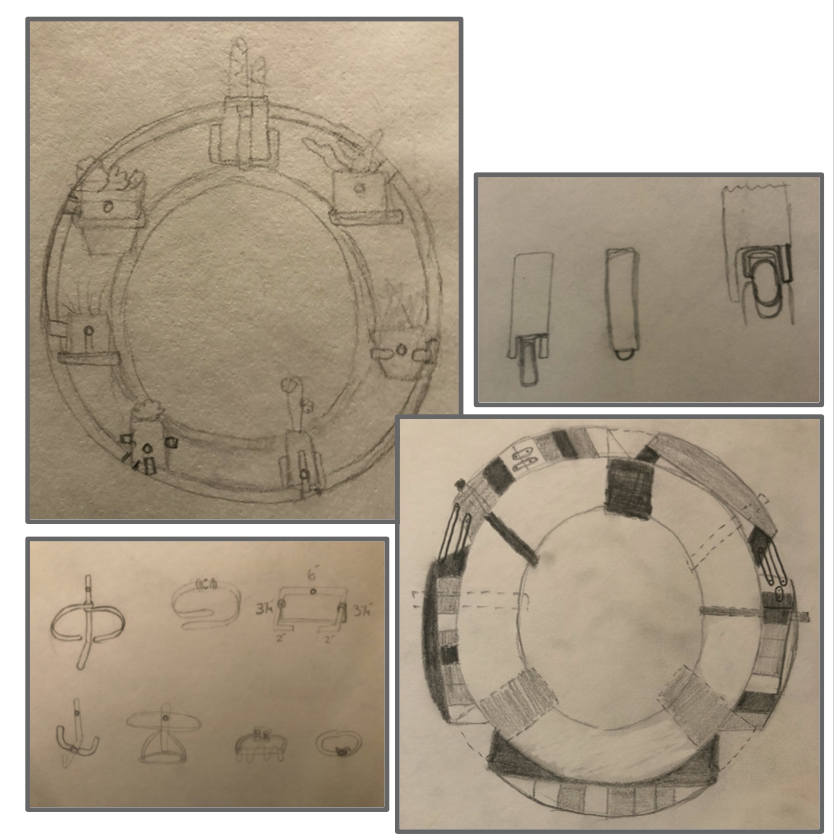
With a concept selected, I started formulating design specs and sketching out my unique twist on the plant wheel. I wanted the wheel to be rather large with an outer diameter of around three feet. I also wanted to incorporate between seven and eight plants, thinking that this would sufficiently fill the three foot wheel without the plants being overly crowded or too far apart. With a desire to mount the wheel on my wall in the end, I was aiming for the artifact to weigh no more than fifteen pounds, as it would be difficult to mount something heavier than this. For my dynamic element, I was hoping that the outer portion of the wheel would smoothy rotate around the mounted inner wheel portion, allowing me to change which plants were at the top versus the bottom and making it easier for me to water the various plants when needed. To prevent the wheel from freely rotating when left mounted, I also wanted to add a locking mechanism to help hold the wheel’s position. Based on these specs, I sketched out a number of concepts, including different plant holder variations and methods for implementing small support wheels to allow the outer wheel to rotate.
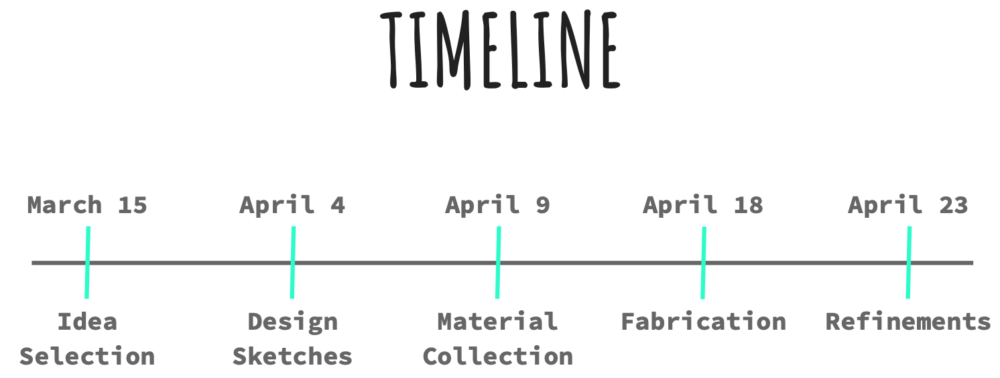
Now that I had a clear plan of what I wanted to make, it was time to figure out how I wanted to make it. To start, I drafted out a timeline with important dates for when I wanted the different critical stages of this project to be complete. By March 15th, I wanted to have my final project idea selected, with the hopes of having all of my design sketches and plans created by April 4th. This would leave me a week to gather materials and begin construction by April 9th, to have the plant wheel mostly fabricated by April 18th. If any issues occurred or troubleshooting was needed along the way, I left myself a week of buffer time at the end to make any necessary refinements before presenting my project on April 23rd.
For my materials, I decided to purchase a 24 inch bike wheel off of craigslist to use as the inner portion of my plant wheel. I wanted to find something circular with a well-structured guide for the outer wheel to glide along in rotation, and the shape, size, and outer groove of a bike wheel seemed to offer exactly the functionality and support I needed. I also went to Eco-Cycle in Boulder on two different weekends to peruse the isles and scope out some hidden gems. These two trips provided me with wooden boards and planks to use for the outer body and middle supports of the wheel, as well as a variety of metal tubing, wire, and rods for the plant holders. I was also able to get a majority of the fasteners and support wheels I needed from various bins around the work yard. I then went to Home Depot, where I got some black paint to clean up the bike wheel, and eight new succulents and plants to mount to the finished wheel.
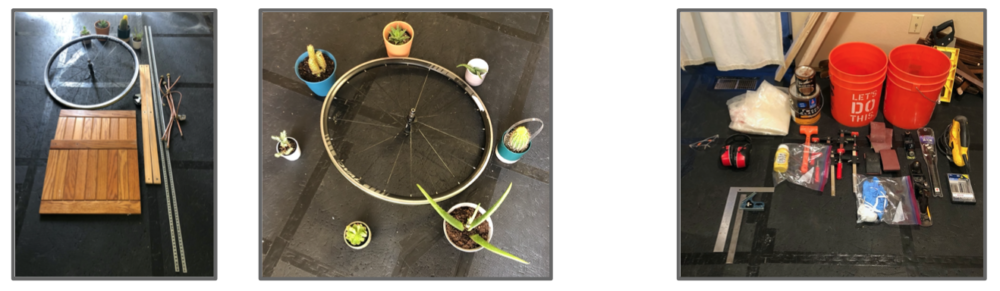
In terms of equipment, I luckily was able to hold onto the equipment I borrowed from the CU Boulder Makerspace during my Upcycle project and utilize it for fabrication of my plant wheel as well. This equipment included two different hand planes, a jig saw with different blades, sandpaper and blocks, clamps, measuring equipment, and even a sharpened number 2 pencil. They also lent me two different wood stains and boiled linseed oil, which I ended up using to finish my different wood components. In addition, I had my own home-toolset with screw drivers, hammers, and wrenches. I also had access to a drill and a dremel, which came in handy during construction.
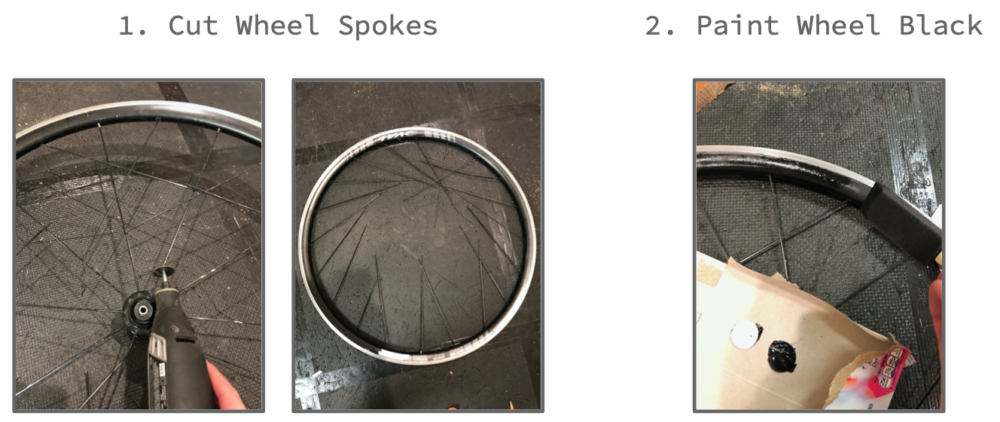
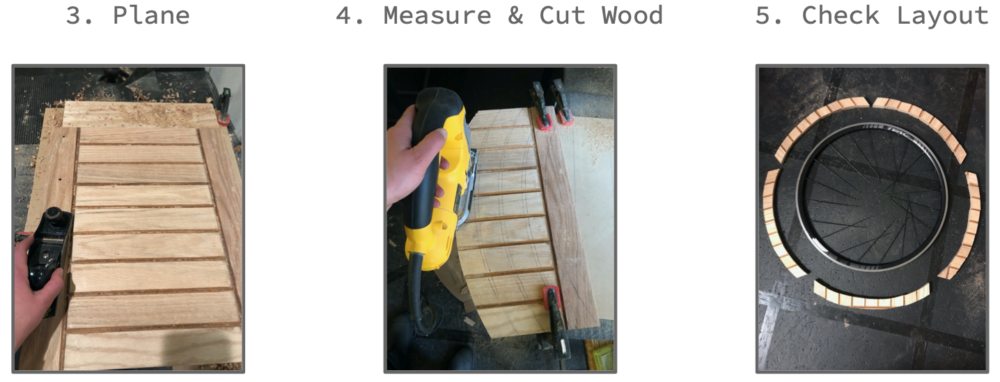
To start fabrication I cut the spokes on the bike wheel to remove the mechanism used to connect the wheel to the bike. That center connector was wider than the wheel itself, preventing the wheel from lying flat on the floor, which made it difficult to take measurements and begin construction. Also, I wanted the wheel to ultimately be hollow, so cutting the middle bike connecter off was a good first step. I then removed the stickers on the bike wheel and painted the wheel black to give it a nice finish throughout.
Next, I planed the two wooden boards down just enough to remove the original finish so I could later re-stain the wood according to my desired color scheme. I proceeded to measure out arcs with the correct radii to eventually make a cohesive three-foot diameter wheel, then cut the wooden arcs with a jig saw. Once all the pieces were cut, I checked their layout around the bike wheel to make sure my measurements were correct and that the pieces were going to fit together as planned.
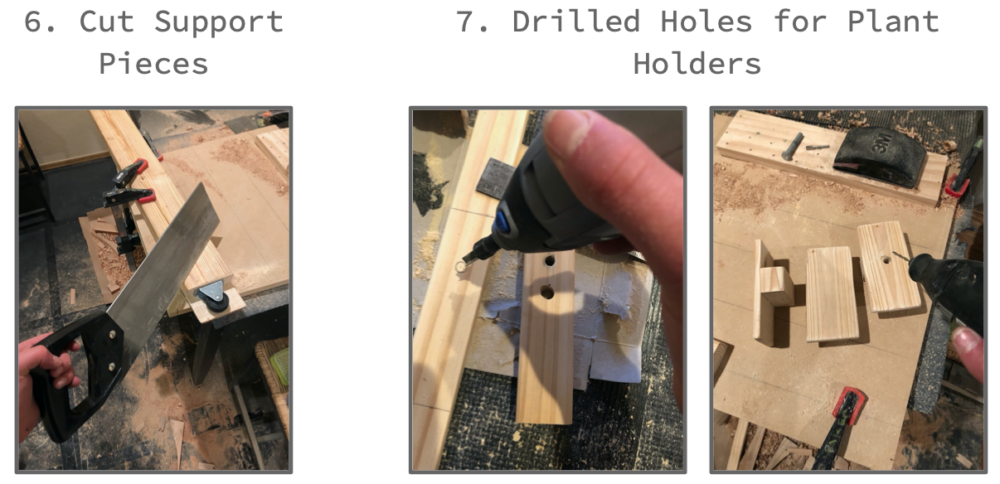
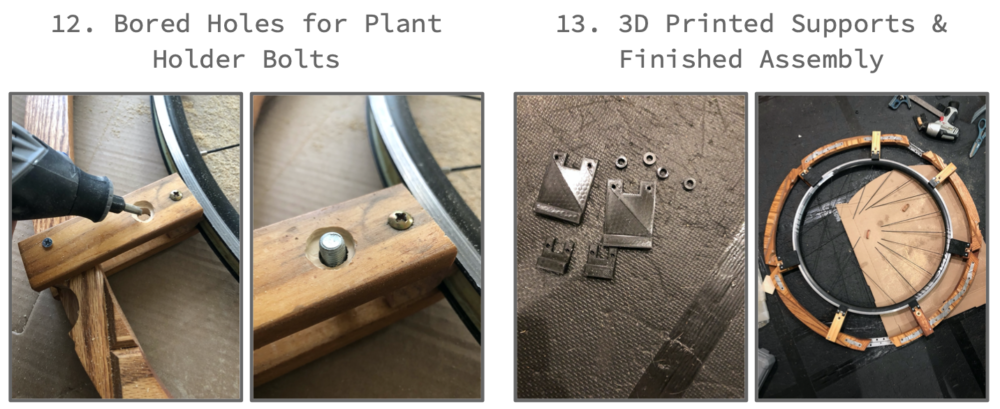
With the outer wooden wheel cut, I moved on to the supporting pieces that would connect the wooden wheel to the bike wheel. I cut three wider pieces which would each house a smaller wheel that could glide along the outer groove on the bike wheel to create the dynamic rotational aspect of my project. I also cut four sets of two thinner supports. These supports would also be used to house the plant holders, so I drilled holes in each support for a long bolt to fit through that would ultimately connect to the plant holders.
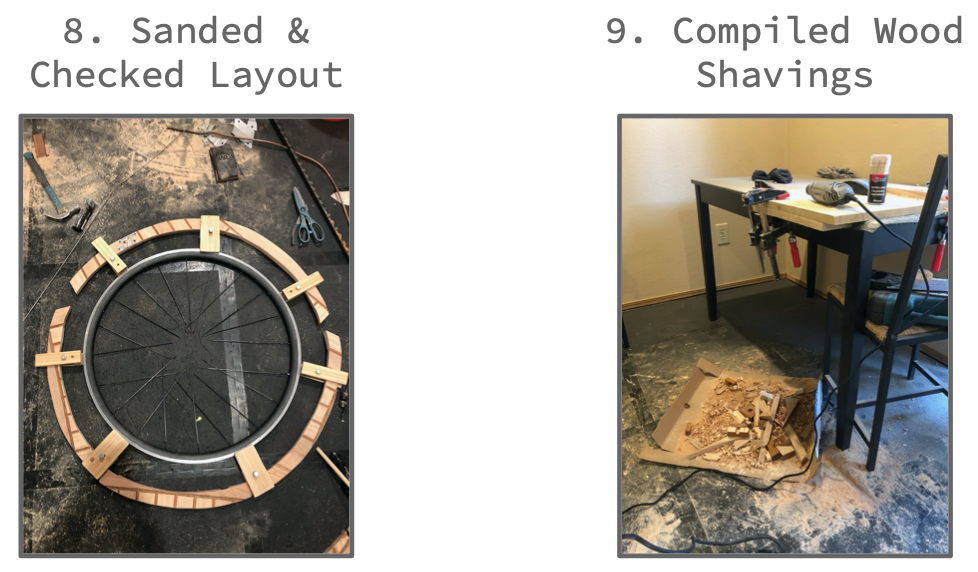
After cutting all the wooden components, I sanded everything down to produce smooth surfaces and edges on each piece and double checked the layout to ensure no adjustments needed to be made. When I was happy with the wooden pieces, it was time for me to clean up my dining-room-turned-woodshop, which was covered in wood chips and saw dust.
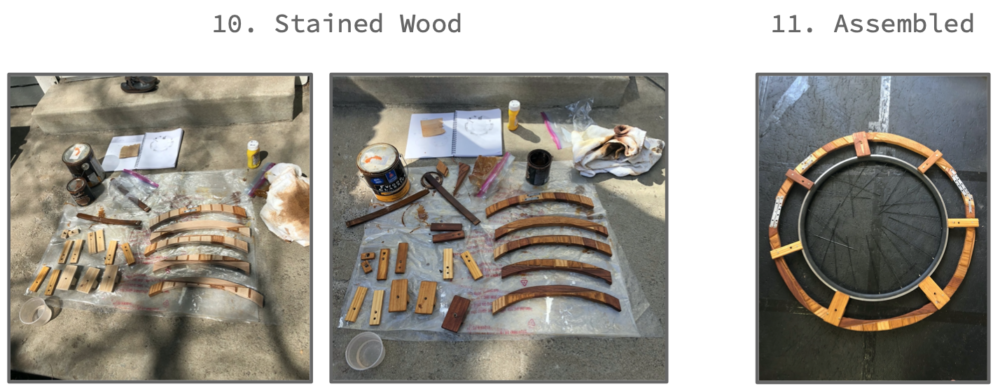
I then took advantage of a rare warm weekend day and stained all of the wood pieces according to a predetermined color pattern that I sketched out. I used three different stains/finishes: boiled linseed oil, fruitwood oil stain, and gun barrel oil stain. The fruitwood and gun barrel stains ended up being somewhat close in color, so I did a second layer of gun barrel to make it a noticeably darker shade. With all of the pieces stained and dried, I proceeded to assemble the plant wheel.
Once assembled, I checked the fit of the large bolts I got to connect the plant holders to the wooden supports. I found that the bolts were a little bit short, so I bored out the back of the supports slightly to ensure that a nut could securely fit on when the plant holders were added. I was also afraid that, when the plants were added, the front of the wheel would be too heavy, causing the wooden wheel to fall off the bike wheel. To accommodate this, I designed and 3D printed some additional support pieces to add to the back of the wooden supports, better securing the wooden wheel to the bike wheel.
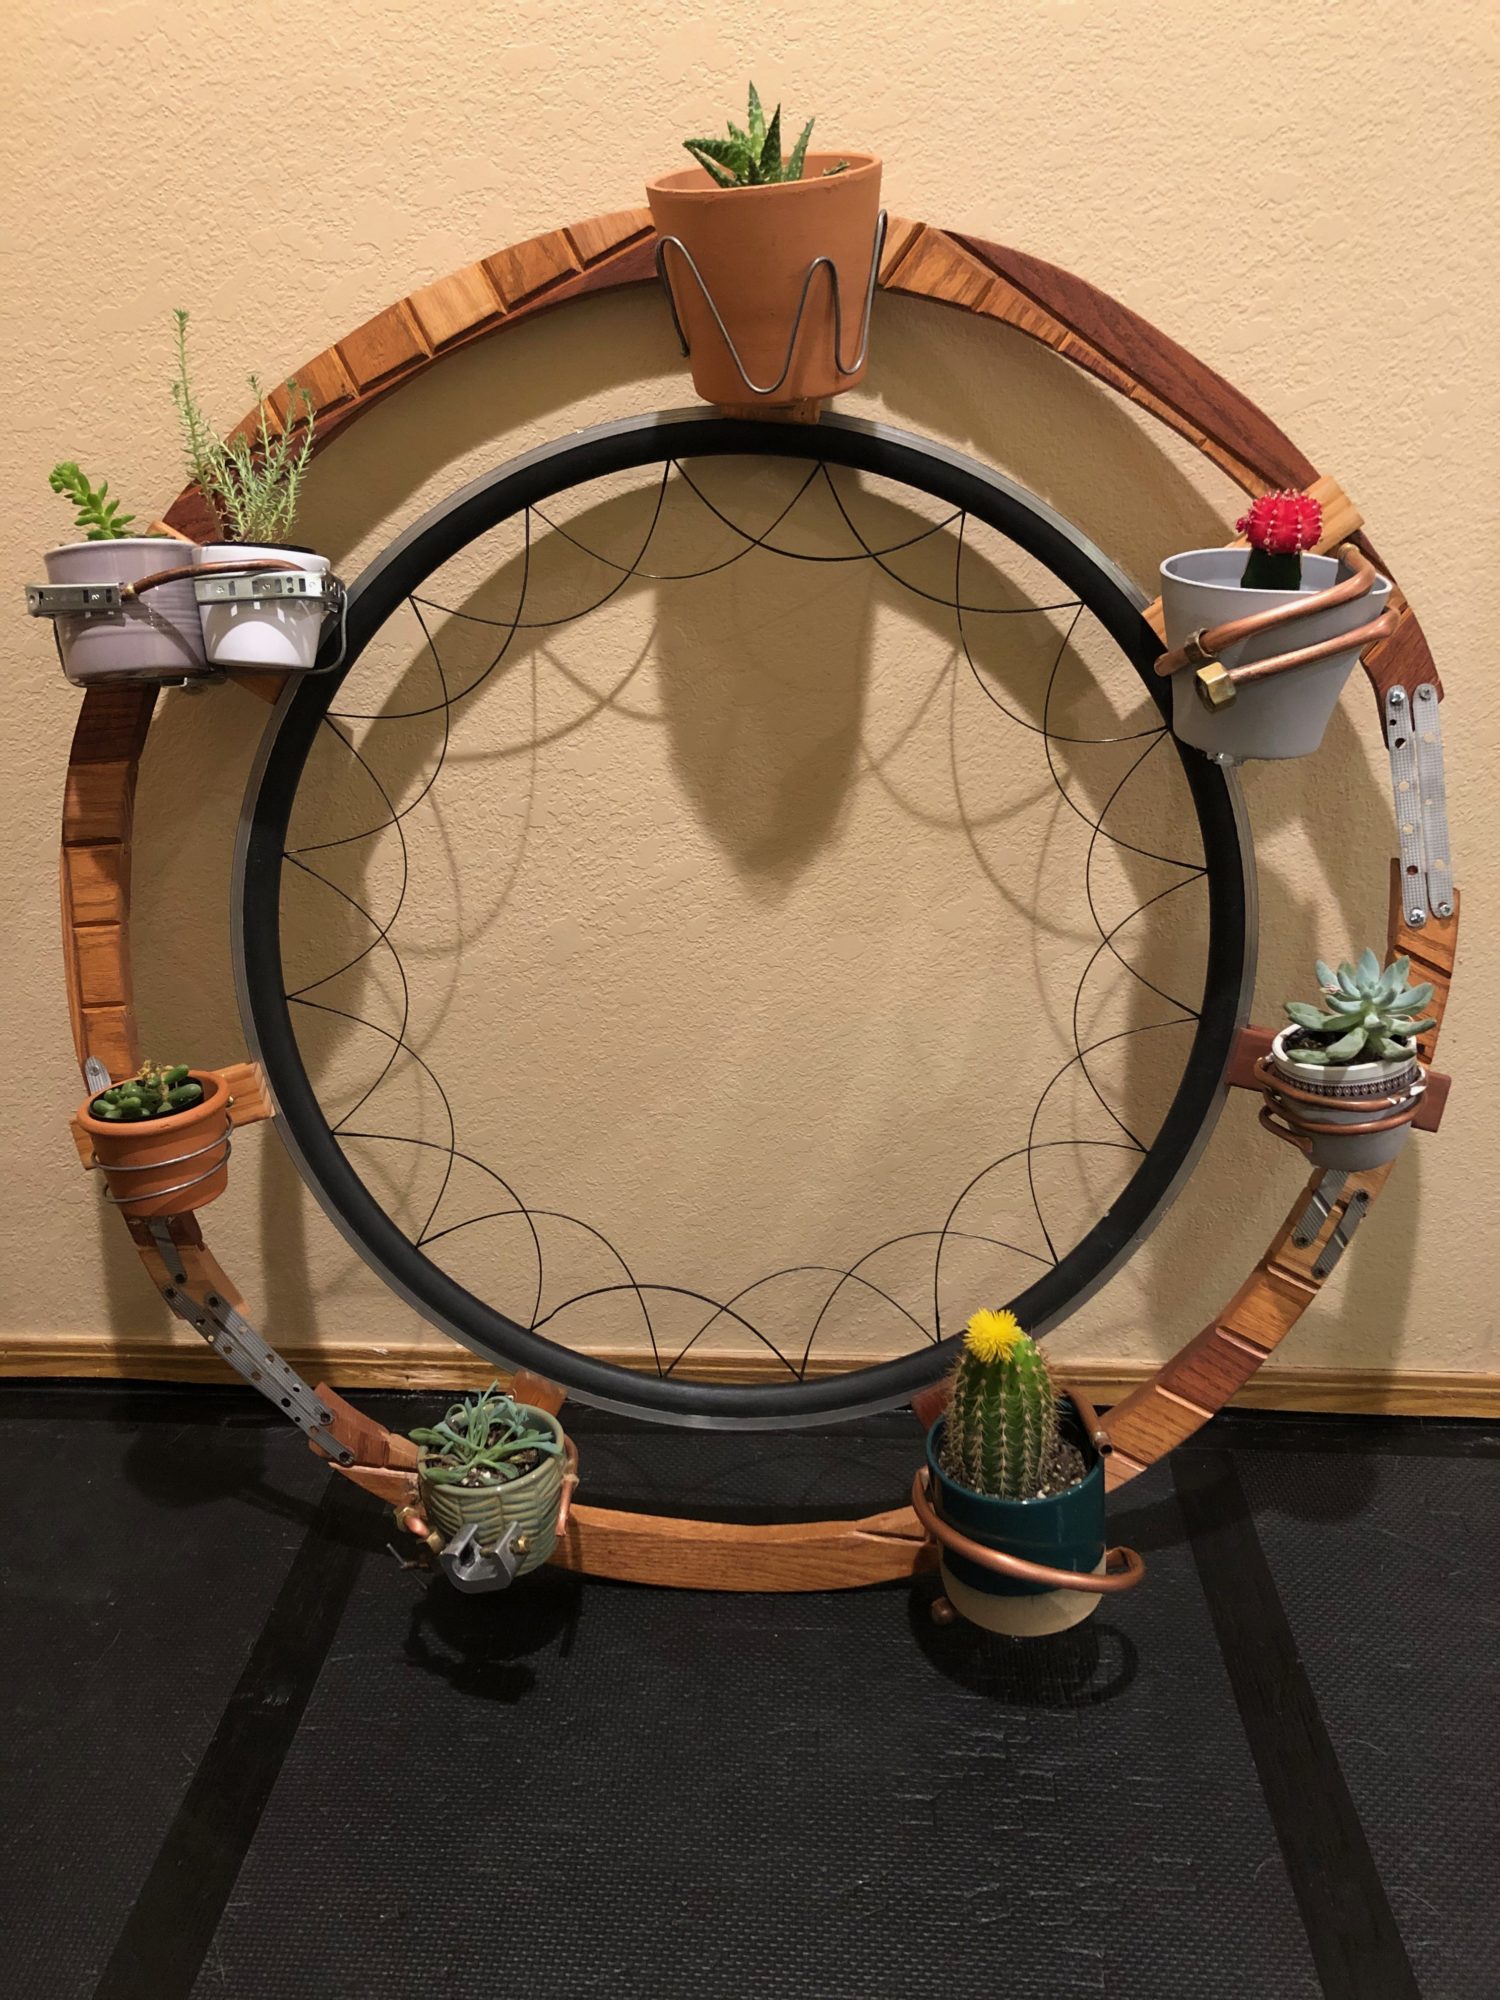
Finally, I crafted the different plant holders using the metal rods and tubes I got from Eco-Cycle. To do this, I utilized the edge of my table to make smooth bends in the metal while keeping other sections straight. I also carefully worked some pieces so they followed the curvature of the plant pots they were going to hold, wrapping around the pots smoothly. I had previously sketched a number of different concepts to create, but it ended up being more difficult to bend the metal than originally anticipated, so I couldn’t craft some of the more interesting designs I had originally thought of. However, I did ultimately craft seven unique plant holders, which was a design goal of mine. With all of the plant holders crafted, I fastened them onto the plant wheel supports to complete assembly.
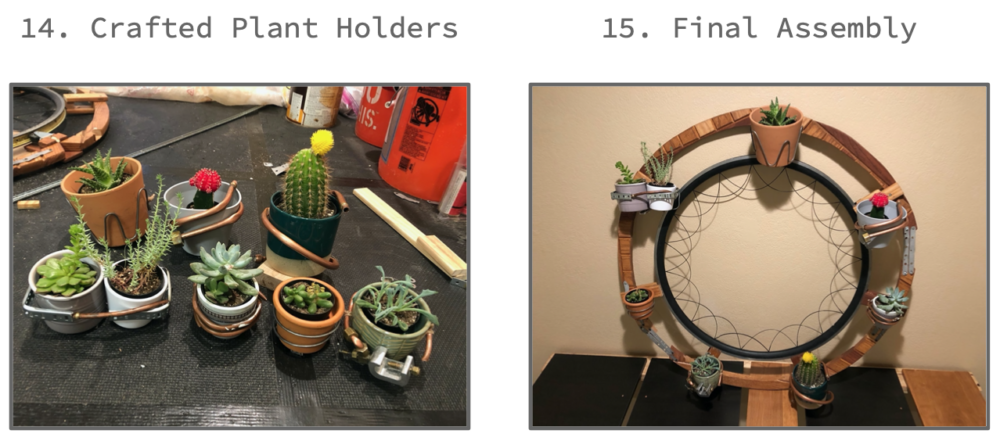
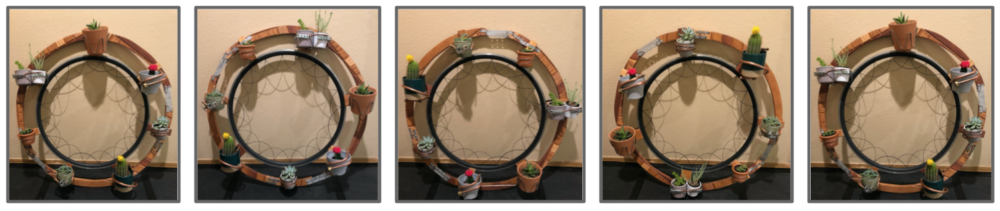
I’m quite happy with how my final artifact turned out. In terms of meeting the one hard requirement of the project – creating something dynamic – I was able to achieve a rotational element of my plant wheel, though it didn’t end up being as smooth as I would have liked. However, it will rotate when carefully handled, allowing me to adjust which plant is at the top versus bottom.
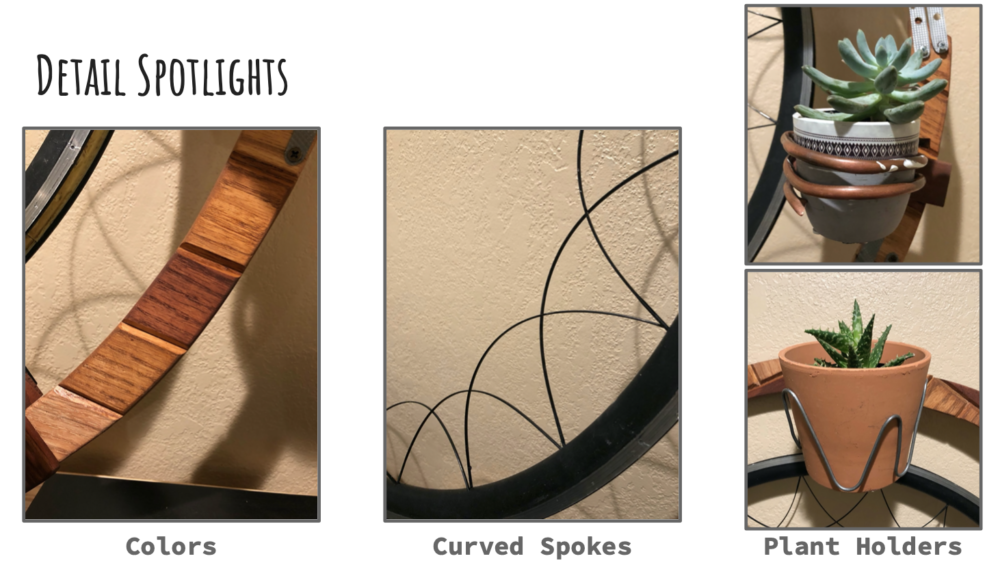
There are a number of elements of the project that came out really well, in my opinion. I really liked how the different wood stains came out. Each stain is different enough to be noticeable and add a bit of extra visual appeal, but the difference is also somewhat subtle, making it look like a cohesive unit. I also decided to utilize the bike spokes as an element of the design rather than completely removing them. After playing around with how they could bend, I decided to create a fun curved pattern on the inside of the wheel. This adds a bit of additional flare to the bike wheel portion, without being overwhelming. Finally, I think the different plant holders came out well, though they did not all match my initial sketches. I like how the different metal tones complement the pots I selected, and I’m happy with the unique curvatures I was able to apply to each holder.
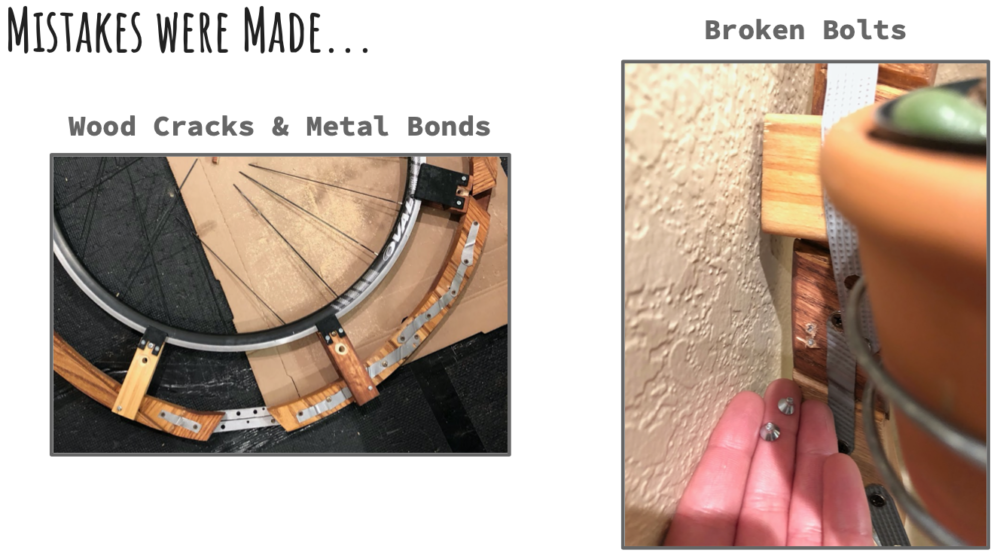
While the final artifact did turn out well, there were a number of issues I had to overcome and flaws that were produced along the way. When I cut the wooden arches out of the boards, I discovered that the middle portions of the different wooden strips that were connected together were not glued together very well. As a result I had to epoxy each wooden piece to the one adjacent to it, and then secure them on the back by screwing metal strips between each piece. While fastening the metal strips to the wood, several of the wood pieces started to crack, so I had to secure the pieces with metal strips on the front side as well. While screwing in a metal strip on the front side, I had two different screws break in the same location, creating a visual flaw on the front of the wheel.
When I compare where I started to where I ended, I think I stuck to my original plans quite well. Looking back at my original design specs, the outer diameter of the final wheel ended up being around 34 inches, which is right in the three foot range that I was aiming for. The final wheel also holds eight plants, which matches my original plan. While I did not formally weigh the final piece, it does feel like it weighs less than fifteen pounds. I ended up deciding not to mount it to a wall because I’m renting my current living space, but its current weight is within reason for mounting it to a wall in a future home. In terms of achieving a smooth, uniform rotation, the wheel does rotate, but not as smoothly as initially planned. Adding the extra 3D printed supports ended up tightening things a bit and adding friction, so the wheel needs to be handled with more care now when getting it to rotate. However, because the wheel does not rotate freely, I did not need to implement a locking mechanism to lock the wheel in a specific position.
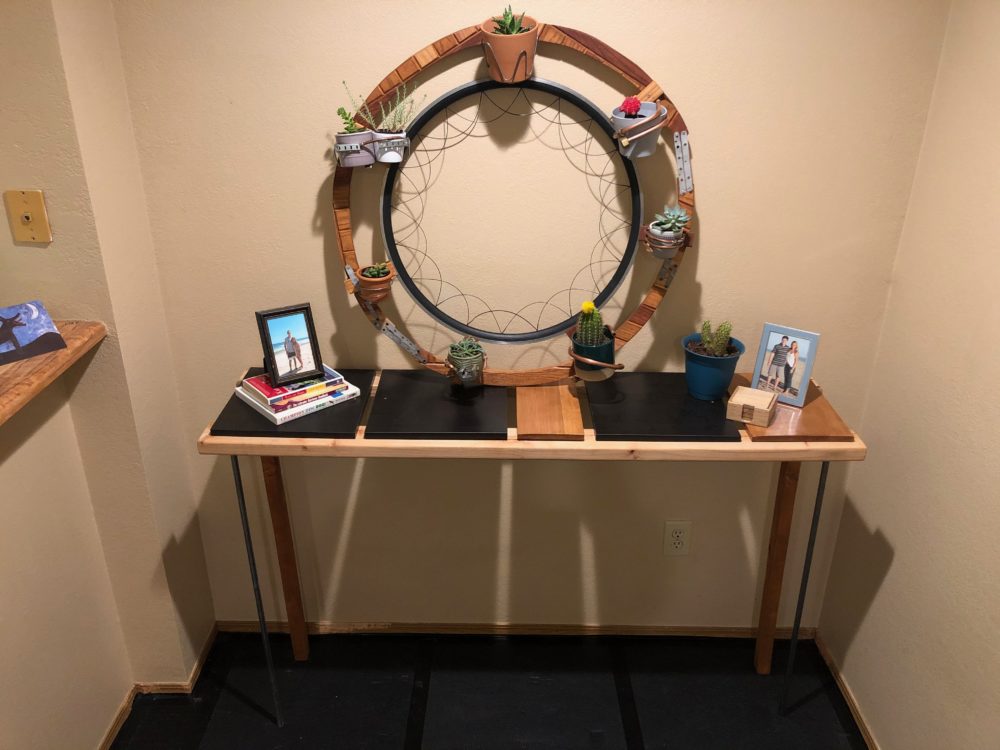
From an aesthetic standpoint, I do think I achieved the earthy-makeshift-craftsman look that I was aiming for. The materials and colors I used really tied together well to include earthy tones, while creating an interesting, makeshift feel. With all of that, the wheel does look well crafted and thought out, making it a clean and cohesive unit.
Moving forward, I’m planning on leaving the wheel resting on top of my Upcycled table and leaning against the wall. To prevent it from rolling off or falling over, I will secure the upper portion of the wheel to the wall to make sure the wheel stays securely in place.
That’s a wrap!
Images:
In order of appearance:
- https://www.amazon.com/Shop-Succulents-Cactus-Succulent-Collection/dp/B008333PBC
- https://www.funkyjunkinteriors.net/2014/05/salvaged-garden-art-projects.html
- https://weheartit.com/entry/348389789
- https://www.1stdibs.com/furniture/seating/armchairs/rare-mp-51-armchair-rosewood-percival-lafer-brazilian-mid-century-modern/id-f_22416702/?gclid=Cj0KCQjw0oCDBhCPARIsAII3C_E8NWdsIFhMwowTXolBxoW5SsZWnLs18K579CQk1KmvY04_3dBv1PQaAt0
- https://www.indiamart.com/proddetail/unique-home-decor-15739697297.html
1 Comment. Leave new
Hey Natalie! I absolutely love how this piece turned out, it looks very well made and super unique! I honestly can’t choose which part is my favorite; I really like the spokes, the multi-toned wood, and the plant holders. I think you absolutely accomplished a really nice mix between all of those aesthetics that you were going for. I see that right now you are just leaning it against a wall, do you plan on hanging it somewhere later?