

Introduction
For my final project, I created a hidden blade like the ones featured in the videogame Assassin’s Creed. In this report, I will describe the design selection process, the planned manufacturing steps, and the testing protocols.
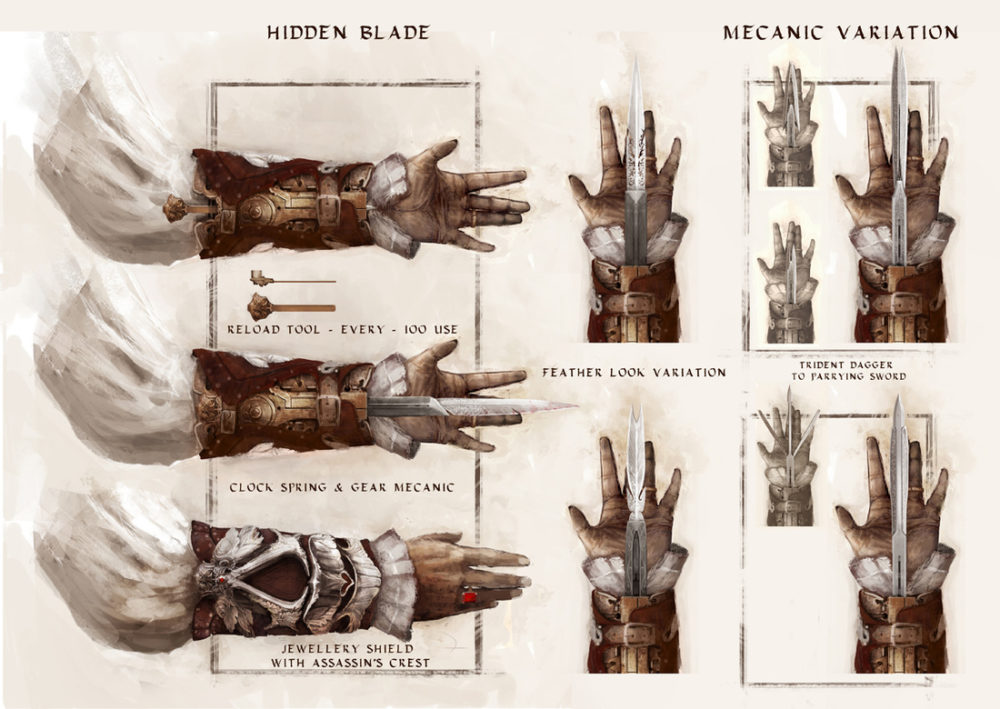
The aesthetic of the hidden blade has varied in each Assassin’s Creed game, featuring the common styles of the era the game is based in. Some of the ornamentation consists of the hidden blade cover and the majority is shown in the bracers that hold the blade cover to the user’s arm. The more modern hidden blades shown in the games are compact and not always feature bracers (since we no longer fight battles with swords and don’t need to protect our arms and wrists from getting cut). However, the design variations of fan-made hidden blades, especially in the DIY environment, feature either nice-looking modern styles or the evidence that the parts were made from readily available components such as cabinet roller slides. I was initially thinking about doing a futuristic shape with metallic color. However, after learning about the effects of certain aesthetics in class, I realized I could implement some of these concepts into my design. My goal was to design a modern-looking hidden blade that is easily concealable and is safe to be used as cosplay and not as a real weapon. In conclusion, I adopted a less aggressive aesthetic in my project and designed the mechanism encasing with a shape that does not trigger an alert response in people.
I also wanted to create a more innovative mechanism to activate the blade. Most blades in the market are either spring-loaded and activated with a button or have a string and ring to pull the blade. My innovative mechanism features a motor attached to a rack and pinion. The electrical system is activated by flexing the hand up and which would bend a flex sensor attached to the top of the wrist. This sensor sends a signal to an Arduino and then this activates the motor.
Design Process
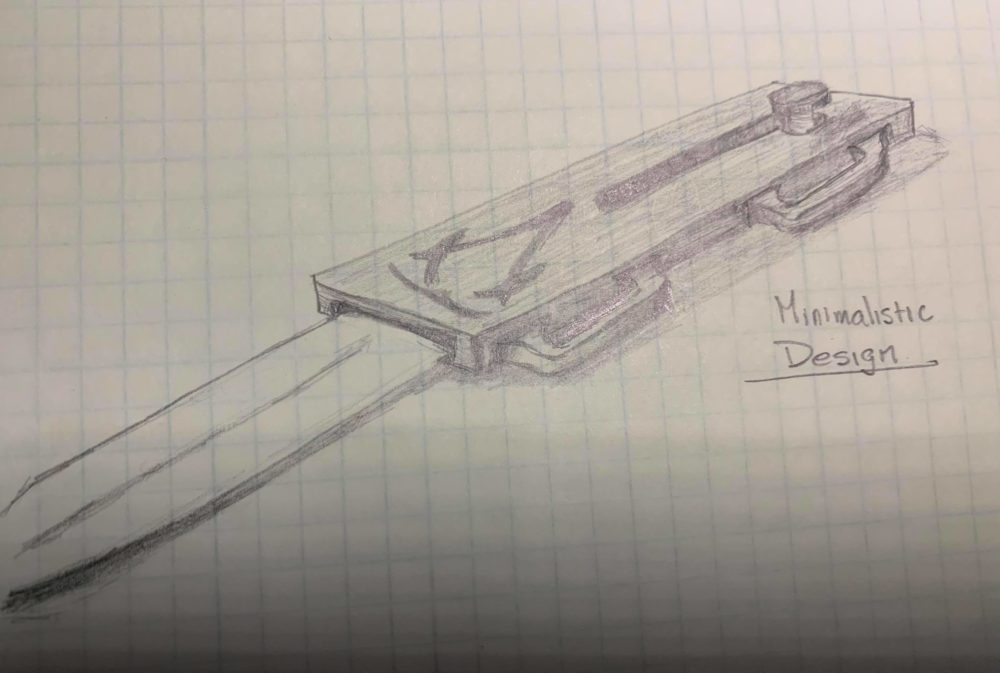
Minimalistic Hidden Blade Design
This design is simple since it features a rectangular box container that holds the blade mechanism. It would feature two slots on each side to insert elastic bands to retain the hidden blade to the user’s arm. The mechanism would also be designed as simple as possible, and the Assassin’s crest would be engraved onto the surface. The large crest can capture people’s eyes and bring unwanted attention and reduce stealth in what is supposed to be a hidden weapon. The black color has the possibility of remaining undetected and can serve for increased stealth. However, the color black can trigger an alert response in people who see the hidden blade. The mechanism shown is a simple tension spring with a thumbscrew that the user can pull back and push into a retaining pocket. When the user wants to engage the blade, he simply needs to push the thumbscrew to the side and the spring will pull the blade all the way out. This design is a little dangerous since it can be accidentally triggering, so a locking mechanism would be necessary.
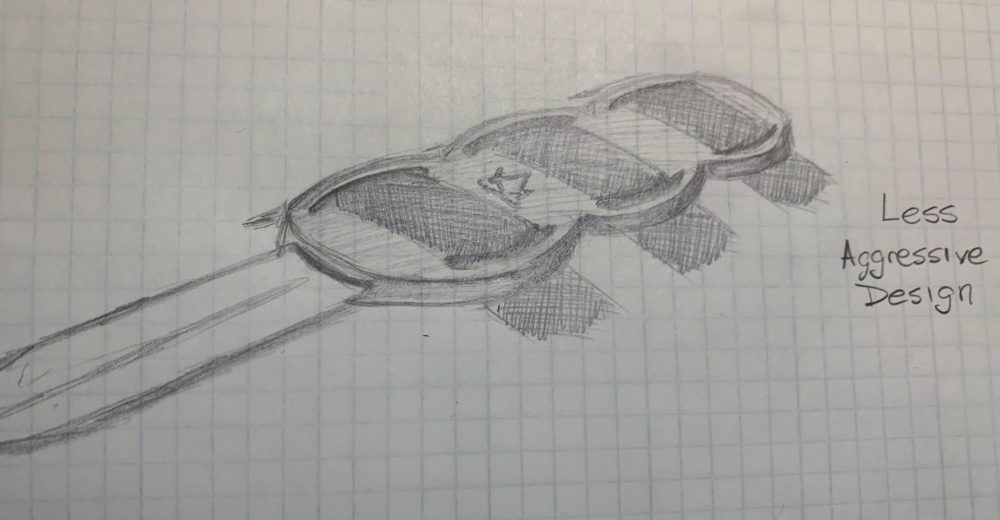
Less Aggressive Hidden Blade Design
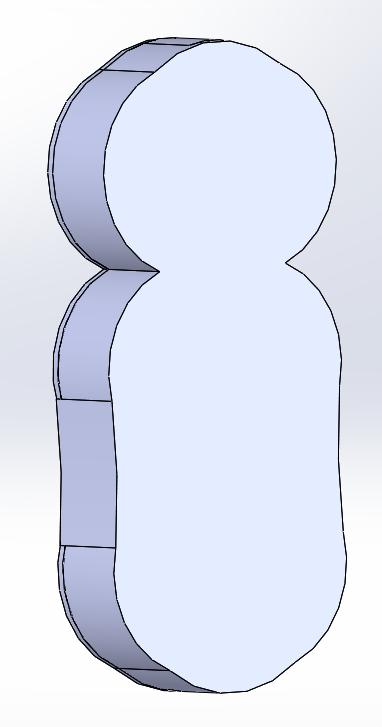
This design gets rid of sharp edges and substitutes them for curves. The entire box is made of basically three semi-overlapping circles. The idea of having a curvy profile is that it has a lower chance of triggering an alert response in people who see the device on the user’s arm. Given today’s technology and many wearable electronic products, people will lean to think its some sort of Fitbit or a similar product. With this design, the user can feed three elastic bands through the slots on the edges of each circle to attach onto their arms. The Assassin’s Crest is still featured but it will be smaller and located in between where the elastic bands cover the device. For this model, I was thinking of using a moss shade of green. I believe this color poses little threat compared to the intimidating black and it is still dark enough to remain stealthy. The mechanism of this device would be a small DC motor attached to an internal battery which is activated to turn a pinion on a rack. This would create a transfer of energy between the rotational motion of the motor and the linear displacement of the rack. By attaching the rack to the blade, the user can extend and retract the blade at the push of a button.
Specifications
- The device shall conceal a 7” blade within a container: The blade will need to be long enough to protrude outside of the container while also having enough blade inside the container to retain the blade in position.
- The blade tip shall move at least 3.5” from the edge of the container when the system is engaged: This amount of protrusion from the container will make the device comparable to those in the Assassins Creed videogames
- The mechanism shall withstand a point load of 10 lbf on the tip of the blade: This point load can be in any direction and represents bumping the extended blade against an object. By resisting this force, the blade can be more robust and confidently used for cosplay.
- The system shall be electronically powered by a battery: The current design consists of an Arduino, flex sensor, and servo motor. These are powered by a battery, since it wouldn’t make sense for the user to be next to a non-portable power supply.
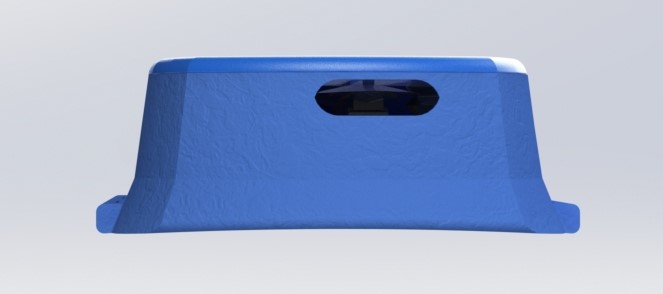
- The system shall have a non-threatening aesthetic and geometry: Sharp things, pointy objects, and straight edges tend to trigger alert responses in people. The device needs to have curved edges and no sharp edges or corners. The use of a draft blends the device with the user’s arm better than a orthogonal wall.
Constraints
- The device shall measure less than 2”x 8” x 2” to be comfortably attached to an average-sized user’s arm: This was estimated using a ruler and hyperextending a long sleeve shirt around the wrist.
- The device shall weight no more than 5lbs to be comfortably carried by the user: This was estimated by attaching dumbbells to an average-sized user’s arm and using that to estimate a comfortable weight to carry around.
- The device shall be capable of a quick disassembly: This is required for emergency access to the internals and deactivation of the blade mechanism.
- The blade shall be made of plastic to reduce potential hazards: Using a 3-D printer can prove beneficial for the rapid prototyping stage but for the model I want to build, I also want to make the blade out of plastic to prevent accidental cuts or stabs.
- The device’s color shall make the device easy to conceal: Dark colors make the device easier to conceal. However, black will trigger an alert response in people since black is subconsciously associated with dangerous things. An army green color or maybe a dark navy blue could prove to be non-threatening and concealable.
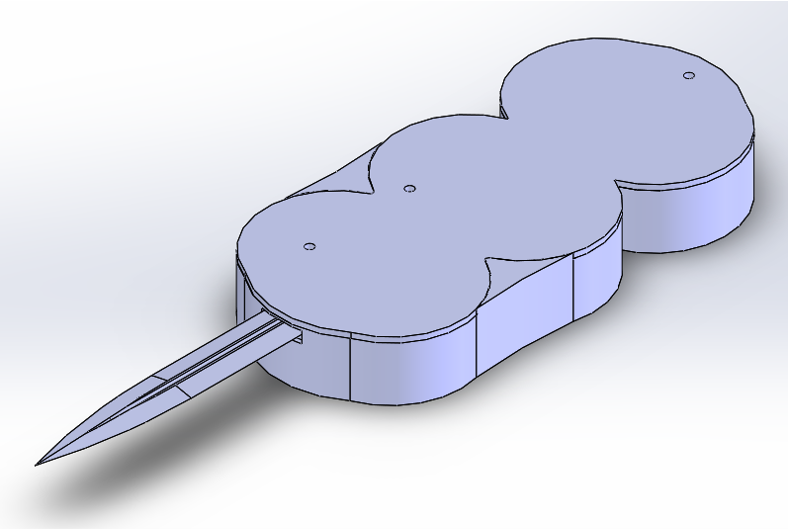
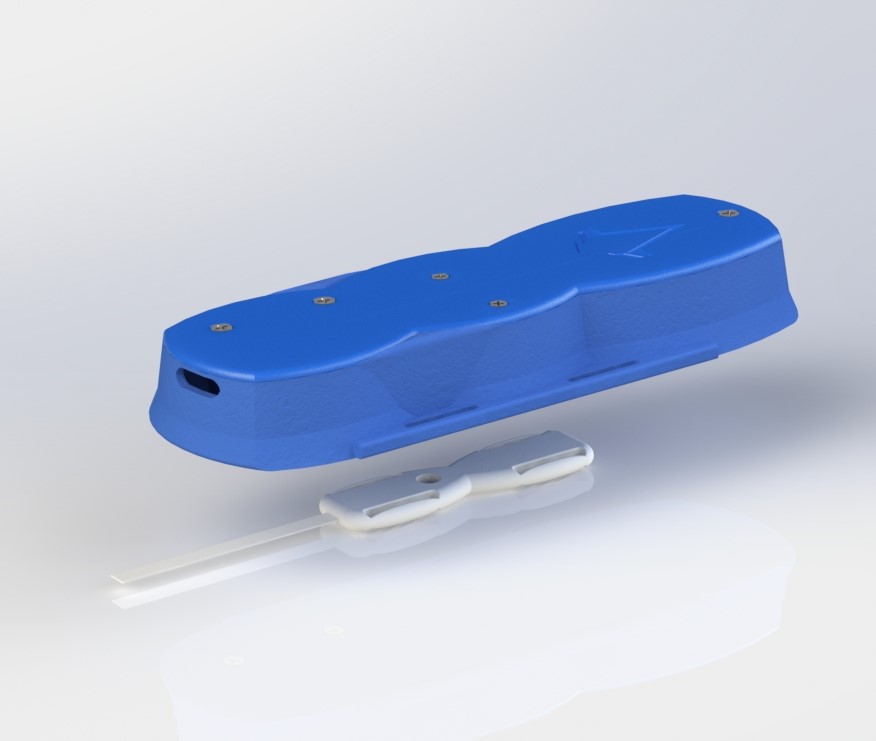
Final Design
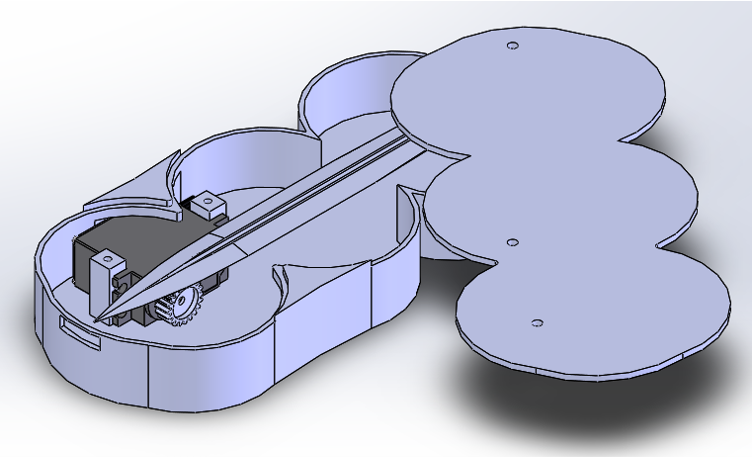
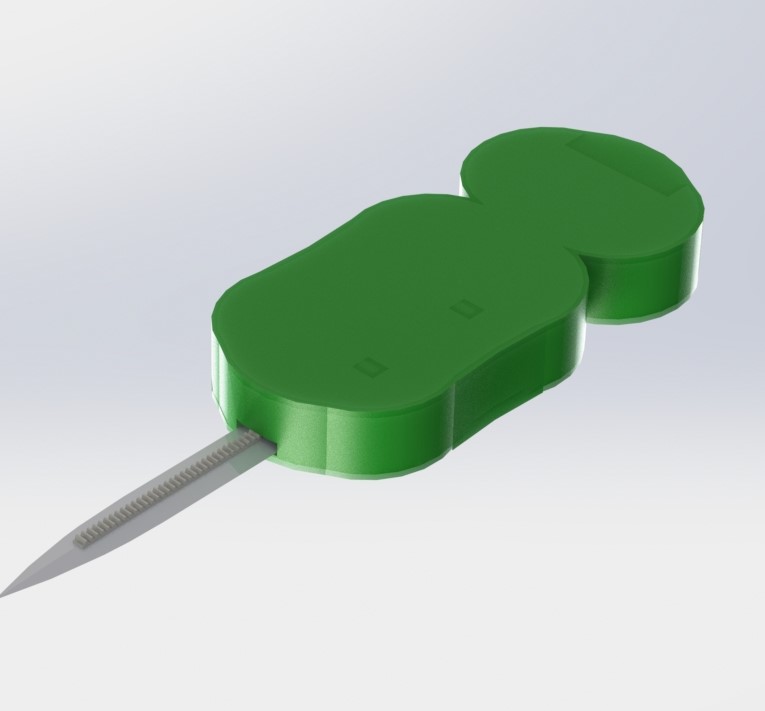
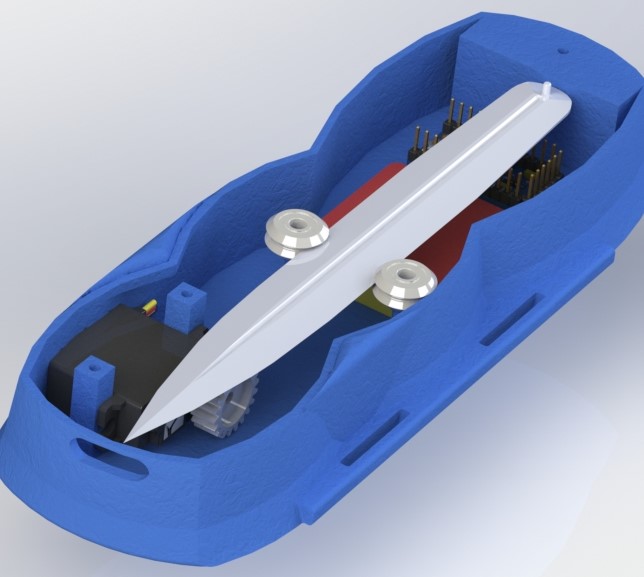
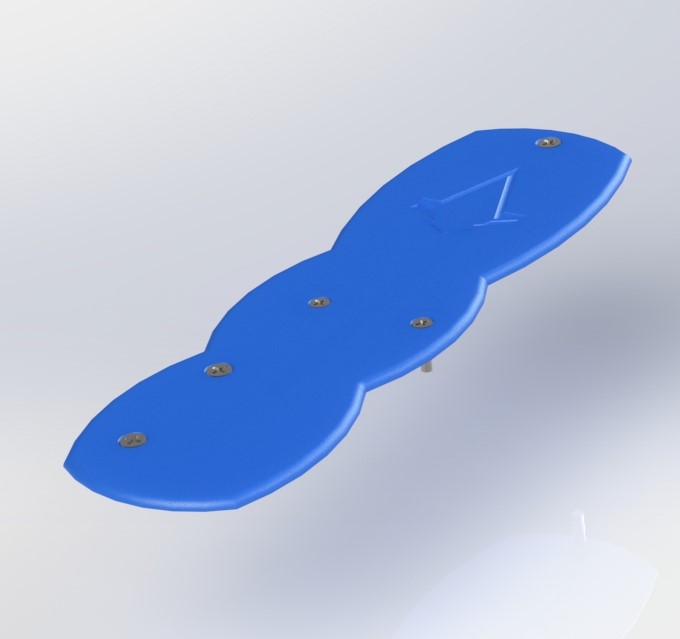
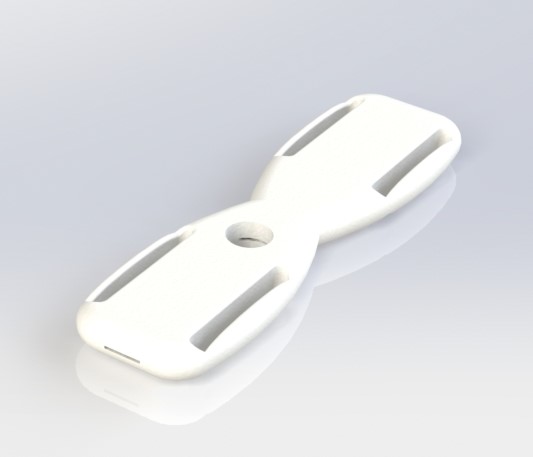
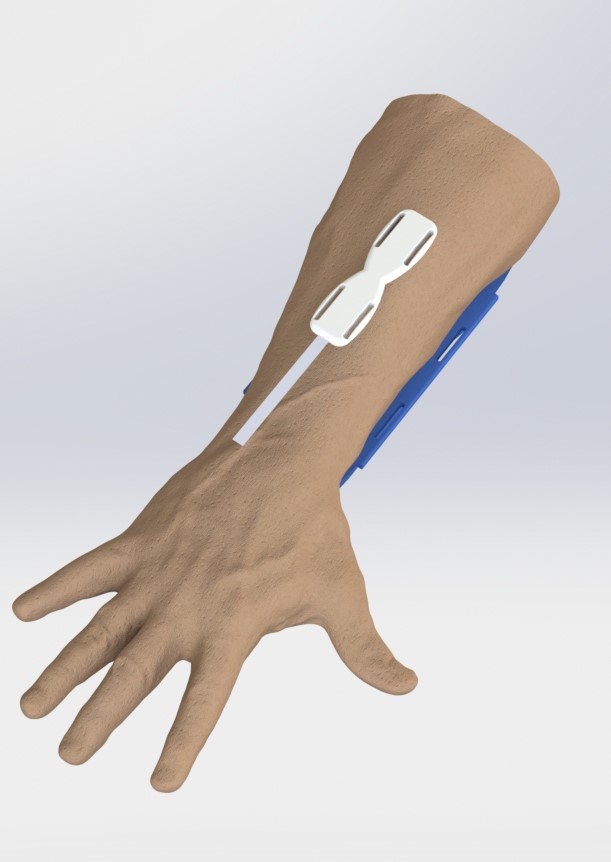
After receiving feedback from my peers in the Design Preview presentation, I implemented some changes to the Less Aggressive Design. I changed the color from green to blue. Even though green is hard to notice, it could remind people of military related equipment. Blue is peaceful and is still hard to notice or that could potentially trigger an alert response. I continued by removing any straight edges, even in the vertical faces of the container’s outer surface. I included the edges and slots for the elastic bands to be attached. I also moved the blade exit port away from the middle of the container. This gave me more room to insert the electronics without expanding the container’s width as much as I had initially planned. I also changed the servo motor from a HITEC HS645MG to a HITEC HS85MG to reduce the amount of space required. This change involved reducing the torque on the blade, given that the purpose is for cosplay and is not required to withstand a large load, the new amount of torque will be enough to move the blade without posing a threat from being used as a weapon. I added an outwards draft as suggested by my peers, this would allow for the bottom surface to be flusher against the user’s harm. I also cut the bottom surface with enough of a curvature to sit flush against the user’s arm, mimicking the shape of a human forearm from below the elbow to the wrist. Similarly, I designed the flex sensor housing to have a similar shape but fitting on the top side of the forearm. I included two V-shaped rollers to keep the blade’s rack aligned with the pinion. Additionally, two pins, one on the blade and one on the container lid guide the blade by fitting onto a linear well on the opposite side. Finally, I added the Assassin’s Creed logo as an engraving, this will make draw less attention to the device.
Build
Manufacturing
The container, lid, and flex sensor housing are all manufactured using HP Multi Jet Fusion additive manufacturing (a type of 3-D printing). This allows the components to have complex shapes while reducing their cost. However, the material will be limited to plastic for this manufacturing style. These components could be made from metal but they would cost over $3,000 a piece instead of the inexpensive price of 3-D printing. These components can be spray painted with their respective colors after manufacturing. For manufacturability purposes, the inner ribs must be printed separately and then screwed into the container, since the side holes on the columns (where the servo attaches) cannot be tapped if they are inside of the container.
Since this device is meant to be used for cosplay and not as a real weapon, there is no need for the blade to be made from metal. The blade will also be made with the HP Multi Jet Fusion and is to be colored with a metallic coating to give the appearance of metal.
All other components are off-the-shelf and do not require manufacturing.
| Part | Material / MFG | Cost ($) | Vendor |
| Container | Nylon 11 / HP Multi Jet Fusion | 117.73 | Xometry |
| Lid | Nylon 11 / HP Multi Jet Fusion | 89.95 | Xometry |
| Blade | Nylon 11 / HP Multi Jet Fusion | 306.50 | Xometry |
| Rack | Steel / Bandsaw | 16.91 | McMaster-Carr |
| Pinion | Aluminum / None | 14.99 | Sparkfun |
| Servo | Plastic / None | 29.95 | Sparkfun |
| Battery (DTP603443) | Polymer Li-Ion / None | 9.95 | Sparkfun |
| Arduino | Various / Glue | 9.95 | Sparkfun |
| Flex Sensor | Various / Glue | 12.95 | Adafruit |
| Flex Sensor Housing | Nylon 11 / HP Multi Jet Fusion | 66.83 | Xometry |
| V-Shaped Rollers | Steel / None | 2 x 53.96 = 107.92 | McMaster-Carr |
| Fasteners | Steel / None | ~5 | Hardware Store |
| Elastic Velcro Straps | Nylon / None | 9.99 | Amazon |
| Total | – | 798.62 | – |
Assembly
Screw the servo motor onto the inner ribs and then fasten the ribs onto the container with the servo facing towards the middle of the container. Connect all electrical components and glue the battery and Arduino to the rear inside area of the container. Insert the blade between the V-shaped rollers and then place the rollers onto the cylindrical studs. Place the lid on the container and ensure pins fit into their respective slots. Fasten the lid to the container. Insert the flex sensor into the flex sensor housing and connect to the wires through the opening in the housing sensor. Press the flex sensor and cable back in the housing hole and apply epoxy until the hole is filled. Insert the elastic straps through the container and flex housing slots and close the loop using the Velcro on the straps.
Test
The device will require calibration, a certain number of motor rotations will result in the maximum allowed displacement. To calibrate, rotate the motor until the blade extrudes 3 to 4 inches from the tip of the container. Test the alignment of the blade at its extruded position my grabbing it and moving it with your hand. If it feels loose, then the blade cannot extend that far, and the motor must be calibrated to have a shorter maximum extrusion.
Test the rigidity of the blade by softly bending it. The blade itself should be able to withstand a large load but no more than 10 lbs of force should be necessary for testing, given that it’s meant for cosplay. Apply a point load of 10 lbs at the tip of the blade (as if trying to forcefully retract it), the blade and servo should withstand this amount of force and the blade should not retract.
Conclusion
This project began as a way to compete against the current hidden blade designs both in the market and the ones created by DIY projects. I wanted to create an innovative activation mechanism that has not yet been used in any of the other designs. I was able to achieve both of these goals but was not able to manufacture the device due to the high cost of components and long lead times for manufacturing.
The design features a non-aggressive style with curved edges, many circular features, and light colors. This prevents the product from triggering an alert response in people who see it and adds to the stealth of what is meant to be a hidden weapon. This product is meant for cosplay but could also be made with metal components and be used as a real hidden blade weapon. However, the cost would be above $5,000 and the servo motor will likely fail if the blade was used to stab something.
The blade protrudes 3 to 4 inches from the tip of the container, even though the blade is 7 inches long. The geometry of the container could be slightly changed to allow the blade to protrude more but at its current length, it allows for a variety of servos to be installed into the device.
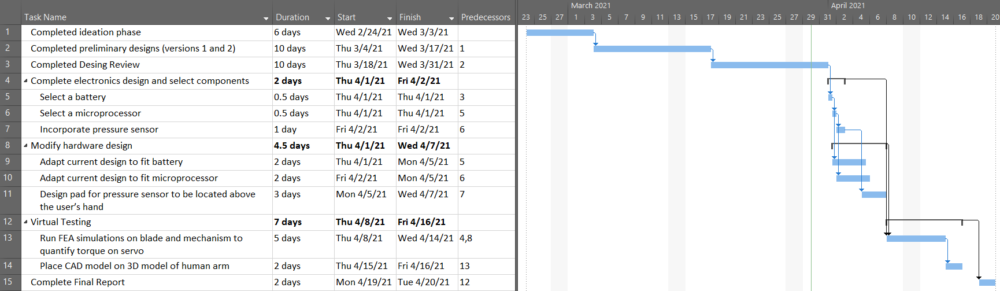
Timeline
Presentation Video
Sources
Images:
https://assassinscreed.fandom.com/wiki/Hidden_Blade
CAD used from the Web:
McMaster Carr Rack: https://www.mcmaster.com/6295K11/
Arm Scan by Jack Stubbs: https://grabcad.com/library/anatomy-model-hand-1/details?folder_id=5812098
Assassins Creed Logo used for base to engraving: https://www.cleanpng.com/free/assassins-creed.html
Arduino Pro Mini by Pamir: https://grabcad.com/library/arduino-pro-mini-1/details?folder_id=3684958
McMaster Carr V-Rollers: https://www.mcmaster.com/6321K73/
Servo Hitec HS-85MG by Pascal Milon: https://grabcad.com/library/servo-hitec-hs-85mg-1
Servo Gear: https://www.sparkfun.com/products/12142
Lithium Battery: https://www.sparkfun.com/products/13854
Other Component Links
Flex Sensor: https://www.adafruit.com/product/182?gclid=Cj0KCQjw1PSDBhDbARIsAPeTqrewMKCaN64imUANSVqIcI1iE7pnMYb2Q5iy6KUjIBVQlsK2LTnpIjwaAmfkEALw_wcB
Arduino Pro Mini: https://www.sparkfun.com/products/11113
Servo Hitec HS-85MG: https://www.sparkfun.com/products/11887
2 Comments. Leave new
Hi Gary,
Amazing work! Your CAD renderings came out amazing and I’m really impressed you found a CAD model of a human hand to use. I’m wondering if you looked into any other 3D printing vendors for some more inexpensive prices?
Hi Gary,
Great job on your project! I think this is one of the more complex project in this course. It seems like your project was pretty expensive! are you actually planning on using the hidden blade as a part of your cosplay in the future or are planning on selling this design? Either way, I think you did a great job!