
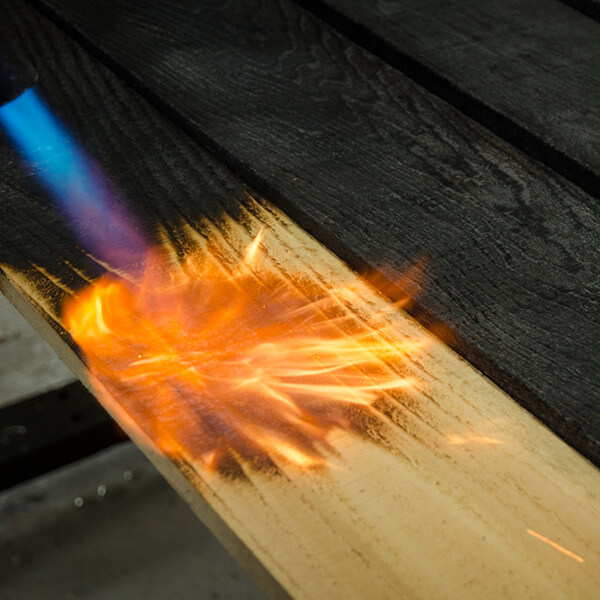
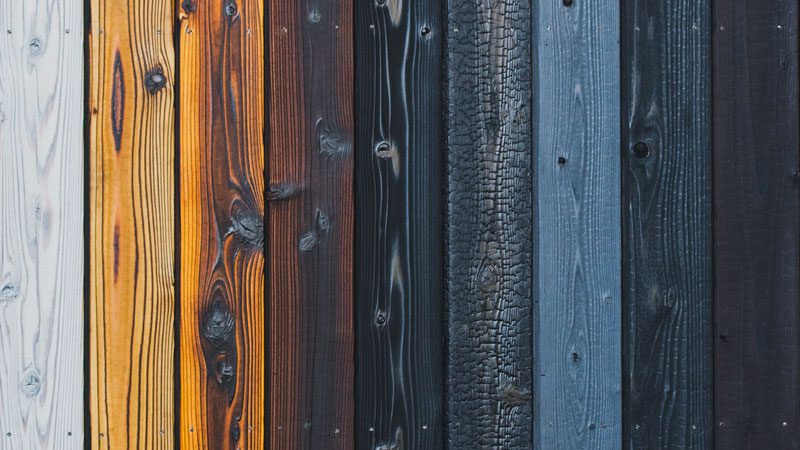
To recap my project plan, I am creating a wooden chessboard by using the Shou Sugi Ban architectural aesthetic. This is a technique that involves charring the wood to be used in the board, and sand components intended to be lighter. In this way, the un-sanded components will be charred to a dark grey or black for the dark squares, and the light squares will have a nice grain pattern.
I have gotten confirmation that I can get my hands on some old barn wood from my friend from Kremmling, and I’ll be able to pick it up either this weekend or early next week. I will then have to inspect the wood to ensure that there aren’t any residual nails or other metal parts in the wood to ensure the quality of the chessboard. My plan is to use these specifically for the squares of the chessboard. If I have enough barn wood, I could make the border out of it as well, but my backup plan is to acquire wood from Home Depot or the ITLL wood shop. The border pieces will need to be substantially longer, and so a barn wood border may suffer from bowing and compromise the border.

For the border of the board, I need to first off preface that I plan to make a full, non-bending chessboard. This just gives off a higher quality aesthetic to me, and will be less expensive to make. I am planning to make a clearly established “light” and “dark” side. I will do this by selectively charring the four sides of the border. The sides on which players will sit will be either fully charred for the “dark” player, or lightly charred for the “light” player. Then, the sides between the players will have a gradient char on them, going from light to dark to show the changing of sides. I have never seen a chessboard with a multi-colored border, and so I believe this will further help in making my board unique.
The torch is another major component of this project, and I am ordering one by close of business on Friday. It is difficult to choose between cost and quality if the torch: I could buy a cheap kitchen torch to stay in the spirit of the cheap and upcycle pieces of the project, or I could splurge a little and acquire a larger torch that would make the charring process much easier. I do think I will lean towards a better torch just to help the quality of my board.

My assembly plan is to first assemble the border of the board, with a thin wooden sheet in the middle to serve as spacing for the squares to go inside. Once this outside is assembled, I will place the squares into the board to create the playing section of it, and only loosely insert them. I do not want to use wood glue because I do not have an easy way to clamp or compress all 64 squares. I think the attachment method that best follows my rustic charred wood is to use small wood screws from the bottom of the board. The last step once all of these pieces are assembled is to apply linseed oil to the board, giving it a safe and nice-looking finish. I am planning to begin manufacturing over the weekend and on Monday!
3 Comments. Leave new
Wow! Really impressive understanding of your aesthetic and what it takes to achieve it. Do you know if you are going to do any other charred designs on the side/boarder? Cant wait to see this at expo!!
This chessboard is gonna look really cool! I like your idea to make the border fade from dark to light. This will look really unique and has the added function of establishing which side is for which player. I would definitely recommend reaching out to Josh at the Idea Forge Woodshop before buying a torch. He probably has one you can use which will save you some money. Excited to see how this turns out, good luck!
Hi Ethan!
Thank you for the tip! I’ll definitely reach out to Josh for the torch, I’m in the Idea Forge a bunch anyways for senior design. And yes I’m excited to try out the establishment of a side for each player! I just have to be extra sure that I get the corners right with these specified borders (white is right!).