
Goal: Build a cork bulletin board in the midcentury modern aesthetic with remnant wood . It will house a large poster of the United States so I can insert pins to the locations I’ve traveled to and then display it as wall art.
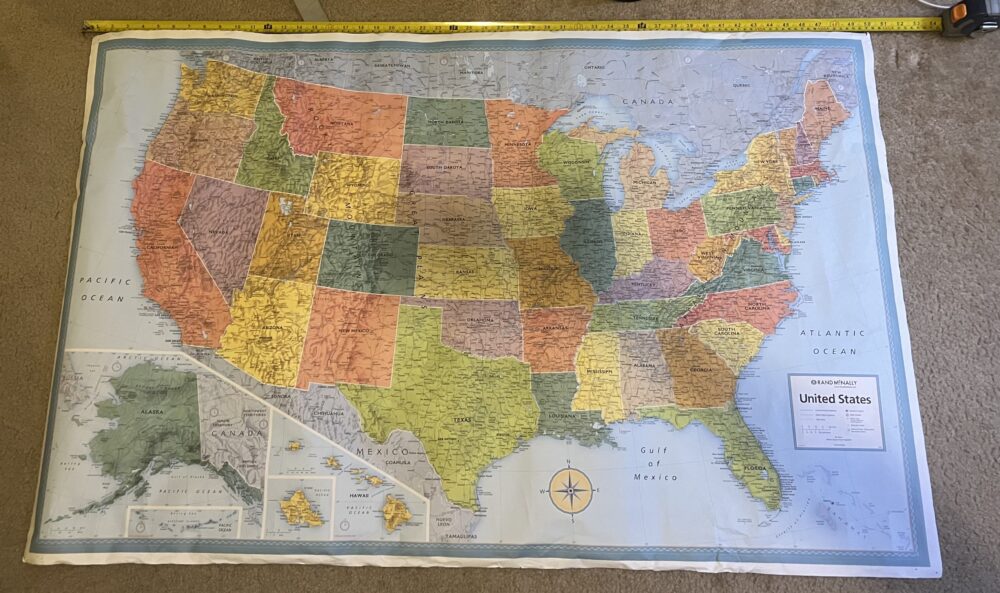
Context: I’ve owned this 50″ x 32″ poster map of the United States for probably 6 years now. Originally, I just pinned the poster to my wall and inserted pins to places I’ve visited. To protect the wall, I purchased cork sheeting and adhered that directly to the wall and then pinned the poster to the cork. However this system was very aesthetically ugly and the cork did not stick to the wall very well. So, these materials have just been sitting at my parent’s house even though the poster is something I enjoy having in my room. As a functional goal, I want to create the bulletin board so that the poster and cork can exist as one piece of furniture that is more aesthetically pleasing art, easy to transport, and more robust for keeping pins in the poster.
Midcentury Modern Aesthetic: The midcentury modern aesthetic is most commonly associated with interior design, so I think building a frame for wall art lends itself naturally to this aesthetic. Sarah Lyon from The Spruce, an interior design website, says that the midcentury modern (or MCM) is “defined by simple, functional, and wooden furniture” [1]. MCM’s simple and functional wooden furniture often adds visual interest through incorporating curves and organic shapes, or using mixed materials.
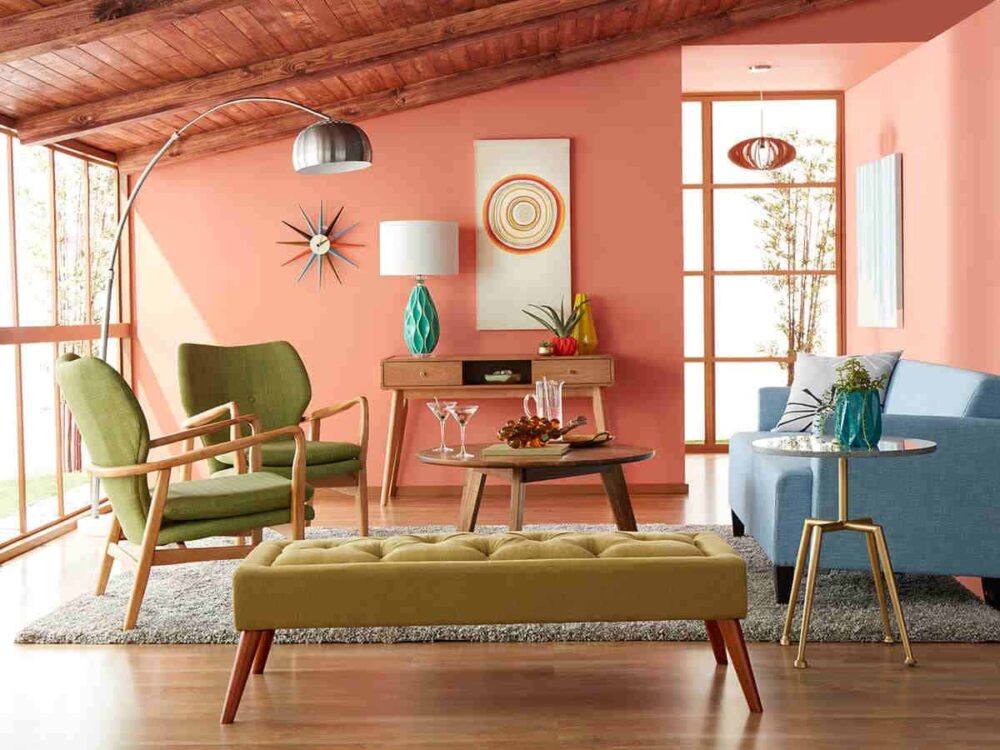
I was most inspired by the image below from the Don Pedro Home Design Website [2]. It is an example of the MCM style but with a lot of colorful pastels and lighter wood (compared to the usual use of dark woods like teak).
My artistic goal is to have a bulletin board with a clean wooden frame, using the wood as the decoration and the map and pins to add a pop of color. It will likely be a lighter wood since I am using remnants and that is what is often available.
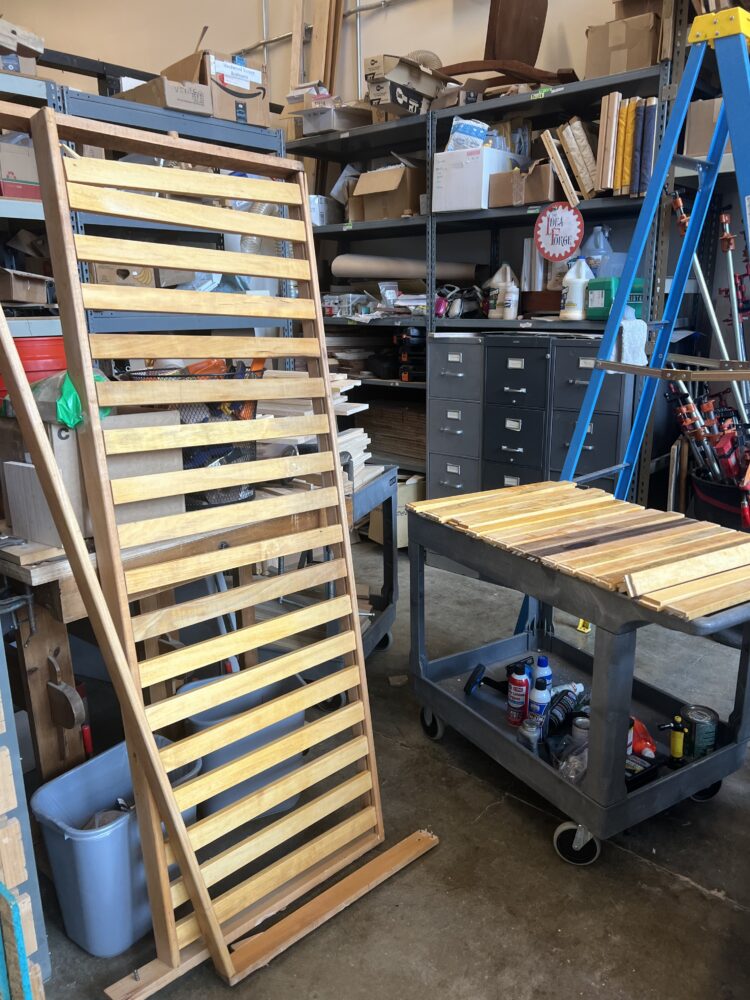
Material Sourcing: I was originally planning to use scraps from the Maker Space wood shop and then join them together to make the long sides of the bulletin board frame, leaning into the mixed materials themes of MCM. However, this changed when I came across a bed frame that was being thrown away in the Idea Forge dumpster. By using the long maple beams from the bed frame, I was able to make frame sides that were continuous and utilize the channel that was already cut to hold the cork board.

Fabrication:
I laid the wood out to dry for a few days since it was sitting out in the snow when I found it. Then I broke down the bed frame into its individual pieces by removing all of the hardware from the long beams, pulling out staples with vice grip pliers and unscrewing wood screws. I scanned the wood with a metal detector to make sure all of the hardware had truly been removed before cutting it.
I sanded these long pieces to start with a blank template and to remove some surface water stains and golden wood stain that I didn’t like. I could have done this after cutting the pieces but I only focused on sanding the areas I would use.

I drew up the dimensions of the frame based on the measurements of the remnant wood and the size of the poster.
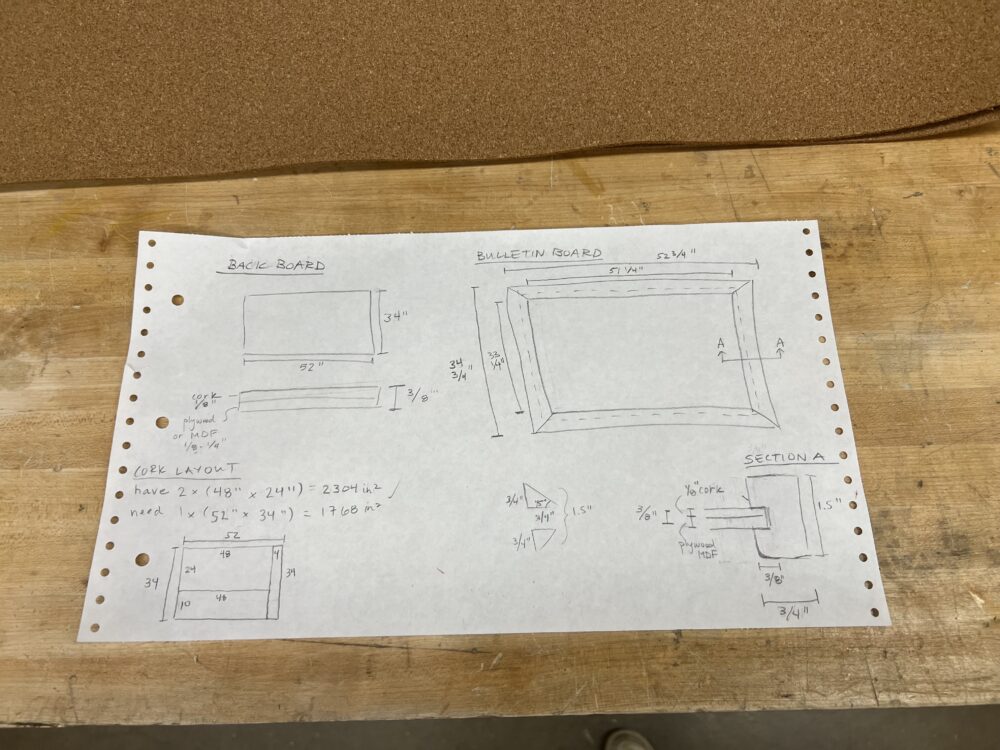
After preparing the wood I turned my focus to making the back cork board so I could build the frame around that. I chose an 1/8″ sheet of wood that was extra in the MakerSpace and cut it to size on the table saw. Then I used spray adhesive to glue the cork to this back sheet of wood, based on the recommendation from tutorial YouTube videos [3] and an experiment I conducted with some extra cork to verify that the cork wouldn’t just absorb the adhesive. I had two 24″ x 48″ sheets of cork for a 53″ x 36″ board, so I did some patchworking to cover the whole board. I was fine with this since the poster would be covering the majority of the cork, and it is just there to hold pins.
I cut the long wooden beams down to the size of the frame sides on the miter and table saws, fitting them up around the backboard and then cutting the 45 degree edges again on the miter saw. I then had to sand some more to get the saw markings off of the wood.
I stained these frame sides a light “Pecan” so the color of the wood wouldn’t change much. I did this before the glue-up to avoid getting stain on the cork.

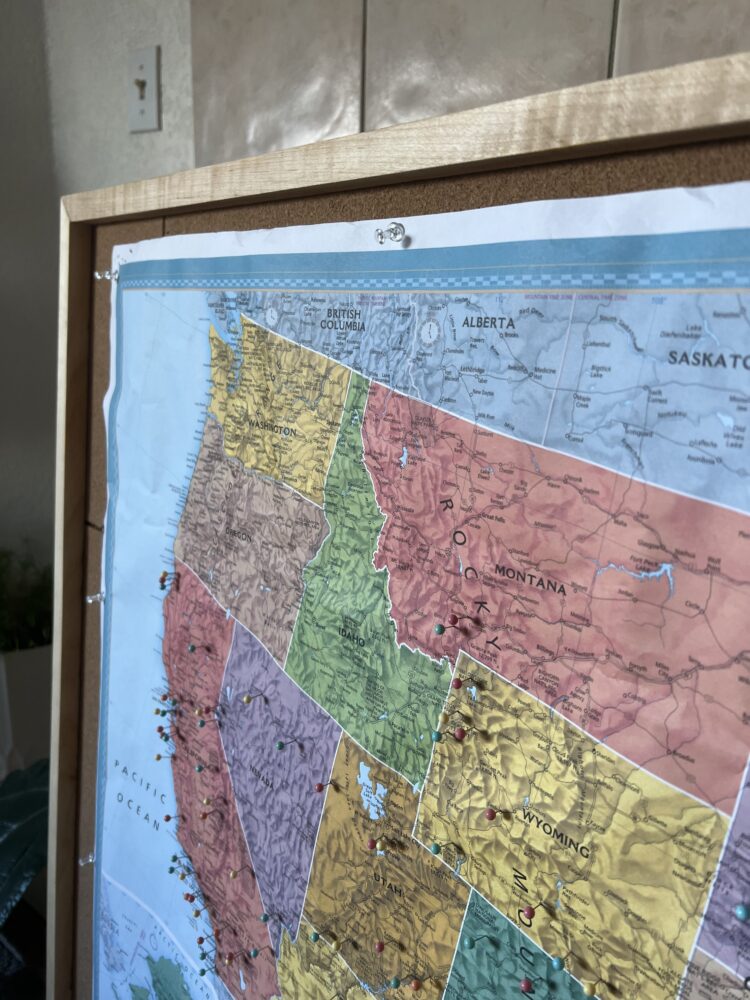
Gluing the entire bulletin board together was the most difficult part since this was such a physically large project. I put wood glue into the channels of the frame edges and slid them onto the sides of the backboard, then glued the corners together. I used large clamps on all sides to apply pressure to the frame and corners while they dried and small clamps on the corners to make sure the face of the frame was flush, adjusting all of the clamps simultaneously to ensure the corners lined up. Even after all of this adjusting, the corners aren’t perfect, but I am still happy with the result and my learnings since this is my first woodworking project.
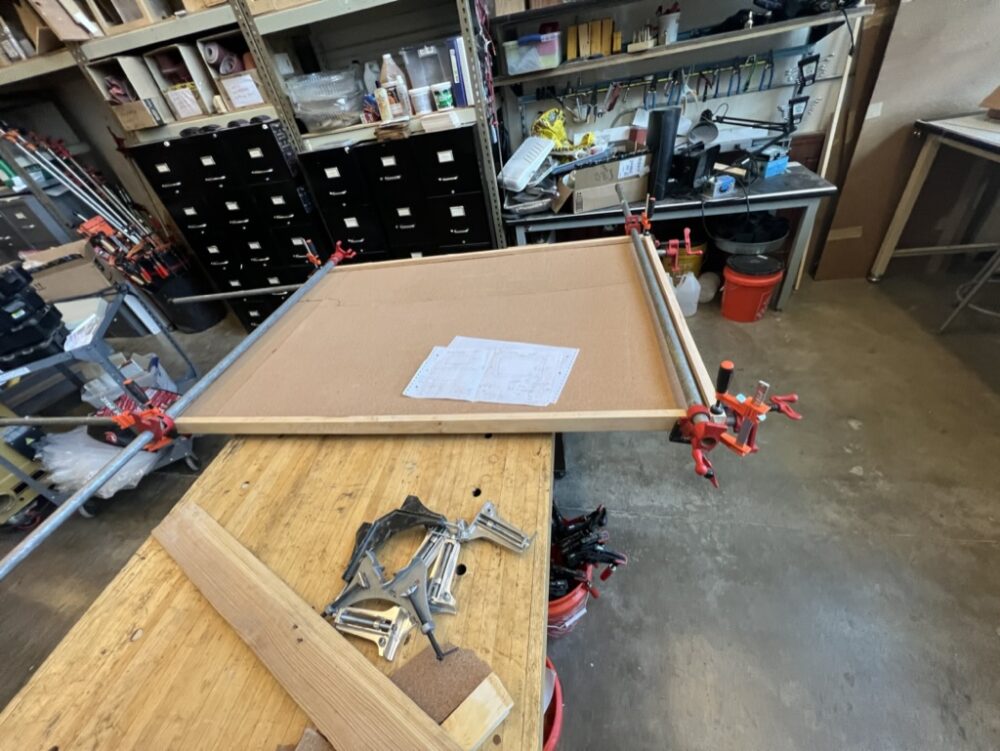
I used such a thin backboard since I didn’t want to cut out a larger channel in the frame than the one that already existed. Because of this I put some thin wooden shims in the channel, behind the backboard, so that the cork is flush with the front of the frame. The backboard wasn’t very rigid either so I cut a scrap plank to the height of the board and used metal brackets to attach it to the back, which has made the board much sturdier.

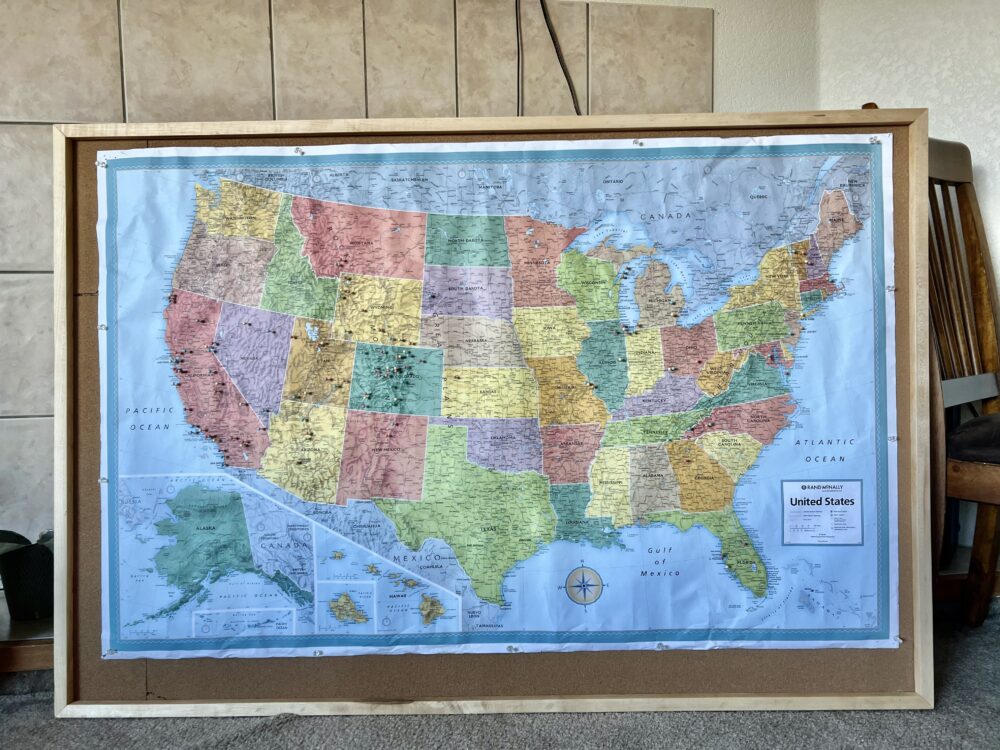
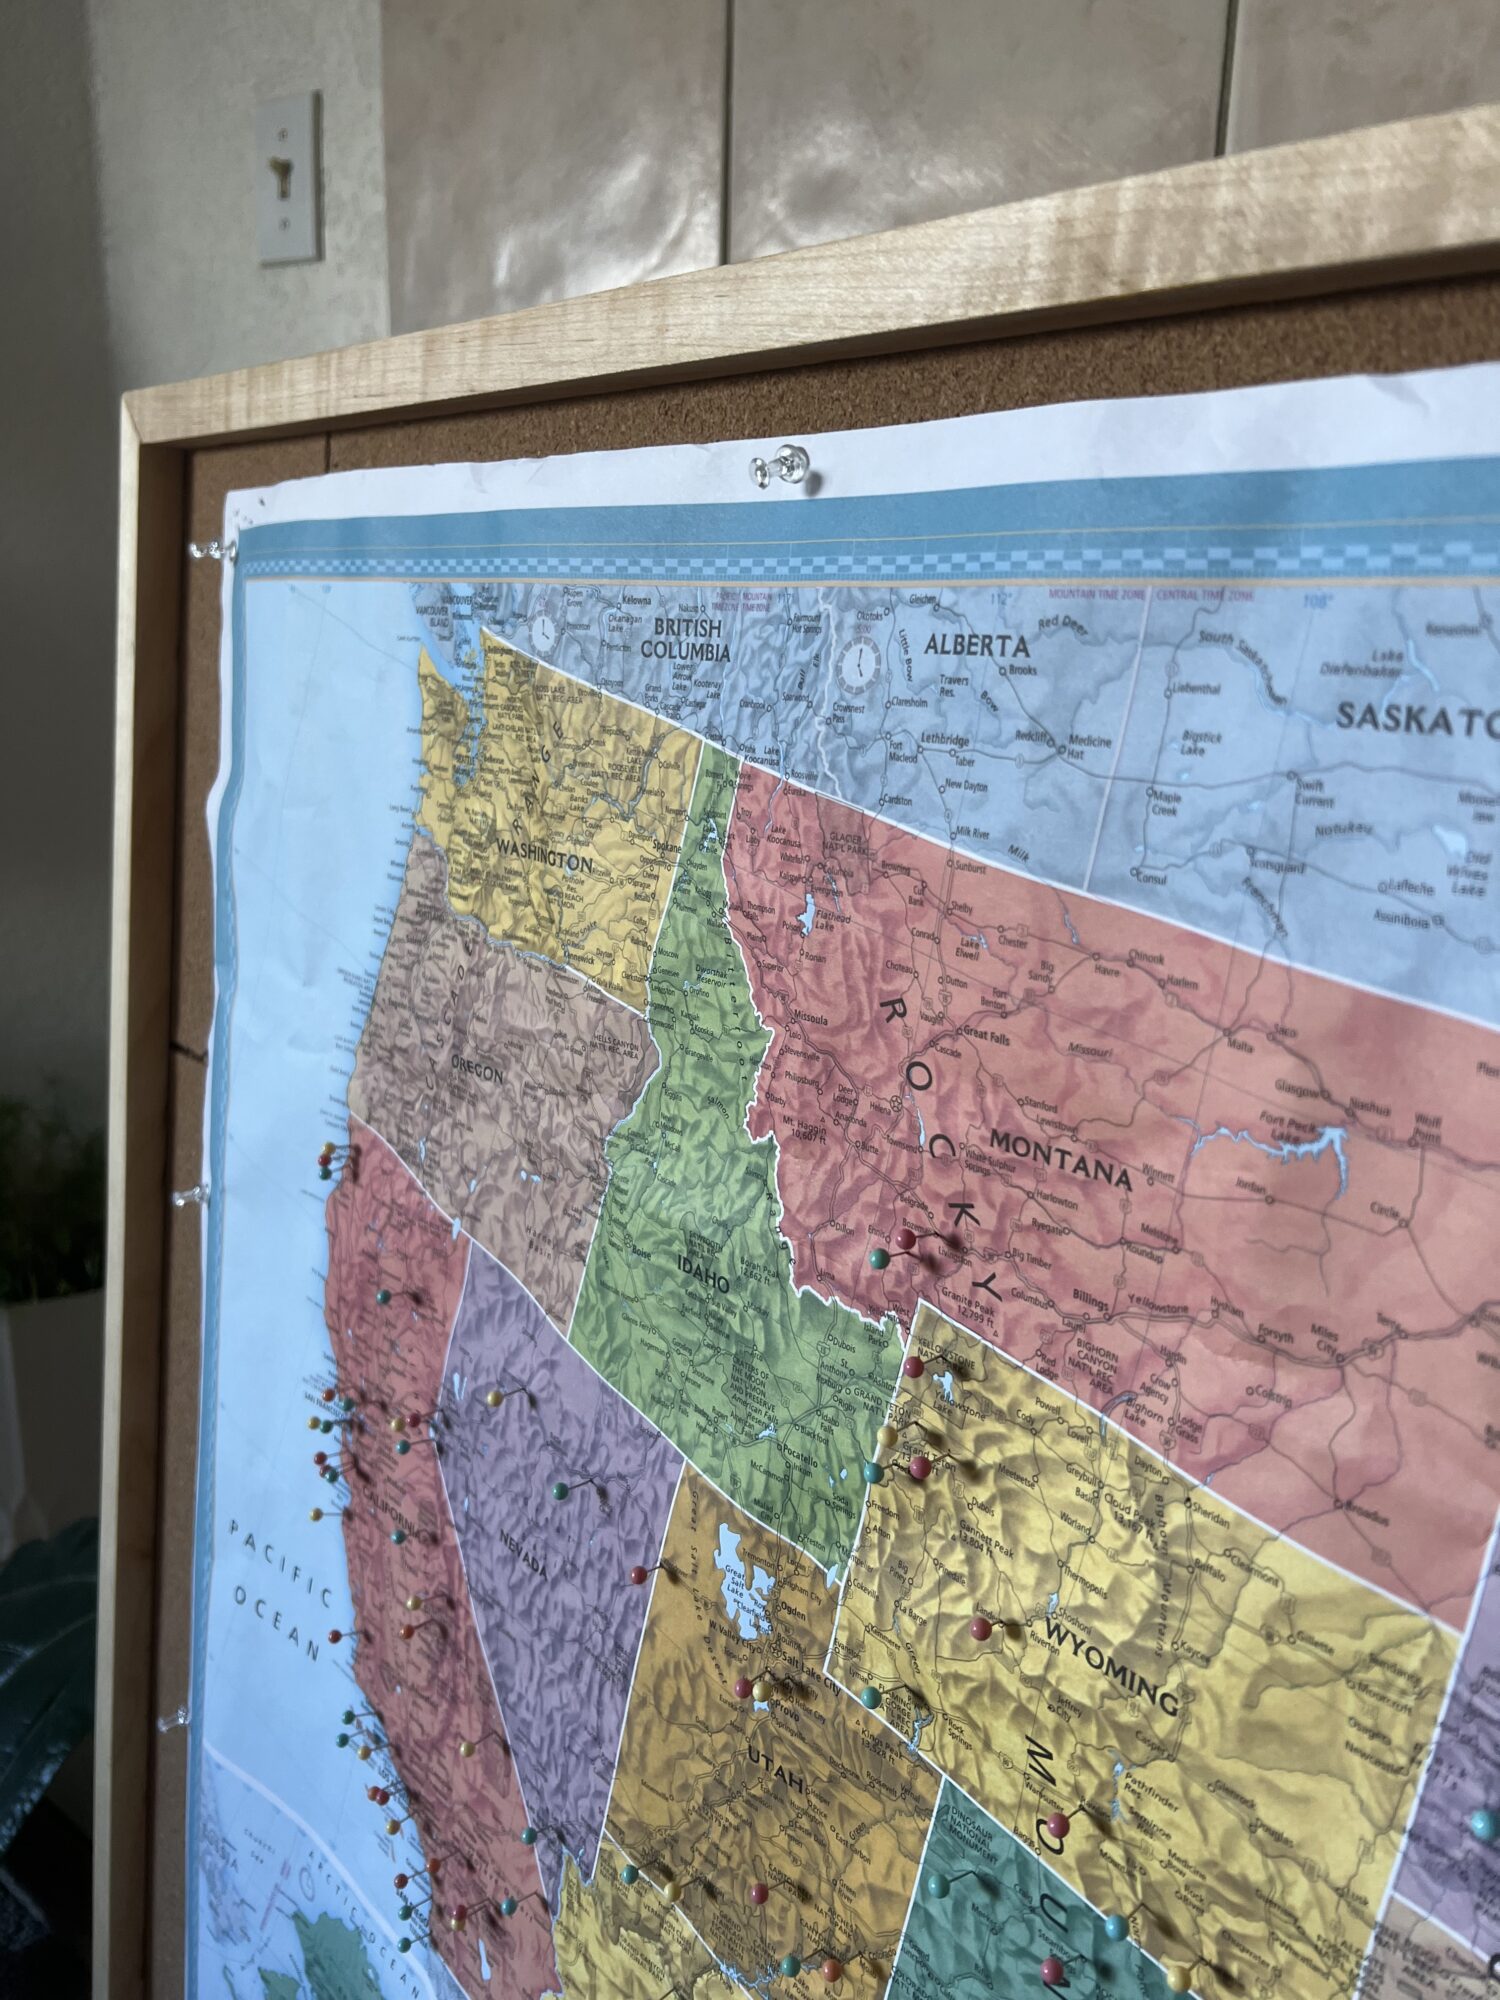
Conclusion: All of my functional goals were met! As I transported the board home and placed pins in it, it held up well and kept the pins and poster secure. It is cool to transform something that was headed to the trash into an interactive piece of wall art for myself.
My artistic goals were mostly met as well. Using uniform wood makes the frame more sleek and clean; a simple maple frame to wrap around the colorful map. I think it would fit into the room from my inspiration image. Some of the fabrication made it it a little messy in the corners and on the back side which might contrast the craftsmanship in a lot of MCM furniture, but I think that is to be expected with undertaking such a large project without much woodworking experience. I learned a lot and I am excited to have this big cork board in my room and to continue adding pins to places I visit!
![]()
References:
[1] Lyon, Sarah. “What Is Midcentury Modern Style? Here’s What You Should Know”. The Spruce. January 18 2024. https://www.thespruce.com/things-you-should-know-about-mid-century-1391827[2] Bailey, Jennifer. “Mid Century Modern Living Room Ideas”. Don Pedro Home Design. March 21 2020. https://donpedrobrooklyn.com/mid-century-modern-living-room/
2 Comments. Leave new
Hi Katie! Wow, your midcentury modern bulletin board turned out great. I think it’s great how you included the discarded bed frame in your design! Your attention to detail in the planning and fabrication stages is very evident. It is wonderful to see your functional goals were met successfully. Putting pins on the map to represent places you have traveled to is a great idea and also adds to the aesthetic in a good way. Congratulations on a visually appealing and successful project!
I love your final product. I think this is something you can keep/use for the rest of your life, and see how the portrait changes as more and more pins are added over time. I’m super impressed by the craftsmanship of the bulletin board itself, especially this being your first time woodworking. Wood is a super difficult medium to get the exact outcome you want, and yet this looks so clean and professional! I’m wondering if in the future, a smaller-scale map (of Colorado maybe) can replace the U.S. map? Amazing job overall!