Design Preview Report: Custom Bike Frame

I am an avid cyclist, and as a result, I have obtained many different bicycles. However, one bicycle that I do not have is a Street Trials Bike. For many years, I have ridden competition trials, but I have never really gotten into Street Trials primarily because the bike frames are fairly small and do not suit taller rider such as myself. Therefore, I decided to create an independent study project where I design and manufacture My Own Street, Trials frame. For the purposes of this aesthetics and design project, I wanted to further document this process.
Street Trials Bicycle (1)
Competition Trials Bicycle (2)
I began my process by researching what geometry was used by numerous different manufacturers on the market today. Ultimately, I decided to lengthen the reach of the bike in order to accommodate my bigger size, and I chose to raise the bottom bracket slightly in order to make the geometry, more similar to a competition-style bike, otherwise, the geometry that I have shown below is fairly similar to other street Trials bicycles on the market.
Geometry Study
This is the geometry that I ultimately decided on:
  • Reach: 475 mm
  • Chainstay Length: 362 mm
  • Bottom Bracket Rise: 30 mm
  • Head Tube Angle: 74 degrees
  • Seat Tube Angle: 78 degrees
  • Wheelbase: Will be determined in CAD (Dependent on fork)
  • Stack Height: Will be determined in CAD (Dependent on steer tube)
  • Rear Hub Spacing: 135 mm
In terms of appearance, I have chosen to follow an industrial aesthetic. I wanted to follow this aesthetic because of its simplicity and focus on raw materials. Frame itself will be made from 4130 steel and it will be welded by myself. Ultimately, I wanted to maintain the raw steel appearance of the frame and emphasize simplicity when making, the frame members and its components. This will make the manufacturing process, simple and also add strength and reliability to the frame. I also believe that these characteristics fit well into the industrial aesthetic if I were to keep the frame in a raw form to showcase, its hand-built nature, and all of my mediocre welds! I want this frame to showcase my manufacturing abilities and I want to leave the frame in a raw steel appearance for a little while. If I use linseed oil to coat the frame initially, it will protect it from rust and it will give me the capability to remove it if I want to change the appearance in the future.

I also explored different aesthetics for this project if I were to choose something other than industrial. First I looked into an organic design, which I thought could be interesting because there are bike frames that are made out of bamboo. Second, I also looked at a minimalist aesthetic, this could be accomplished, by using carbon fiber to get rid of some of the extra lines and complexities that come with using steel tubing. Ultimately, I decided to stick with an industrial aesthetic mostly because steel would be the easiest to work with, and I am confident in my welding abilities when using steel.

Minimalist Aesthetic
Organic Aesthetic with bamboo frame menbers
And then move forward to my CAD design, which I have shown below.
CAD models of the frame
From the images above, this is what my bike frame should look like with the geometry that I’ve selected, it will be made of steel tubing ranging from 3/4 of an inch in diameter to 1 1/2 inches with wall thickness between .049 and .035 inches in thickness. You can see some of the critical components on the frame shown above. These include the head tube, the bottom bracket, and the rear dropouts, which are important for the frame to accommodate standard bicycle components. These components will be outsourced since it is much easier to acquire these as stock instead of manufacturing them myself. I also included a seat post on this bike to fit the aesthetic of most street, trials bicycles.  I thought about not, including a seat, believe it, or not, because competition trials bikes that I usually ride do not have seats. Once again, this frame will be designed around 24-inch wheels so you can see above that there are some compound bends in the rear triangle. This is to accommodate the rear wheel and allow for crank clearance. Otherwise, I tried to keep the frame simple. You can see from the side of you that the top tube is in line with the rear seat days. I did this almost purely for aesthetic appeal. Manufacturing these components will largely consist of using tube bending dyes, mitering the tubes with a mill, and welding all of the components together. Simplicity was key in my design process and I think it greatly influenced the appearance of the frame.
A critical portion of this project will be the manufacturing process. Most importantly, I will need a system to jig the frame in order to place all of the tubes and components in the correct areas to create the geometry that I desire for the frame. Luckily, I am able to work with a custom frame builder in Fort Collins. James Bleakley, who owns Black Sheep Bicycles, has offered to help me with this project and donate his time and resources. He has decades of experience making custom titanium frames. This means that I will have the proper equipment to bend and miter the tubes, and most importantly jig the frame. He has his own jigging system that he has used on dozens of bikes for his company, once the frame is jigged, and it is ready to be welded, I will be able to tack weld the frame, while they are still in the jigs. Following tacking, I will then move the frame to the idea Forge welding shop where I will complete the welding because the tubes are so thin, I will most likely use a TIG welder because it is easier to control the heat applied on the thin-walled material, and I also think that TIG welding creates a superior finish and appearance on the middle compared to other types of arc welding. I have already acquired materials and components for this bike build so the next steps will be the manufacturing process to complete the frame.
There is also a part that I will have to outsource the manufacturing for. I will be making head tube gussets that interface with the head tube, top tube, and the downtube to reinforce the front of the frame this will be made from .1 inches thick steel And it will have to be water jetted in the idea forge machine shop because of its complex geometry. I tried to design these parts to look consistent with the rest of the frame so I maintained simple geometry that would still fit within the industrial aesthetic that I was aiming for.  Ideally, these parts will be done when I am ready to start welding in the Idea Forge machine shop
Head Tube Gusset
I have outlined the schedule that I have laid out for myself to complete this project. This will allow me to complete the project in a reasonable amount of time alongside senior design and other projects that I have in place.

Week 1 (March 18-22): At this point, I will potentially have time to start manufacturing the tubes and the frame components after having received the tubing and components required.

Week 2 (March 25-29): I will be unable to work on the project over spring break. I may have the time to start manufacturing the tubing on the last weekend.

Week 3 (April 1-5): This is when I will be able to complete the bending and general cutting of the tubes and begin setting up the frames jigging system. I will need to complete the rest of the coping and bending of the tubes and start putting all numbers in the frame jig system to be tack welding.

Week 4 (April 8-12): After tack welding, I will be able to finish weld the rest of the frame, and hopefully weld the head to gussets, brake, routing, and brake caliper mounts.

Week 5 (April 15-19): Finally, I will need to clearcoat the frame with linseed oil. I love it. This will leave the color of the steel and the welds exposed to maintain my industrial aesthetic. Furthermore, I will need to chase and face the bottom bracket and head tube of the bike so that they can interface with the high-tolerance components that fit in those areas. At this point, the frame should be done.

I am looking forward to seeing this project take shape and fulfill a dream that I have had for a long time. To make my own bike frame! I will begin manufacturing the materials and ordering external components for the frame shortly and I hope to have the complete bike at expo. I will continue to document the manufacturing process for you to see and share my progress. Please let me know if you have any questions and I hope you are also excited to see it come together!

Sources:

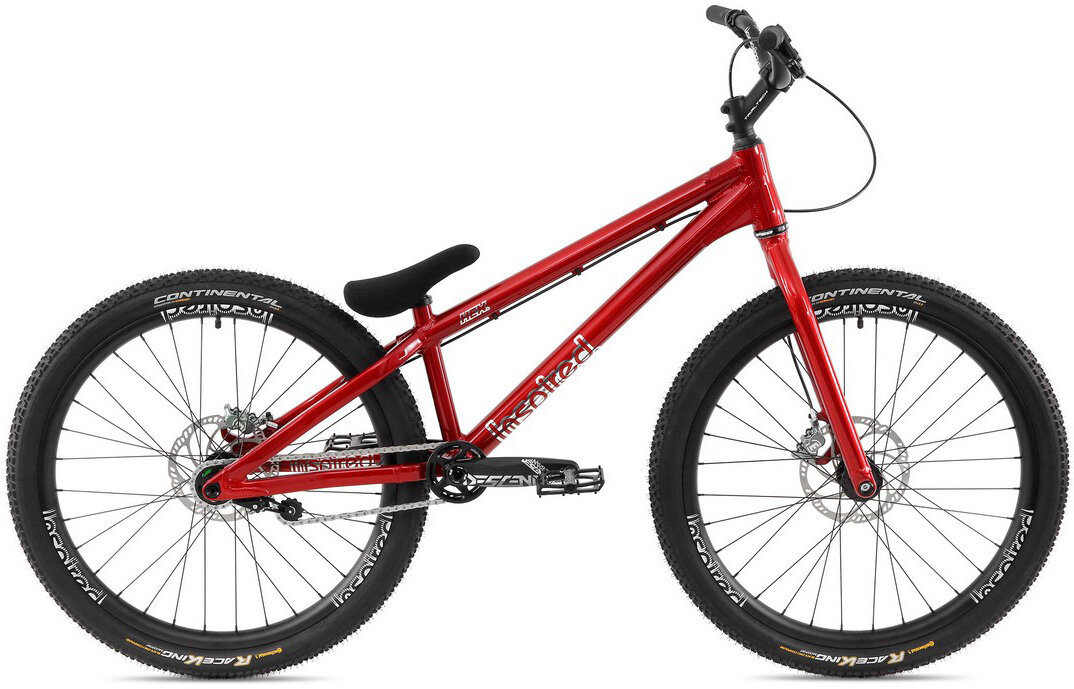
  1. https://www.webcyclery.com/product/inspired-hex-team-26-bike-14112.htm
  2. https://biketrialsdirect.com/2024-crewkerz-26-jealousy-ultimate-full-hs33/
Previous Post
Post 8 – Gear Wall Art Design Preview
Next Post
Design Preview Report: Western Camping Table

2 Comments. Leave new

  • Hi Sophie!
    Thanks for your response. I have definitely considered making the back out of steel as it could be more structurally sound. I even considered an industrial aesthetic for this project where the main structure would be steel instead of wood. Ultimately, I think that it may become more expensive for me to go in that direction but I am not opposed to having some steel elements in my minimalist design for structural integrity. Thank you for the feedback!

    Reply
  • Sophie Berry
    March 15, 2024 8:05 pm

    Hi Ian,
    I really like the idea of furniture that also acts as a bike stand/ storage space as someone that also has limited space and a bike to store. Something that I was wondering while reading was if you had considered making the back stand piece out of steel (or other metal) square hollowed out support bars. I think the combination of metal and wood could go quite nicely and fit into the minimal aesthetic. I also would help from a structural standpoint if you are going to be trying to mount heavier kinds of bikes like mountain and trail bikes you mentioned.

    Reply

Leave a Reply to Ian Farrar Cancel reply

Your email address will not be published. Required fields are marked *

Fill out this field
Fill out this field
Please enter a valid email address.