
Introduction
In this project, I aim to create a unique levitating nature scene, blending the serene beauty of natural elements with the intricate and mechanical allure of steampunk design. This piece is intended not only as a captivating decorative item but also as a testament to the harmonious coexistence of natural and mechanical aesthetics.
Inspiration and Existing Designs
My primary inspiration for this project comes from Victorian-era steampunk culture, characterized by its imaginative fusion of industrial steam-powered machinery and Nature . I am also drawing inspiration from Japanese bonsai art, which represents tranquility and harmony with nature.
Vision and Specifications
In this project, my goal is to create a unique levitating nature scene that combines the serene beauty of natural elements with the imaginative flair of steampunk design. This concept aims to transcend being merely a decorative item, embodying a symbolic representation of the harmonious blend between organic and mechanical worlds. With a budget cap of $150, the focus is on simplicity, affordability, and a dynamic feature that adds an element of change over time.
Specifications within a $150 Budget
- Levitating Element with Dynamic Feature:
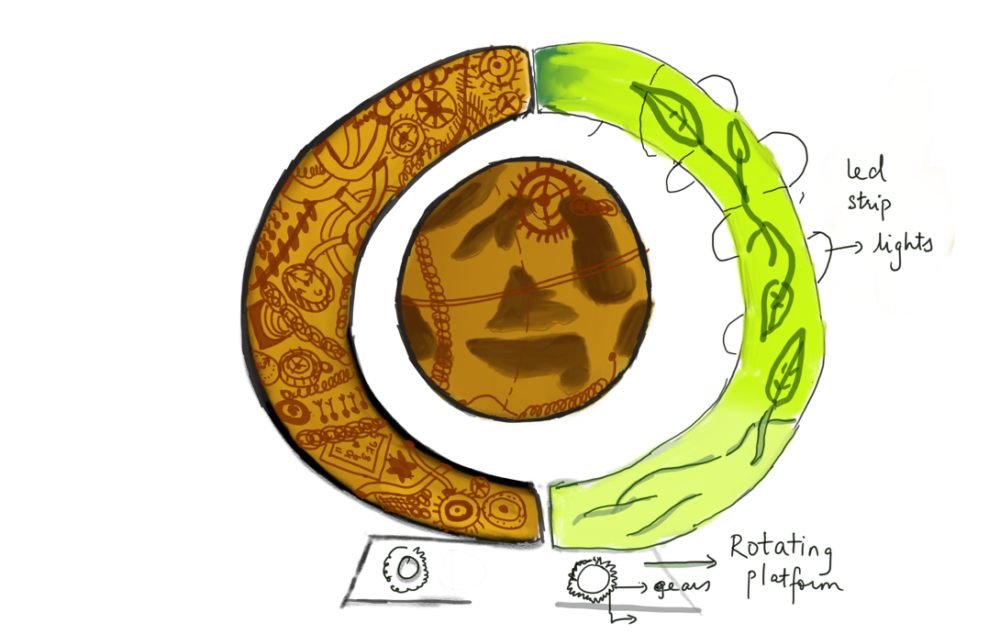
- Function: Utilizing affordable magnetic levitation technology, the main feature will be a floating Globe inside a circular frame rotating on a base
- Composition: The levitating element will consist of a lightweight, faux bonsai or an assembly of durable, low-maintenance air plants and moss. This choice not only reduces cost but also minimizes maintenance requirements.
- Steampunk-Inspired Base with Simplified Design:
- Material: The base will be constructed from a cost-effective wood alternative, such as MDF (Medium Density Fiberboard), painted or stained to mimic darker, richer woods typically used in steampunk designs.
- Design Elements: Instead of costly brass or copper, the steampunk aesthetics will be achieved using affordable metallic paint on sculpted plastic gears and cogs, arranged artistically around the base. These gears will be static, focusing on visual appeal rather than functionality to stay within budget.
- Interactive Lighting System:
- Lighting: The project will include a simple, battery-operated LED light strip. This choice offers an affordable way to enhance the visual appeal of both the levitating nature scene and the base.
- Control: The LED system will have a basic on/off switch. To add a dynamic aspect, the lights can be programmed to change brightness or color slowly over time, creating a subtle but engaging visual change.
- Cost-Effective and Easy Assembly:
- Construction: Emphasis will be placed on using components that are easy to assemble and require minimal special tools or skills. This approach ensures that the project remains accessible to DIY enthusiasts.
- Sourcing: Parts and materials will be sourced from budget-friendly suppliers, focusing on off-the-shelf components rather than custom-made items to keep costs down.
- Overall Aesthetic:
- Blending Styles: The design will maintain a balance between the rustic charm of the nature scene and the imaginative steampunk base, while ensuring that each element is cost-effective.
- Aim: To create an appealing and interactive piece that captures the essence of the original concept but is practical and within the financial scope of a modest budget.
In summary, the vision and specifications are tailored to create a levitating globe that is both captivating and budget-friendly. By focusing on affordable materials and a simple yet dynamic feature, this project aims to deliver an enchanting piece that is feasible to build and maintain within a $150 budget.
Alternate Aesthetics and Approach
Initially, I considered two alternate aesthetics: Modern Minimalism and Rustic Naturalism. However, I ultimately set these aside in favor of enhancing the original steampunk concept with dynamic and interactive elements.
Design Process and Sketches
My initial sketches showcased a static nature scene atop a steampunk base. As I progressed to the final designs, I will utilize CAD drawings to refine the rotating mechanism and the integration of LED lighting. My sketches show the the rough idea of the design
Prototyping and Fabrication Progress
Initial Prototyping
- Magnetic Levitation Setup:
- I will begin by testing the magnetic levitation technology. This involves setting up a basic levitation kit to ensure it can effectively support and levitate the globe while rotating
- The primary focus will be on balancing the weight and size of the levitating element to achieve stable and consistent levitation.
- Rotating base
- The aim will be to ensure smooth operation and sufficient strength to adjust the rotation of the levitating element without disrupting its stability.
- LED Lighting Integration:
- I will experiment with different configurations of LED lights to determine the best way to illuminate both the nature scene and the base. This will include testing battery life and brightness levels.
- The focus will be on achieving a pleasing aesthetic effect that complements the overall design without overwhelming it.
Refining the Prototype
- Adjusting Levitation and Rotatory Motion
- Based on initial tests, I will make necessary adjustments to the levitation mechanism and the rotating base , ensuring reliable and effective operation.
- Modifications may include tweaking the magnetic strength, optimizing the rotations for smoother movement, and adjusting the positioning of components for better balance and aesthetics.
- Enhancing LED Layout:
- I will refine the placement and integration of the LED lights based on the initial tests. This might involve rearranging the lights for better distribution or selecting different LED models for improved visual appeal or energy efficiency.
Fabrication of the Final Design
- Base Construction:
- The base will be fabricated using the chosen material, likely MDF or a similar cost-effective wood alternative. It will be cut, shaped, and stained to match the envisioned steampunk design.
- The decorative gears and cogs, made from budget-friendly materials, will be attached to the base, ensuring they align with the overall aesthetic without functional movement.
- Assembling the Levitating Nature Scene:
- The nature scene, consisting of faux bonsai or air plants and moss, will be carefully assembled. I will ensure it is lightweight and balanced for effective levitation.
- The scene will be tested on the magnetic levitation setup to confirm its stability and appearance.
- Final Integration and Assembly:
- All components, including the Rotating base and LED lighting, will be integrated into the base. I will pay special attention to the discreet and seamless incorporation of these elements.
- The final assembly will involve connecting all parts, ensuring that the levitating element functions as intended with the base.
Testing and Final Adjustments
- Functionality Testing:
- The completed project will undergo thorough testing to ensure all components work harmoniously. This includes testing the stability of the levitation, the effectiveness of the pulley system, and the performance of the LED lighting.
- I will observe the overall aesthetic and functional aspects, making sure they align with the project’s vision.
- Making Final Tweaks:
- Any necessary adjustments or refinements will be made following the testing phase. This could involve fine-tuning the levitation mechanism, adjusting the lighting, or making minor aesthetic enhancements to the base or nature scene.
In conclusion, the prototyping and fabrication process will be a careful and iterative journey, balancing functionality, aesthetics, and budget constraints. Each step will be approached with an eye for detail and a commitment to realizing the envisioned levitating nature scene with enhanced steampunk elements.
Timeline
Days 1-2: Design Finalization
- Refine and finalize the sketches for the levitating nature scene and the steampunk base.
- Select materials and components, focusing on affordability and availability.
Days 3-4: Material Procurement
- Purchase all required materials, including the magnetic levitation kit, MDF or wood alternative for the base, decorative gears and cogs, faux bonsai or air plants, moss, and LED lights.
- Gather tools and equipment needed for the construction and assembly of the project.
Days 5-7: Initial Prototyping
- Begin testing the magnetic levitation setup, focusing on balancing and stabilizing the levitating element.
- Construct a basic version of the the base to test the stability
- Experiment with different configurations of LED lighting to find the optimal layout.
Week 2: Refinement and Component Integration
Days 8-9: Refinement of Levitation and Rotation Mechanics
- Analyze results from initial tests and make necessary adjustments to improve the levitation mechanism and the Rotatory Motion .
- Optimize component placement for balance and aesthetic appeal.
Days 10-11: LED Lighting Enhancement
- Refine the LED lighting setup based on initial experiments, finalizing the arrangement and installation method.
- Test the longevity and brightness of the LED lights to ensure they meet project requirements.
Days 12-14: Base Construction and Component Assembly
- Start constructing the base, cutting, shaping, and staining the chosen material.
- Begin attaching decorative gears and cogs to the base, ensuring they align with the steampunk aesthetic.
- Integrate the improved levitation mechanism and pulley system into the base.
Week 3: Final Assembly, Testing, and Adjustments
Days 15-16: Assembling the Levitating Nature Scene
- Assemble the levitating nature scene, ensuring it’s lightweight and visually appealing.
- Test the assembly on the magnetic levitation setup for stability and balance.
Days 17-18: Integration of Lighting and Final Assembly
- Integrate the LED lighting into the base and the levitating element.
- Conduct a preliminary assembly of all components to ensure they work cohesively.
Days 19-20: Comprehensive Testing
- Perform thorough testing of the entire setup, focusing on functionality, stability, and overall aesthetics.
- Observe the project in different lighting conditions and from various angles to ensure it meets design expectations.
Day 21: Final Adjustments and Completion
- Make any last-minute tweaks or adjustments based on testing feedback.
- Finalize the assembly and prepare the project for presentation or display.
- Document the completed project through photographs and notes for future reference or replication.
This 3-week timeline provides a structured approach to bringing the levitating nature scene project to fruition, balancing design, construction, and refinement within a limited timeframe. Each phase is crucial, from initial concept development and material procurement to detailed testing and final adjustments, ensuring the project is completed successfully and meets the envisioned aesthetic and functional goals
design inspiration
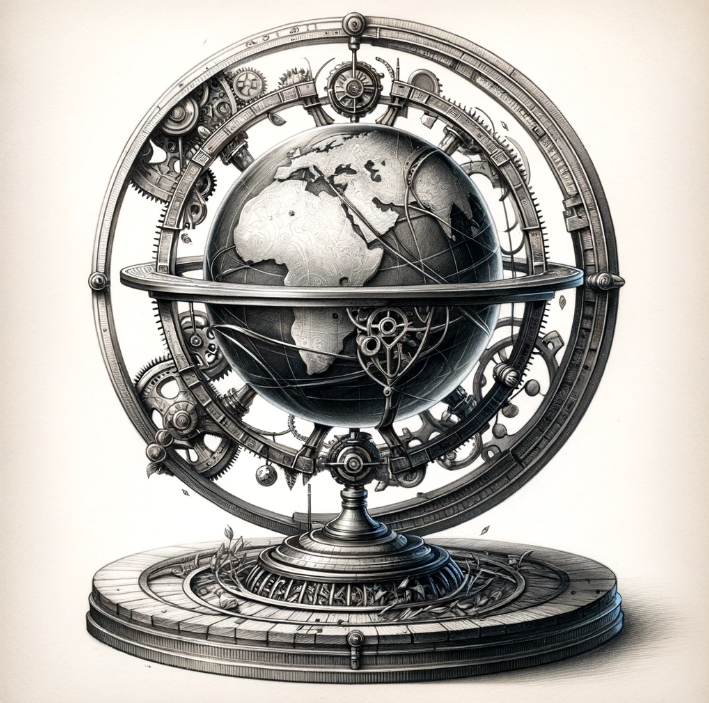
Generated by Dall E
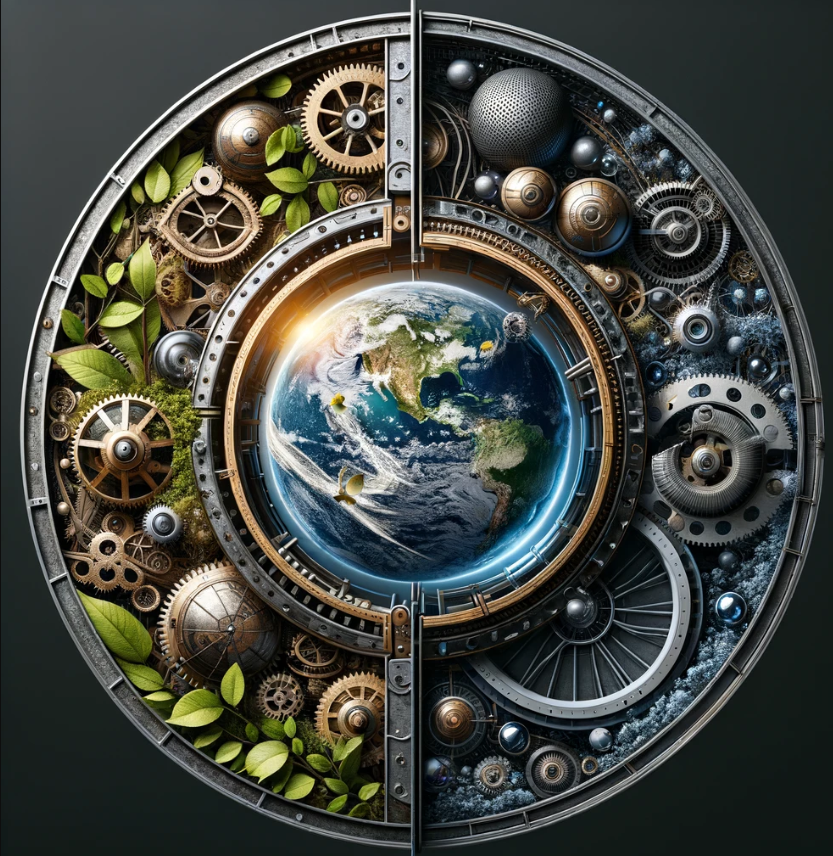
Generated by DallE
2 Comments. Leave new
Hi Grreshan, this is such a cool design and I think it’ll look great. I think its also cool you already have a very specific plan for getting it made so that you can get it done faster. Do you know how you’re going to cut out the gear pieces yet?
Grreshan, great post. I think your idea is really cool, both aesthetically and mechanically. And I think you’ve done a great job planning out your time realistically. I would like to know a little bit more about where you’re planning to get your materials, especially the magnet stuff. Do you have a reliable supplier in mind?