
In this post I’ll be detailing how the algorithm works and what tweaks I applied to create the different images shown in my presentation. Since I was a little confused on the topics of the final blog posts, most of my schedule stuff got put into last week’s blog post. So the “How” will be how the algorithm works plus why I think it’s viable and where I might go next with it.

My Procedural Gradient Algorithm is a pixelswap algorithm that processes the pixels of an image from left to right, top to bottom. So in the diagram below the pixel I is being process, the shaded pixels are already processed and the unshaded ones are unprocessed.
When we process a pixel we first find an area C that is typically made up of unprocessed pixels, and find the average color of that area. We’ll call that color C as well for convenience.
Then we look at all unprocessed pixels and take a sample of size N. We compare the color of each of these pixels to color C and pick the closest one to swap with I
Now mark I as processed and move onto the next pixel, and repeat until the image is completely processed.
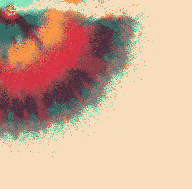
Like in my presentation, I’ll be using this input image to show you how different parameters change the output. It’s color and random pixel placement make it easy to tell what’s happening, and I think it looks very vibrant compared to some images I’ve used.
What if I change where I get the area C from?
C is typically obtained from a square area above I, but shifting that left or right will change the direction of the smears.


What happens if I change the size of C?
Since C is a square we can change the size of that square. A larger C size means larger, smoother smears.
What happens if I change N?
N is the number of pixels to compare to C. Larger values means there is a higher chance that the comparison finds a very close color to C. Larger means smoother, smaller means more random and static-y


What happens if I look for the furthest pixel to C instead of the closest?
This means that process pixels will “try” to be the opposite color of those above them, creating an alternating pattern. I really like this one and might refine it.


What happens if I process the pixels in some other order?
This was an experiment that didn’t get too far, but I tried only processing pixels that are adjacent to processed ones, and processing the ones furthest from the center first. The code I wrote was really inefficient though, so I might need to start over at some point. It creates so awesome patterns though.
![]()


What if I tried to imprint images on top of the filter?
I also wrote an addon that takes a black and white image and changes N based on the opacity of the corresponding pixel. The result is that the dark parts of the impression look fuzzier. I’m not sure if I like it in it’s current state.


Takeaway
In it’s current state this project is a toy, it’s a simple algorithm that I can tinker with and refine for a long time. I think that to consider it “complete” I would want it to be more focused in what it does, creating a specific type of output image that could be shown off somewhere. It also might be a good idea to make a UI for all of the tweaks I mentioned above, as currently they’re included as variables in the actual source code. Even though circumstances made this process difficult, I’m glad I decided to fall back on something I’m familiar with. I didn’t have as much time as I anticipated but I’m proud of my final product, it’s likely one of the best looking code doodles I’ve made in a few years.
Citations:
All images not listed are made by me!
Teatime-With-Maddie. “Teatime-with-Maddie.” Teatime with Maddie, 19 Sept. 2016, teatime-with-maddie.tumblr.com/post/150622675394/everythingistroymazing-rerooted-my-meeshell-i.
Temporal Color Changes in a Stack of Images Containing Randomly Generated Colors, www.youvan.com/Examples/Example_1._Temporal_Color_Changes_in_a_Stack_of_Images_Containing_Randomly_Generated_Colors.htm.
1 Comment. Leave new
Hi, Kyle,
Wow! I’m amazed by the algorithm processed pictures that you showed. I think you made a really unique project that can be reused and repurposed for many other things. (The project reminded me of a talk that was hosted at ATLAS, and it was presented by an artist who’s good at using computer processing to make art pieces, and now I totally forgot about his name.) Anyway, I think it’s interesting that line of codes can perform such an amazing job of altering a picture into something that’s totally different. I think you did a really great job, and I’m interested to see your GitHub post if you have any.
Well done!
Xiang