

Timeline:
W1: get the materials
W2: start prepping them to be assembled easily later (cut wires, cut wood, glue pieces together etc.)
W3:Catch up week
W4:assemble 1+ ornithopters
W5: Spring break – test, build larger model, TEST, film
W6: test/ extra week
W7:Build stand?
__________________________________________________________________________
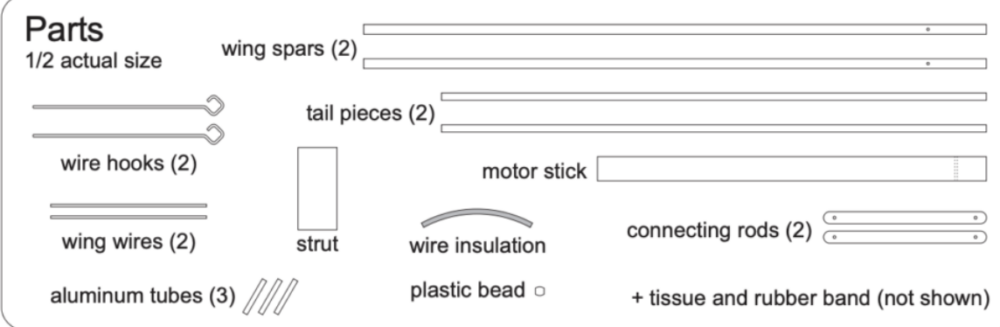
Getting the bits and bobs:
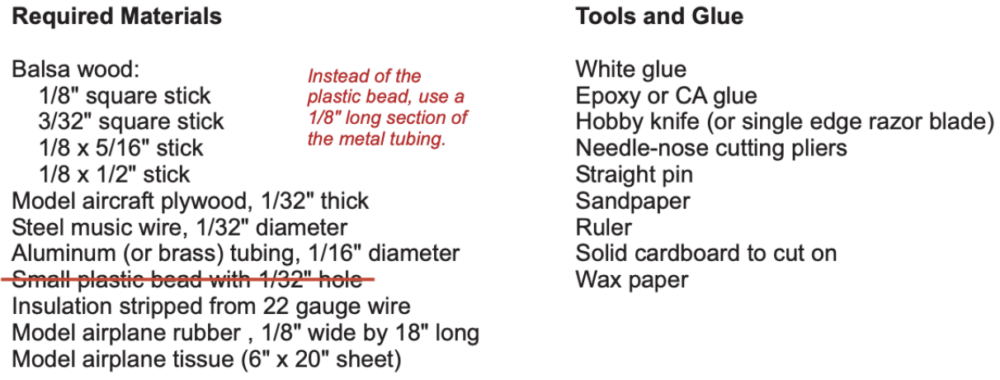 In the instructions that I had found while researching there was a detailed parts list. I first tried acquiring the different parts at Michaels however that went extremely poorly. While they had one or two things that I was looking for there selection was quite a dismal and I ended up concluding that if I got the pierced they offered and cut them down / modified them to fit my needs it would end up taking more time and energy than was worth the convenience of getting the pieces then and there.
So I turned to ordering the materials online which went smoothly and everything came in a timely manner. After getting the material I needed to prepare the material so assembly would also go smoothly.
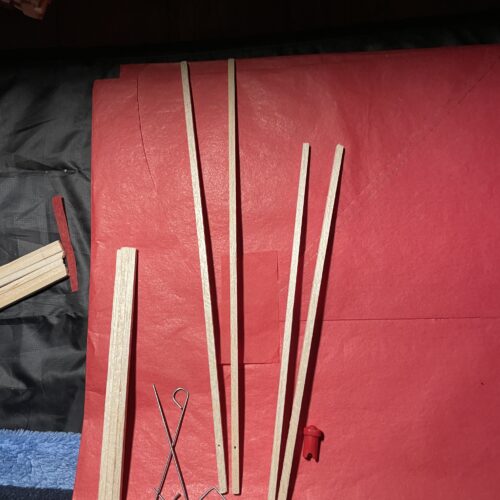
Preparation of the materials:
 The image shows a few of the things that I needed to prepare before I could start building.

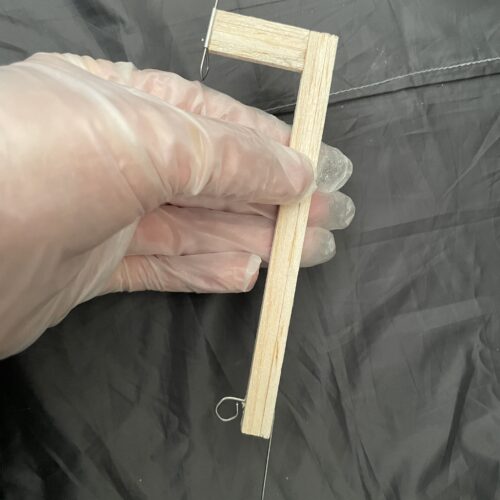
After that came putting those prepared parts together. I prepared more pieces than I needed so I could make three ornithopters. Just in case I needed a backup. I assembled the pieces the Friday before spring break in order to set myself up with the most time to test (and fix all of the pieces that broke). I also because of the method I had used to make the first ornithopter I thought I would be a bit too heavy to fly so I only built up two ornithopters fully. The third would be my back up’s back up (the red one). Assembling the ornithopter took more time than I had expected. It took me all afternoon at least 3+ hours to get everything to the point where I felt the ornithopter was almost ready to fly.

As some bad weather was expected during the week of spring break I also pushed to do the inaugural test flight that same Friday.
Video 1:
I think the test flights were moderately successful as they flew in a circle with one of the longest attempts being close circling 3 times before hitting the ground. Something that I had noticed was that the orange one that I had made flew better than the blue one. My best guess as to why that was comes down to the weight distribution differing slightly between the two as the gluing and placement of each piece differed slightly. Or the adjustments made to the tail and wings.
While I was testing the blue one disaster struck. As I was winding the rubber band around the 65 turn the connection between the vertical and horizontal join snapped because of the amount of force the rubber band was exerting onto the hooks. This was a bit unexpected because with the other one I was able to wind the wire a bit over 80 times. That is where I called it for the first test. After testing each ornithopter a few times and snapping one of the joins. I moved onto reapplying the wing tissue to both, fix the join on the blue one, and order the proper rubber bands.
I hadn’t prepared any of the rubber bands beforehand so it was a bit of a surprise when problems like these appeared.
I think the rubber bands that I got were too large for the application that I was trying to use them for.
Since the rubber band needed to be wound up to capture the energy it would expend in flight the large size seemed to get in the way causing a lot of friction and when it unwinds it wasn’t at all consistent. It often got stuck part way unraveling. I attempted to modify the rubber bands by cutting round the loop to make the thickness about half of the original which seemed to work the best but it still had the problem of sticking inconveniently. So back to the store I went to get a pack of different sized rubber bands thinking if I got ones that were rounder and thinner the duration of consistency would improve. Nope, they were a disaster and snapped even before getting close to the revolutions I was looking for.
I had read about using a different kind of rubber band that is specifically used for model airplanes, but thought that as long as I got the correct size rubber band that it wouldn’t really matter. That was a very wrong assumption!
(Side note: It was recommended using oil on the rubber bands to prolong the life and reduce friction. So when I am speaking about testing I oiled all of the rubber bands for optimum performance. So I spent way more time testing out different oils and squishing rubber bands around is oil that I ever care to admit).
In the end I need to order the special model airplane rubber bands that I should have gotten in the first place.
Video 2:
I was able to receive the new rubber bands after spring break and test again. The new rubber bands seemed to improve the flight time but I noticed when I tested outside the flight path was very variable so I tested a third time inside where I had some of the best test flights.
Video 3:
After all the different testing I think all that is left is to finish up the documentation for the post, possibly make a stand, and present.
______________________________________________________________________________________________________
Guide I followed for the ornithopters: freebird
______________________________________________________________________________________________________
Prompt: Final Project Documentation Part 2
Timeline graphic. Show your actual design process. Be sure to show times for exploration, skill acquisition, looping, shopping, fabrication and documentation. Add a detailed description of your actual fabrication process. How did you make your artifact? What were the steps? Describe the steps shown in your timeline graphic. Document with lots of additional sketches, flowcharts, photos and/or video.
Write a conclusion. Compare where you started (plans) with where you ended. What do you wish you had done differently? What will happen to your creation now? Focus on the aesthetics. Don’t get too wrapped up in function. Include a link to the video you made of your live presentation, or another video that provides an equivalent full description.
1 Comment. Leave new
Hi Sophie. I was happy to see your presentation in our pod! I’m excited to see your project at expo as well. I think that you chose your aesthetic very wisely, and you executed this project very well! Do you have any more plans of creating more functionality/ flight time?